Recovering from a disaster when upgrading PHP-MySQL on VirtualMIN

YUM Downgrade syntax for  CentOS/RHEL 6.x/7.x+ users

The syntax is:

 ## get list ##
yum history
 
## Okay undo/downgrade it ##
yum history undo {NUMBER-HERE}

BACKUP ALL YOUR VIRTUAL SVR BEFORE THIS!!!
ALSO BAREBONE BACKUP YOUR ENTIRE SERVER IF POSSIBLE.

Apply only when you had updated via root the PHP-MySQL on,,.
webmin / virtualmin.

Examples

For demo purpose, I’m going to install/update zsh:
sudo yum install zsh
Now, list yum history:
sudo yum history
sudo yum history list
sudo yum history info

Sample outputs:

Loaded plugins: fastestmirror
ID     | Login user               | Date and time    | Action(s)      | Altered
-------------------------------------------------------------------------------
    11 |  <veryv>                 | 2015-05-05 11:14 | Update         |    1   
    10 |  <veryv>                 | 2015-05-05 11:08 | Downgrade      |    1   
     9 |  <veryv>                 | 2015-05-05 10:56 | Install        |    1   
     8 |  <veryv>                 | 2015-05-05 10:56 | Install        |    1   
     7 |  <veryv>                 | 2015-05-05 09:59 | Update         |    1   
     6 | System <unset>           | 2015-04-23 20:02 | I, O, U        |  156 EE
     5 | System <unset>           | 2015-04-23 20:02 | Install        |    1   
     4 | System <unset>           | 2015-04-23 20:02 | Install        |    1 EE
     3 | System <unset>           | 2015-04-23 20:02 | Install        |    1   
     2 | System <unset>           | 2015-04-23 20:02 | Install        |    1   
     1 | System <unset>           | 2015-04-23 20:00 | Install        |  280   
history list

Let us undo (downgrade) ID #11 (i.e. the last action of zsh update):
sudo yum history undo 11
Sample outputs:

Loaded plugins: fastestmirror
Undoing transaction 11, from Tue May  5 11:14:21 2015
    Updated zsh-5.0.2-7.el7.x86_64     @base
    Update      5.0.2-7.el7_1.1.x86_64 @updates
Loading mirror speeds from cached hostfile
 * base: mirror.web-ster.com
 * extras: mirror.raystedman.net
 * updates: centos-distro.cavecreek.net
Resolving Dependencies
--> Running transaction check
---> Package zsh.x86_64 0:5.0.2-7.el7 will be a downgrade
---> Package zsh.x86_64 0:5.0.2-7.el7_1.1 will be erased
--> Finished Dependency Resolution
 
Dependencies Resolved
 
===========================================================================================
 Package           Arch                 Version                   Repository          Size
===========================================================================================
Downgrading:
 zsh               x86_64               5.0.2-7.el7               base               2.4 M
 
Transaction Summary
===========================================================================================
Downgrade  1 Package
 
Total download size: 2.4 M
Is this ok [y/d/N]: y
Downloading packages:
zsh-5.0.2-7.el7.x86_64.rpm                                          | 2.4 MB  00:00:02     
Running transaction check
Running transaction test
Transaction test succeeded
Running transaction
  Installing : zsh-5.0.2-7.el7.x86_64                                                  1/2 
  Cleanup    : zsh-5.0.2-7.el7_1.1.x86_64                                              2/2 
  Verifying  : zsh-5.0.2-7.el7.x86_64                                                  1/2 
  Verifying  : zsh-5.0.2-7.el7_1.1.x86_64                                              2/2 
 
Removed:
  zsh.x86_64 0:5.0.2-7.el7_1.1                                                             
 
Installed:
  zsh.x86_64 0:5.0.2-7.el7                                                                 
 
Complete!

Verify zsh package history, enter:
sudo yum history list zsh
Sample outputs:

Loaded plugins: fastestmirror
ID     | Command line             | Date and time    | Action(s)      | Altered
-------------------------------------------------------------------------------
    12 | history undo 11          | 2015-05-05 11:19 | Downgrade      |    1   
    11 | install zsh              | 2015-05-05 11:14 | Update         |    1   
    10 | downgrade zsh            | 2015-05-05 11:08 | Downgrade      |    1   
     8 | install zsh              | 2015-05-05 10:56 | Install        |    1   
history lis

~ HAVE A GOOD TIME FIXING THIS!!!

Server is fixed! but lost some data!

Cheers!

Get Rid of js.users.51.la in OpenCart

js.users.51.la malware in OpenCart

This was detected hours ago on a old opencart plaform!

js.users.51.la is a rogue domain that affects your browsing activities. It is categorized as a redirect virus. Usually this website is used as an advertising platform. So you might be bothered by a bunch of commercial ads. js.users.51.la is a potentially unwanted program. It won’t enhance your online experience while keeps increasing web traffics. Each time you try to access a domain, unwanted redirection will occur. js.users.51.la is definitely a vicious computer virus.

Generally, js.users.51.la develops the third party. So making profits is the main purpose.You should start worrying because js.users.51.la is able to put your PC into being vulnerable by installing malicious adware, Trojan, browser hijacker and randomware. It causes slow Internet and keeps directing your homepage.When inside, js.users.51.la would changes computer default setting so that it can easily invade browsers like Chrome, Mozilla Firefox, Internet Explorer and Edge. js.users.51.la needs to be removed immediately.

js.users.51.la has been programmed to violate users’confidential information and earn money. It shows cookies to records your browsing histories. All useful data would be collected and sent to remote sever. You have to solve this problem right away.

  • Waiting server credential to be able to fix the problem(s)…,
    ,… will keep you posted!


We fixed, this ! thing !! ,,.wow.. a sticky one!!!

Cheers!

+|1/19/2017

😉 , Now it’s time to reborn this site Dejan@Cheers!

Automated Webmin installation from repository

What is Webmin?

Webmin is a web-based interface for system administration for Unix. Using any modern web browser, you can setup user accounts, Apache, DNS, file sharing and much more. Webmin removes the need to manually edit Unix configuration files like /etc/passwd, and lets you manage a system from the console or remotely.

“install from RPM” VS “install from repository”

When installing from RPM by “rpm -U webmin-1.470-1.noarch.rpm” you will not be able to upgrade Webmin by simple yum upgrade. To upgrade such installation you will need to redownload and reinstall RPM manually. E.g. no automatic upgrades are done.

When Webmin is installed from a repository, bug fixes and security patches can be automated as are other system updates, and managed using yum.. Also, yum_updatesd daemon will warn you about updates and/or install them depending on it’s settings.

How to install from repository

Become root.

Copy and paste the following into console:

(echo "[Webmin]
name=Webmin Distribution Neutral
baseurl=http://download.webmin.com/download/yum
enabled=1" >/etc/yum.repos.d/webmin.repo
rpm --import http://www.webmin.com/jcameron-key.asc
yum -y install webmin)

Press enter if command hasn’t executed automatically.

Ok.

The Webmin repo and application are now installed.

Notice: Undefined variable: backup.tpl on line 43 – Opencart

<file path="admin/view/template/tool/backup">
      <operation>
         <search><![CDATA[
            <label class="col-sm-2 control-label"><?php echo $entry_export; ?></label>
            ]]></search>
         <add position="replace">
            <![CDATA[
         <label class="col-sm-2 control-label"><?php echo $entry_backup; ?></label>
            ]]>
         </add>
      </operation>
   </file>

Simply replace Line 43

<?php echo $entry_export;

for

<?php echo $entry_backup;

4 Ways to Identify Who is Logged-In on Your Linux System

As a system administrator, you may want to know who is on the system at any give point in time. You may also want to know what they are doing. In this article let us review 4 different methods to identify who is on your Linux system.

1. Get the running processes of logged-in user using w

w command is used to show logged-in user names and what they are doing. The information will be read from /var/run/utmp file. The output of the w command contains the following columns:

  • Name of the user
  • User’s machine number or tty number
  • Remote machine address
  • User’s Login time
  • Idle time (not usable time)
  • Time used by all processes attached to the tty (JCPU time)
  • Time used by the current process (PCPU time)
  • Command currently getting executed by the users

 
Following options can be used for the w command:

  • -h Ignore the header information
  • -u Display the load average (uptime output)
  • -s Remove the JCPU, PCPU, and login time.
# w
 23:04:27 up 29 days,  7:51,  3 users,  load average: 0.04, 0.06, 0.02
USER     TTY      FROM              LOGIN@   IDLE   JCPU   PCPU WHAT
sftpd-user   pts/0    dev-db-server        22:57    8.00s  0.05s  0.01s sshd: ramesh [priv]
www    pts/1    dev-db-server        23:01    2:53   0.01s  0.01s -bash
root     pts/2    dev-db-server        23:04    0.00s  0.00s  0.00s w

# w -h
sftpd-user   pts/0    dev-db-server        22:57   17:43   2.52s  0.01s sshd: ramesh [priv]
www    pts/1    dev-db-server        23:01   20:28   0.01s  0.01s -bash
root     pts/2    dev-db-server        23:04    0.00s  0.03s  0.00s w -h

# w -u
 23:22:06 up 29 days,  8:08,  3 users,  load average: 0.00, 0.00, 0.00
USER     TTY      FROM              LOGIN@   IDLE   JCPU   PCPU WHAT
sftpd-user   pts/0    dev-db-server        22:57   17:47   2.52s  2.49s top
www    pts/1    dev-db-server        23:01   20:32   0.01s  0.01s -bash
root     pts/2    dev-db-server        23:04    0.00s  0.03s  0.00s w -u

# w -s
 23:22:10 up 29 days,  8:08,  3 users,  load average: 0.00, 0.00, 0.00
USER         TTY      FROM               IDLE WHAT
sftpd-user   pts/0    dev-db-server        17:51  sshd: sftpd-user [priv]
www          pts/1    dev-db-server        20:36  -bash
root         pts/2    dev-db-server         1.00s w -s

2. Get the user name and process of logged in user using who and users command

who command is used to get the list of the usernames who are currently logged in. Output of the who command contains the following columns: user name, tty number, date and time, machine address.

# who
sftpd-user   pts/0        2009-03-28 22:57 (dev-db-server)
www          pts/1        2009-03-28 23:01 (dev-db-server)
root         pts/2        2009-03-28 23:04 (dev-db-server)

To get a list of all usernames that are currently logged in, use the following:

# who | cut -d' ' -f1 | sort | uniq
root
www
sftpd-user

Users Command

users command is used to print the user name who are all currently logged in the current host. It is one of the command don’t have any option other than help and version. If the user using, ‘n’ number of terminals, the user name will shown in ‘n’ number of time in the output.

# users
root www sftpd-user

3. Get the username you are currently logged in using whoami

whoami command is used to print the loggedin user name.

# whoami
root

whoami command gives the same output as id -un as shown below:

# id -un
root

who am i command will display the logged-in user name and current tty details. The output of this command contains the following columns: logged-in user name, tty name, current time with date and ip-address from where this users initiated the connection.

# who am i
root     pts/2        2009-03-28 23:04 (dev-db-server)

# who mom likes
root     pts/2        2009-03-28 23:04 (dev-db-server)

Warning: Don't try "who mom hates" command.

Also, if you do su to some other user, this command will give the information about the logged in user name details.

4. Get the user login history at any time

last command will give login history for a specific username. If we don’t give any argument for this command, it will list login history for all users. By default this information will read from /var/log/wtmp file. The output of this command contains the following columns:

  • User name
  • Tty device number
  • Login date and time
  • Logout time
  • Total working time
# last root
root   pts/0        dev-db-server   Fri Mar 27 22:57   still logged in
root   pts/0        dev-db-server   Fri Mar 27 22:09 - 22:54  (00:45)
root   pts/0        dev-db-server   Wed Mar 25 19:58 - 22:26  (02:28)
root   pts/1        dev-db-server   Mon Mar 16 20:10 - 21:44  (01:33)
root   pts/0        192.168.201.11  Fri Mar 13 08:35 - 16:46  (08:11)
root   pts/1        192.168.201.12  Thu Mar 12 09:03 - 09:19  (00:15)
root   pts/0        dev-db-server   Wed Mar 11 20:11 - 20:50  (00:39)

Security Hardening Linux using sysctl.conf


sysctl is an interface that allows you to make changes to a running Linux kernel. With /etc/sysctl.conf you can configure various Linux networking and system settings such as:

  1. Limit network-transmitted configuration for IPv4
  2. Limit network-transmitted configuration for IPv6
  3. Turn on execshield protection
  4. Prevent against the common ‘syn flood attack’
  5. Turn on source IP address verification
  6. Prevents a cracker from using a spoofing attack against the IP address of the server.
  7. Logs several types of suspicious packets, such as spoofed packets, source-routed packets, and redirects.

sysctl command

The sysctl command is used to modify kernel parameters at runtime. /etc/sysctl.conf is a text file containing sysctl values to be read in and set by sysct at boot time. To view current values, enter:

# sysctl -a
# sysctl -A
# sysctl net.ipv4.conf.all.rp_filter

Sample /etc/sysctl.conf

Edit /etc/sysctl.conf and update it as follows. The file is documented with comments.

# The following is suitable for dedicated web server, mail, ftp server etc. 
# ---------------------------------------
# BOOLEAN Values:
# a) 0 (zero) - disabled / no / false
# b) Non zero - enabled / yes / true
# --------------------------------------
# Controls IP packet forwarding
net.ipv4.ip_forward = 0
 
# Controls source route verification
net.ipv4.conf.default.rp_filter = 1
 
# Do not accept source routing
net.ipv4.conf.default.accept_source_route = 0
 
# Controls the System Request debugging functionality of the kernel
kernel.sysrq = 0
 
# Controls whether core dumps will append the PID to the core filename
# Useful for debugging multi-threaded applications
kernel.core_uses_pid = 1
 
# Controls the use of TCP syncookies
# net.ipv4.tcp_syncookies = 1
net.ipv4.tcp_synack_retries = 2
 
########## IPv4 networking start ##############
# Send redirects, if router, but this is just server
net.ipv4.conf.all.send_redirects = 0
net.ipv4.conf.default.send_redirects = 0
 
# Accept packets with SRR option? No
net.ipv4.conf.all.accept_source_route = 0
 
# Accept Redirects? No, this is not router
net.ipv4.conf.all.accept_redirects = 0
net.ipv4.conf.all.secure_redirects = 0
 
# Log packets with impossible addresses to kernel log? yes
net.ipv4.conf.all.log_martians = 1
net.ipv4.conf.default.accept_source_route = 0
net.ipv4.conf.default.accept_redirects = 0
net.ipv4.conf.default.secure_redirects = 0
 
# Ignore all ICMP ECHO and TIMESTAMP requests sent to it via broadcast/multicast
net.ipv4.icmp_echo_ignore_broadcasts = 1
 
# Prevent against the common 'syn flood attack'
net.ipv4.tcp_syncookies = 1
 
# Enable source validation by reversed path, as specified in RFC1812
net.ipv4.conf.all.rp_filter = 1
net.ipv4.conf.default.rp_filter = 1
 
########## IPv6 networking start ##############
# Number of Router Solicitations to send until assuming no routers are present.
# This is host and not router
net.ipv6.conf.default.router_solicitations = 0
 
# Accept Router Preference in RA?
net.ipv6.conf.default.accept_ra_rtr_pref = 0
 
# Learn Prefix Information in Router Advertisement
net.ipv6.conf.default.accept_ra_pinfo = 0
 
# Setting controls whether the system will accept Hop Limit settings from a router advertisement
net.ipv6.conf.default.accept_ra_defrtr = 0
 
# Router advertisements can cause the system to assign a global unicast address to an interface
net.ipv6.conf.default.autoconf = 0
 
# How many neighbor solicitations to send out per address?
net.ipv6.conf.default.dad_transmits = 0
 
# How many global unicast IPv6 addresses can be assigned to each interface?
net.ipv6.conf.default.max_addresses = 1
 
########## IPv6 networking ends ##############
 
# Enable ExecShield protection
kernel.exec-shield = 1
kernel.randomize_va_space = 1
 
# TCP and memory optimization 
# increase TCP max buffer size set using setsockopt()
#net.ipv4.tcp_rmem = 4096 87380 8388608
#net.ipv4.tcp_wmem = 4096 87380 8388608
 
# Increase Linux auto tuning TCP buffer limits
#net.core.rmem_max = 8388608
#net.core.wmem_max = 8388608
#net.core.netdev_max_backlog = 5000
#net.ipv4.tcp_window_scaling = 1
 
# Increase system file descriptor limit    
fs.file-max = 65535
 
# Allow for more PIDs 
kernel.pid_max = 65536
 
# Increase system IP port limits
net.ipv4.ip_local_port_range = 2000 65000

To use this settings paste the above sysctl variables in /etc/sysctl.conf and ask sysctl command to read and apply the newly added conf settings:

# sysctl -p

Hopefully you should not get errors while applying the sysctl settings, if you get some errors, it’s possible some of the variable is differently named (depending on the Linux kernel version) or the Linux distribution on which sysctl are implemented.

You don’t have permission to access /index.php on this server OpenCart + CentOS + Apache + MOD_SECURITY

oc-strange-bug

I noticed a problem after migrating a Opencart v2 project to a new server.  (Special thanks to Dejan)

Server Specs : HP Proliant Blade Server G7 Dual XEON ~ 24 Cores

Running : CentOS 7.x / Webmin / Apache / MySQL / CSF / MOD_SEC

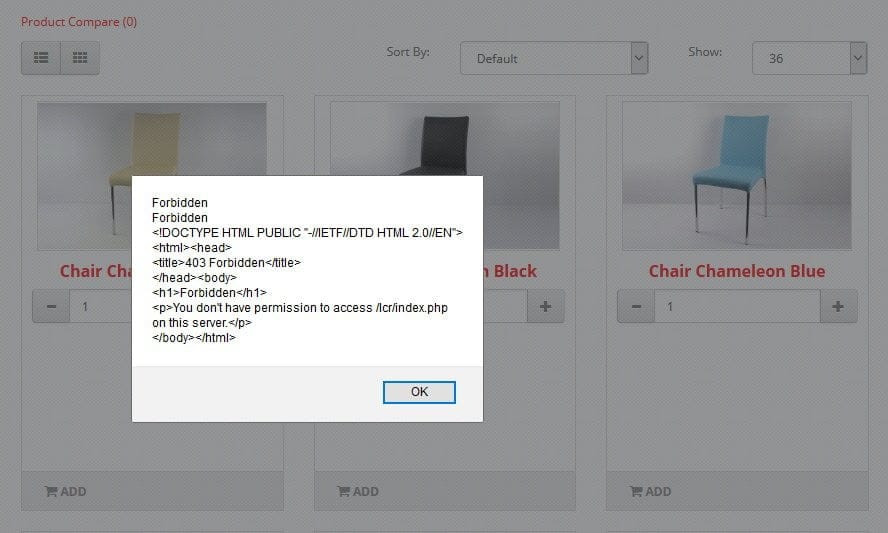
I ran into a problem when I was adding multiple products at the same time into the cart “A fresh OpenCart Install”. After the third click on Add to Cart… I received this error!

Forbidden “You don’t have permission to access /…/index.php”

After reading a lot of blog’s on this subject and many tests,,… I found out that this was caused by the server!

This apply only if you have installed MOD_SECURITY on your Apache Server.

How to fix this?

Open the following configuration file /etc/httpd/conf.f/mod_evasive.conf

# mod_evasive configuration
LoadModule evasive20_module modules/mod_evasive24.so

<IfModule mod_evasive24.c>
# The hash table size defines the number of top-level nodes for each
# child’s hash table.  Increasing this number will provide faster
# performance by decreasing the number of iterations required to get to the
# record, but consume more memory for table space.  You should increase
# this if you have a busy web server.  The value you specify will
# automatically be tiered up to the next prime number in the primes list
# (see mod_evasive.c for a list of primes used).
DOSHashTableSize    3097

# This is the threshhold for the number of requests for the same page (or
# URI) per page interval.  Once the threshhold for that interval has been
# exceeded, the IP address of the client will be added to the blocking
# list.
DOSPageCount        3  “CHANGE THIS TO 12”

# This is the threshhold for the total number of requests for any object by
# the same client on the same listener per site interval.  Once the
# threshhold for that interval has been exceeded, the IP address of the
# client will be added to the blocking list.
DOSSiteCount        50

Save the .conf file and then restart your Apache Server

Et voilà!

NOTE

http://stackoverflow.com/questions/23007551/the-fastcgi-process-exited-unexpectedly

Install wordpress over Windows 2012 R2 Server

Note: Install both version x64 and x86

Display SSH Login Message

To display Welcome or Warning message for SSH users before login. We use issue.net file to display a banner massages.

Open the following file with NANO editor

# yum -y install nano

nano /etc/issue.net

Add the following banner sample message and save the file.

######################################
#    W E L C O M E   TO  MY  SSHD  SERVER   #
######################################

save the issue.net document

To use the banner message you have to edit the sshd_config document located in

# /etc/ssh/sshd_config

or

# /etc/ssh/ssh_config

Edit the sshd_config document with NANO

# nano /etc/ssh/sshd_config

or

# nano /etc/ssh_config

Search for the word “Banner” and uncomment out the line

#Banner /some/path

Change #Banner /some/path

Banner /etc/issue.net (You can use any path you like!)

Save the document!

Restart your SSHD server

# systemctl restart sshd

Check if the SSHD server is running

# systemctl status sshd

Connect to your SSH server and you will see your new login message

CLEAROS ~ a good alternative to SonicWall vs Fortinet devices!

clearfoundation-logo

ClearOS was recently named by Linux Voice the #1 server distribution for it’s variety of server functions. Many have called ClearOS the Swiss Army Knife® of operating systems for the same reason, ClearOS offers 100+ IT functions all easily installable through ClearOS Marketplace. ClearOS is dedicated to delivering a stable, scalable, and affordable solution for the Server, Network, Gateway and many Cloud Integrated technologies. Linux Voice said it best when they said:

clearos_circles

Simple & Elegant Web Management

ClearOS is managed through Webconfig; a web-based user interface available through any browser on almost any web-connected device.

content_filter_bus

ClearOS is available in 3 Flavors

ClearOS in 3 flavors!

* Community edition is 100% Free!

The ClearOS TEAM!

clearos-team

See more ClearOS team

Note: All text, pictures or graphics are Copyrighted to the ClearOS Foundation.

https://www.montreal.poweredbyclear.com