warning: connect to Milter service : Connection refused

The issue isn’t with postgrey or postfix, but with milter-greylist.

What you may want to do is edit /etc/postfix/main.cf, and comment out the lines beginning with “smtpd_milters” and “non_smtpd_milters”. After that, restart Postfix.

not working,,,, hummm 😉

NOTE: http://unix.stackexchange.com/questions/74477/postfix-smtpd-warning-connect-to-milter-service-unix-var-run-opendkim-opendki

warning: connect to Milter service local:/run/milter-greylist/milter-greylist.sock: Connection refused

Enabling DKIM milter in Virtualmin

To enable DKIM signing of outgoing email messages, follow these steps :

  1. Login to Virutalmin as root and go to Email Messages -> DomainKeys Identified Mail
  2. Change Signing of outgoing mail enabled? to Yes.
  3. In the Selector for DKIM record name field enter a short name that you will use to identify the signing key. This is typically just the current year, like 2010. Do NOT enter default, as this can trigger a bug in the current Virtualmin release which deletes the /etc/default directory!
  4. Click the Save button.

Assuming all goes well, Virtualmin will report the steps taken to configure and enable DKIM.

Only virtual servers that have both the DNS and email features enabled will have DKIM activated, as the mail server needs to be setup to use a private signing key whose corresponding public key is added to DNS.

By default, Virtualmin will also configure the DKIM milter to verify incoming email that has the proper signatures. DKIM-signed messages where the signature is incorrect or cannot be checked with a DNS lookup will be bounced or delayed. If you want to disable verification, set the Verify DKIM signatures on incoming email? option to No.

To turn off DKIM signing completely, just do the following :

  1. Login to Virutalmin as root and go to Email Messages -> DomainKeys Identified Mail
  2. Change Signing of outgoing mail enabled? to No.
  3. Click Save.

This will remove the public key from all domains, and stop your mail server from signing messages with the DKIM milter.

NOTES:
Common problems:

  1. Check if you have SPF, DKIM and DMARC records and if they are properly set
  2. Check if you have rDNS
  3. Check if your domain or IP is blacklisted
  4. From 1 to 3 plus several other settings can be checked with:
    http://mxtoolbox.com/SuperTool.aspx
  5. Check what services are active and their ports especially dovecot: http://www.cyberciti.biz/faq/how-do-i-find-out-what-ports-are-listeningo…

NOTES:
For rDNS should be easy to sort. Best and easiest solution would be to use the hostname (either way it should be FQDN), so if your hostname is “myserver.domain.tld” then check if you have in your DNS records “myserver.domain.tld. IN A your.server.IP.address”. If you are missing this record be sure to add it before you proceed to set rDNS. Once done go to your host control panel and set rDNS to “myserver.domain.tld”.

Tools like mxtoolbox.com should give you some info if there is a problem, another option is intodns.com but it will check only DNS (there are other solutions just use google). To test email only you can use https://www.unlocktheinbox.com/mail-tester . One thing you must know, every single thing what is not properly set or defined, it will increase spam score of your emails and more problems you have it will be easier for emails to end in spam or be rejected by receiver.

NOTES:
You can enable dmarc if you go virtualmin – domain – server configuration and click dns options. There you scroll down and click enabled on DMARC record enabled? also you can change policy there. You may perhaps wait 24 hours to apply this as its dns which could take time a bit.

NOTES:
I do see your point but I am hosting sites with emails without rDNS - that does not need to be concerned at all

Well based on RFC1912 we have:

2.1 Inconsistent, Missing, or Bad Data

Every Internet-reachable host should have a name.  The consequences
of this are becoming more and more obvious.  Many services available
on the Internet will not talk to you if you aren’t correctly
registered in the DNS.

Make sure your PTR and A records match.  For every IP address, there
should be a matching PTR record in the in-addr.arpa domain.  If a
host is multi-homed, (more than one IP address) make sure that all IP
addresses have a corresponding PTR record (not just the first one).
Failure to have matching PTR and A records can cause loss of Internet
services similar to not being registered in the DNS at all.  Also,
PTR records must point back to a valid A record, not a alias defined
by a CNAME.

It is highly recommended that you use some software
which automates this checking, or generate your DNS data from a
database which automatically creates consistent data…So please read it you will find a lot of information there about rDNS.

For the rest there is difference between helping and hand holding and i will not do the later. If someone dont want to spend few minutes on google then he or she dont deserve any attention and if you want to do differently please be my guest, i’m sure no one will stop you.

P.S. Stop telling people wrong information, there are rules you must follow so instead of teaching people wrong things lets educate them to properly follow the rules.

Diabolico
https://www.virtualmin.com/node/41321

– I often come to the conclusion that my brain has too many tabs open. –
Failing at desktop publishing & graphic design since 1994.

postfix/anvil

ANVIL(8)                                                              ANVIL(8)

NAME
       anvil - Postfix session count and request rate control

SYNOPSIS
       anvil [generic Postfix daemon options]

DESCRIPTION
       The  Postfix  anvil(8) server maintains statistics about client connec-
       tion counts or client request rates. This information can  be  used  to
       defend against clients that hammer a server with either too many simul-
       taneous sessions, or with too many successive requests within a config-
       urable  time interval.  This server is designed to run under control by
       the Postfix master(8) server.

       In the following text, ident specifies a (service, client) combination.
       The  exact  syntax  of  that  information is application-dependent; the
       anvil(8) server does not care.

CONNECTION COUNT/RATE CONTROL
       To register a new connection send the following request to the anvil(8)
       server:

           request=connect
           ident=string

       The anvil(8) server answers with the number of simultaneous connections
       and the number of connections per unit time for the  (service,  client)
       combination specified with ident:

           status=0
           count=number
           rate=number

       To  register  a  disconnect  event  send  the  following request to the
       anvil(8) server:

           request=disconnect
           ident=string

       The anvil(8) server replies with:

           status=0

MESSAGE RATE CONTROL
       To register a message delivery request send the  following  request  to
       the anvil(8) server:

           request=message
           ident=string

       The  anvil(8)  server  answers  with  the  number  of  message delivery
       requests per unit time for the (service, client) combination  specified
       with ident:

           status=0
           rate=number

RECIPIENT RATE CONTROL
       To  register  a  recipient  request  send  the following request to the
       anvil(8) server:

           request=recipient
           ident=string

       The anvil(8) server answers with the number of recipient addresses  per
       unit time for the (service, client) combination specified with ident:

           status=0
           rate=number

TLS SESSION NEGOTIATION RATE CONTROL
       The  features  described in this section are available with Postfix 2.3
       and later.

       To register a request for a new (i.e. not cached) TLS session send  the
       following request to the anvil(8) server:

           request=newtls
           ident=string

       The anvil(8) server answers with the number of new TLS session requests
       per unit time for the  (service,  client)  combination  specified  with
       ident:

           status=0
           rate=number

       To  retrieve  new TLS session request rate information without updating
       the counter information, send:

           request=newtls_report
           ident=string

       The anvil(8) server answers with the number of new TLS session requests
       per  unit  time  for  the  (service, client) combination specified with
       ident:

           status=0
           rate=number

AUTH RATE CONTROL
       To register an AUTH request send the following request to the  anvil(8)
       server:

           request=auth
           ident=string

       The  anvil(8)  server answers with the number of auth requests per unit
       time for the (service, client) combination specified with ident:

           status=0
           rate=number

SECURITY
       The anvil(8) server does not talk to the network or to local users, and
       can run chrooted at fixed low privilege.

       The anvil(8) server maintains an in-memory table with information about
       recent clients requests.  No persistent state is kept because  standard
       system  library  routines are not sufficiently robust for update-inten-
       sive applications.

       Although the in-memory state is kept only temporarily, this may require
       a  lot  of  memory  on systems that handle connections from many remote
       clients.  To reduce memory usage, reduce the time unit over which state
       is kept.

DIAGNOSTICS
       Problems and transactions are logged to syslogd(8).

       Upon  exit, and every anvil_status_update_time seconds, the server logs
       the maximal count and rate values  measured,  together  with  (service,
       client)  information  and the time of day associated with those events.
       In order to avoid unnecessary overhead, no measurements  are  done  for
       activity that isn't concurrency limited or rate limited.

BUGS
       Systems behind network address translating routers or proxies appear to
       have the same client address and can run into connection  count  and/or
       rate limits falsely.

       In  this  preliminary  implementation, a count (or rate) limited server
       process can have only one remote client at a time. If a server  process
       reports  multiple simultaneous clients, state is kept only for the last
       reported client.

       The anvil(8) server automatically discards client  request  information
       after  it  expires.   To  prevent  the  anvil(8) server from discarding
       client request rate information too early or too late, a  rate  limited
       service  should  always register connect/disconnect events even when it
       does not explicitly limit them.

CONFIGURATION PARAMETERS
       On low-traffic mail systems, changes to main.cf are picked up automati-
       cally  as  anvil(8) processes run for only a limited amount of time. On
       other mail systems, use the command "postfix  reload"  to  speed  up  a
       change.

       The  text  below provides only a parameter summary. See postconf(5) for
       more details including examples.

       anvil_rate_time_unit (60s)
              The time unit over which client connection rates and other rates
              are calculated.

       anvil_status_update_time (600s)
              How  frequently the anvil(8) connection and rate limiting server
              logs peak usage information.

       config_directory (see 'postconf -d' output)
              The default location of the Postfix main.cf and  master.cf  con-
              figuration files.

       daemon_timeout (18000s)
              How  much  time  a  Postfix  daemon process may take to handle a
              request before it is terminated by a built-in watchdog timer.

       ipc_timeout (3600s)
              The time limit for sending  or  receiving  information  over  an
              internal communication channel.

       max_idle (100s)
              The  maximum  amount of time that an idle Postfix daemon process
              waits for an incoming connection before terminating voluntarily.

       max_use (100)
              The maximal number of incoming connections that a Postfix daemon
              process will service before terminating voluntarily.

       process_id (read-only)
              The process ID of a Postfix command or daemon process.

       process_name (read-only)
              The process name of a Postfix command or daemon process.

       syslog_facility (mail)
              The syslog facility of Postfix logging.

       syslog_name (see 'postconf -d' output)
              A prefix that  is  prepended  to  the  process  name  in  syslog
              records, so that, for example, "smtpd" becomes "prefix/smtpd".

SEE ALSO
       smtpd(8), Postfix SMTP server
       postconf(5), configuration parameters
       master(5), generic daemon options

README FILES
       TUNING_README, performance tuning

LICENSE
       The Secure Mailer license must be distributed with this software.

HISTORY
       The anvil service is available in Postfix 2.2 and later.

AUTHOR(S)
       Wietse Venema
       IBM T.J. Watson Research
       P.O. Box 704
       Yorktown Heights, NY 10598, USA

       Wietse Venema
       Google, Inc.
       111 8th Avenue
       New York, NY 10011, USA

Website Icon Not Showing Up?

The icons – including submenu indicator arrows – for example in UberMenu are font icons. Some browsers – most commonly Firefox – enforce a Cross-origin resource sharing (CORS) restriction policy for fonts. As a result, if you serve the Font Awesome fonts from a separate domain, Firefox (and depending on your server configuration, other browsers as well), will not load the fonts due to this policy, so the icons are not displayed.

CDN (Content Delivery Network)

The most common occurrence is using a CDN. For example, if your site is mydomain.com, but your stylesheets are served from cdn.mydomain.com, or cdn.someotherdomain.com, the browser will not load the fonts because they are served from another domain.

The Solution

There are two options to resolve the issue: either serve your fonts from the same domain as your site, or configure the fonts on your secondary domain to be served with the appropriate headers to allow cross-origin resource sharing.

Serve the files from the same domain

This generally means that you would exclude the Font Awesome files from your CDN, and link the files on your main server instead. The font file itself is the important resource, but generally this would come down to excluding the Font Awesome stylesheet. If you’re using UberMenu’s copy, it is found at

/wp-content/plugins/ubermenu/assets/css/fontawesome/css/font-awesome.min.css

This solution will work, but you won’t be able to take advantage of your CDN for these files.

Set the font headers to allow cross-origin resource sharing

This means that you would configure your server to tell the browser that it’s okay to load these resources from a different domain.

What you’ll need to do is set the Access-Control-Allow-Origin header to * for the fonts. If your server is running apache, this generally just means dropping an .htaccess file into the directory containing the font with the following configuration

<FilesMatch “.(eot|ttf|otf|woff)”>
Header set Access-Control-Allow-Origin “*”
</FilesMatch>

You may have to check your Theme directory if you are not using UberMenu’s Font Awesone…

wp-content/themes/theme_name/fonts and simply add the file
.htaccess in the directory!

UberMenu’s Font Awesome assets are located in /wp-content/plugins/ubermenu/assets/css/fontawesome/fonts/

[Experimental] for SSL website

Header add Access-Control-Allow-Origin “https://www.domain.com”
#Header add Access-Control-Allow-Origin “https://domain.com”
RewriteEngine On
RewriteCond %{HTTPS} !=on
RewriteRule ^/?(.*) https://%{SERVER_NAME}/$1 [R,L]

Having a hard time restoring your site using XCloner?

Good day to all ~
p.s : This only apply if you are already running “WordFence” on your WordPress website,,, and then ,,, …,,, 😉

~ maybe you have to update first WordFence plugin on a old wordpress installation!? Was like 11 updates on this thing!@ will dig this!

We had a serious problem with restoring a crashed website that was using the plugin “Wordfence”. We are using the “XCloner” pluging for many years now to restore all our wordpress websites. After noticing that the customer website was not loading anymore, We started to investigate the problem(s)?>

The reason was caused by Wordfence itself!?

Fatal error: Unknown: Failed opening required
,,… … when opening the website!@

Restoration was not possible anymore using XCloner because of the..,,,
famous Internal 500 error!

Here is what..,,, We did to make this work…,

  1. Upload your XCloner backup in your root
  2. Upload the restoration files XCloner.php and TAR.php in the same folder
  3. On your server create a fresh database & user with all previledge

This is the tricky part!

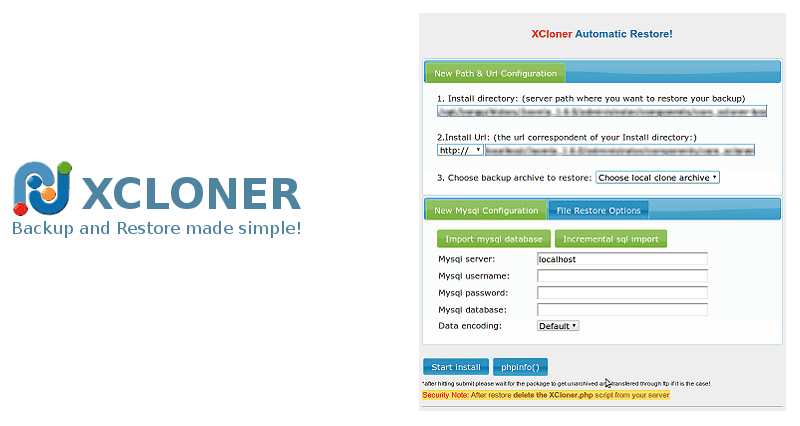
Open a browser to point to this page

http://www.yourdomain.xxx/XCloner.php

This will start the restoration page of XCloner plugin…

Okay here are the steps

  1. Select the database file to restore
  2. Enter your database credential and password

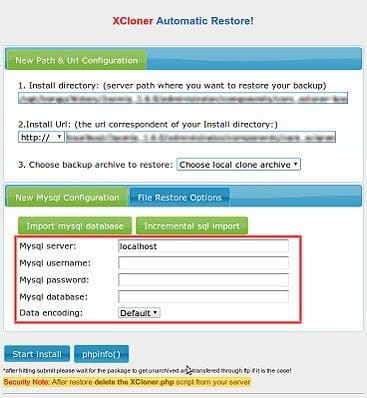
  1. Start the first step of the restoration of XCloner
  2. DO NOT PRESS IMPORT DATABASE YET!
    & DONT CLOSE THE BROWSER WINDOW@ 😉
  3. Log into your FTP server and locate those files > user.ini and .htaccess
  4. user.ini file must be empty of all contents!!! do not delete delete the file,,,..  just save it!!!
; Wordfence WAF
auto_prepend_file = '/public_html/wordfence-waf.php'
; END Wordfence WAF
# Wordfence WAF
<IfModule mod_php5.c>
	php_value auto_prepend_file '/public_html/wordfence-waf.php'
</IfModule>
</Files>
.htaccess you need to remove anything related to Wordfence

Re-upload both files using your FTP Client

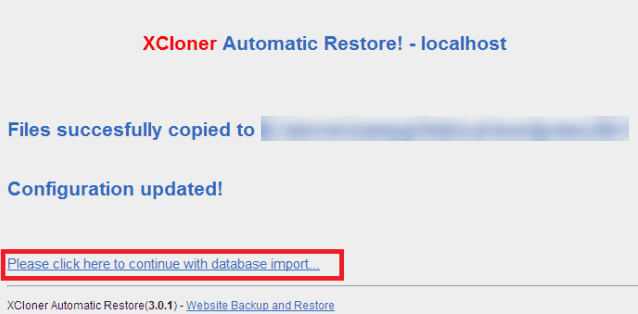
Now go back to your XCloner restoration webpage..,,,

“Please click here to continue with database import…”

*** MAKE SURE THAT USERS.INI file is empty before the next step!
Refresh your ftp folder!

Also make sure that there is nothing related to Wordfence in your .htaccess

Click Continue to trigger the database restoration!

After the restoration you will be able to connect to your wordpress dashboard and un-install Wordfence #@!%f%^

You should make now a fresh backup of your wordpress site.

~ Up to you if you wish to re-install WordFence!

Here you go!

Recovering from a disaster when upgrading PHP-MySQL on VirtualMIN

YUM Downgrade syntax for  CentOS/RHEL 6.x/7.x+ users

The syntax is:

 ## get list ##
yum history
 
## Okay undo/downgrade it ##
yum history undo {NUMBER-HERE}

BACKUP ALL YOUR VIRTUAL SVR BEFORE THIS!!!
ALSO BAREBONE BACKUP YOUR ENTIRE SERVER IF POSSIBLE.

Apply only when you had updated via root the PHP-MySQL on,,.
webmin / virtualmin.

Examples

For demo purpose, I’m going to install/update zsh:
sudo yum install zsh
Now, list yum history:
sudo yum history
sudo yum history list
sudo yum history info

Sample outputs:

Loaded plugins: fastestmirror
ID     | Login user               | Date and time    | Action(s)      | Altered
-------------------------------------------------------------------------------
    11 |  <veryv>                 | 2015-05-05 11:14 | Update         |    1   
    10 |  <veryv>                 | 2015-05-05 11:08 | Downgrade      |    1   
     9 |  <veryv>                 | 2015-05-05 10:56 | Install        |    1   
     8 |  <veryv>                 | 2015-05-05 10:56 | Install        |    1   
     7 |  <veryv>                 | 2015-05-05 09:59 | Update         |    1   
     6 | System <unset>           | 2015-04-23 20:02 | I, O, U        |  156 EE
     5 | System <unset>           | 2015-04-23 20:02 | Install        |    1   
     4 | System <unset>           | 2015-04-23 20:02 | Install        |    1 EE
     3 | System <unset>           | 2015-04-23 20:02 | Install        |    1   
     2 | System <unset>           | 2015-04-23 20:02 | Install        |    1   
     1 | System <unset>           | 2015-04-23 20:00 | Install        |  280   
history list

Let us undo (downgrade) ID #11 (i.e. the last action of zsh update):
sudo yum history undo 11
Sample outputs:

Loaded plugins: fastestmirror
Undoing transaction 11, from Tue May  5 11:14:21 2015
    Updated zsh-5.0.2-7.el7.x86_64     @base
    Update      5.0.2-7.el7_1.1.x86_64 @updates
Loading mirror speeds from cached hostfile
 * base: mirror.web-ster.com
 * extras: mirror.raystedman.net
 * updates: centos-distro.cavecreek.net
Resolving Dependencies
--> Running transaction check
---> Package zsh.x86_64 0:5.0.2-7.el7 will be a downgrade
---> Package zsh.x86_64 0:5.0.2-7.el7_1.1 will be erased
--> Finished Dependency Resolution
 
Dependencies Resolved
 
===========================================================================================
 Package           Arch                 Version                   Repository          Size
===========================================================================================
Downgrading:
 zsh               x86_64               5.0.2-7.el7               base               2.4 M
 
Transaction Summary
===========================================================================================
Downgrade  1 Package
 
Total download size: 2.4 M
Is this ok [y/d/N]: y
Downloading packages:
zsh-5.0.2-7.el7.x86_64.rpm                                          | 2.4 MB  00:00:02     
Running transaction check
Running transaction test
Transaction test succeeded
Running transaction
  Installing : zsh-5.0.2-7.el7.x86_64                                                  1/2 
  Cleanup    : zsh-5.0.2-7.el7_1.1.x86_64                                              2/2 
  Verifying  : zsh-5.0.2-7.el7.x86_64                                                  1/2 
  Verifying  : zsh-5.0.2-7.el7_1.1.x86_64                                              2/2 
 
Removed:
  zsh.x86_64 0:5.0.2-7.el7_1.1                                                             
 
Installed:
  zsh.x86_64 0:5.0.2-7.el7                                                                 
 
Complete!

Verify zsh package history, enter:
sudo yum history list zsh
Sample outputs:

Loaded plugins: fastestmirror
ID     | Command line             | Date and time    | Action(s)      | Altered
-------------------------------------------------------------------------------
    12 | history undo 11          | 2015-05-05 11:19 | Downgrade      |    1   
    11 | install zsh              | 2015-05-05 11:14 | Update         |    1   
    10 | downgrade zsh            | 2015-05-05 11:08 | Downgrade      |    1   
     8 | install zsh              | 2015-05-05 10:56 | Install        |    1   
history lis

~ HAVE A GOOD TIME FIXING THIS!!!

Server is fixed! but lost some data!

Cheers!

Get Rid of js.users.51.la in OpenCart

js.users.51.la malware in OpenCart

This was detected hours ago on a old opencart plaform!

js.users.51.la is a rogue domain that affects your browsing activities. It is categorized as a redirect virus. Usually this website is used as an advertising platform. So you might be bothered by a bunch of commercial ads. js.users.51.la is a potentially unwanted program. It won’t enhance your online experience while keeps increasing web traffics. Each time you try to access a domain, unwanted redirection will occur. js.users.51.la is definitely a vicious computer virus.

Generally, js.users.51.la develops the third party. So making profits is the main purpose.You should start worrying because js.users.51.la is able to put your PC into being vulnerable by installing malicious adware, Trojan, browser hijacker and randomware. It causes slow Internet and keeps directing your homepage.When inside, js.users.51.la would changes computer default setting so that it can easily invade browsers like Chrome, Mozilla Firefox, Internet Explorer and Edge. js.users.51.la needs to be removed immediately.

js.users.51.la has been programmed to violate users’confidential information and earn money. It shows cookies to records your browsing histories. All useful data would be collected and sent to remote sever. You have to solve this problem right away.

  • Waiting server credential to be able to fix the problem(s)…,
    ,… will keep you posted!


We fixed, this ! thing !! ,,.wow.. a sticky one!!!

Cheers!

+|1/19/2017

😉 , Now it’s time to reborn this site Dejan@Cheers!

Automated Webmin installation from repository

What is Webmin?

Webmin is a web-based interface for system administration for Unix. Using any modern web browser, you can setup user accounts, Apache, DNS, file sharing and much more. Webmin removes the need to manually edit Unix configuration files like /etc/passwd, and lets you manage a system from the console or remotely.

“install from RPM” VS “install from repository”

When installing from RPM by “rpm -U webmin-1.470-1.noarch.rpm” you will not be able to upgrade Webmin by simple yum upgrade. To upgrade such installation you will need to redownload and reinstall RPM manually. E.g. no automatic upgrades are done.

When Webmin is installed from a repository, bug fixes and security patches can be automated as are other system updates, and managed using yum.. Also, yum_updatesd daemon will warn you about updates and/or install them depending on it’s settings.

How to install from repository

Become root.

Copy and paste the following into console:

(echo "[Webmin]
name=Webmin Distribution Neutral
baseurl=http://download.webmin.com/download/yum
enabled=1" >/etc/yum.repos.d/webmin.repo
rpm --import http://www.webmin.com/jcameron-key.asc
yum -y install webmin)

Press enter if command hasn’t executed automatically.

Ok.

The Webmin repo and application are now installed.