CRAM-MD5 authentication for Dovecot

This entry documents the basic process for setting up CRAM-MD5 authentication for Dovecot.

Firstly, you need to enable the mechanism and specify a passwd database file in Dovecot. The mechanism and passdb file are specified in the dovecot.conf configuration file, on a Red Hat or similar system this is located in the /usr/local/etc/ directory.

# Space separated list of wanted authentication mechanisms:
# plain login digest-md5 cram-md5 ntlm rpa apop anonymous gssapi
auth_mechanisms = plain login cram-md5

# passwd-like file with specified location 
passdb { 
  driver = passwd-file
  # Path for passwd-file. Also set the default password scheme.
  args = scheme=cram-md5 /etc/cram-md5.pwd 
}

You see that I’ve added the cram-md5 mechanism to the mechanisms statement and then added a passdb file, /etc/cram-md5.pwd.

Next, you need to create this passdb file and set appropriate permissions.

# touch /etc/cram-md5.pwd 
# chmod 0600 /etc/cram-md5.pwd

After creating the file you need to add your users and hashed passwords to the passdb file. The users and passwords are added in the format:

username:passwordhash

You can generate password hashes using “doveadm pw”:

# doveadm pw
Enter new password: password
Retype new password: password
{CRAM-MD5}26b633ec8bf9dd526293c5897400bddeef9299fad

Enter the user’s password when prompted and it will be converted and outputted as a hash. The default hashed output is in the CRAM-MD5 scheme. You can change the scheme of the outputted hashes using the -s command line switch.

Now add the generated password to the passdb file, /etc/cram-md5.pwd.

username:26b633ec8bf9dd526293c5897400bddeef9299fad

Finally, restart Dovecot and test authentication by enabling the appropriate mechanism in your email client. For example, to enable CRAM-MD5 authentication in Thunderbird you need to check the “Use secure authentication” checkbox in the Account Settings page.

I recommend that you also use TLS/SSL to encrypt the authentication process as well.

Postfix SMTP Auth Error “no SASL authentication mechanisms”

I have been setting up a new mail server recently with Postfix and SMTP Auth, and got the error message “no SASL authentication mechanisms”.

If you have enabled SMTP Auth with Postfix like this:

smtpd_sasl_auth_enable = yes
smtpd_sasl_security_options = noanonymous
smtpd_sasl_local_domain = $myhostname
broken_sasl_auth_clients = yes
smtpd_recipient_restrictions =
    permit_sasl_authenticated,
    permit_mynetworks,
    reject_unauth_destination

and are getting messages like this (the extract below is from the mail log file):

Nov  2 15:31:09 vps131 postfix/smtpd[14007]: warning: dict_nis_init: NIS domain name not set - NIS lookups disabled
Nov  2 15:31:09 vps131 postfix/smtpd[14007]: warning: xsasl_cyrus_server_get_mechanism_list: no applicable SASL mechanisms
Nov  2 15:31:09 vps131 postfix/smtpd[14007]: fatal: no SASL authentication mechanisms
Nov  2 15:31:10 vps131 postfix/master[12004]: warning: process /usr/libexec/postfix/smtpd pid 14007 exit status 1
Nov  2 15:31:10 vps131 postfix/master[12004]: warning: /usr/libexec/postfix/smtpd: bad command startup -- throttling

then you need to install the cyrus-sasl-plain package like so:

yum install cyrus-sasl-plain

The above method will install the cyrus-sasl-plain packages on CentOS and other RPM/Yum based Linux distributions, so you would need to use the appropriate package manager (and software package) for other Linux distros.

  • Also make sure the SASAUTHD is running on your system

# systemctl status saslauthd

# systemctl start saslauthd

# systemctl enable saslauthd

NOTES :

# SASL CONFIGURATION
smtpd_sasl_auth_enable = yes
smtpd_sasl_security_options = noanonymous
smtpd_sasl_local_domain = $myhostname
broken_sasl_auth_clients = yes
smtpd_recipient_restrictions = permit_mynetworks permit_inet_interfaces permit_sasl_authenticated
#

You may verified your email server security score here:

http://www.emailsecuritygrader.com

Here is a part of my /etc/postfix/main.cf

# Sender restrictions
smtpd_sender_restrictions =
permit_mynetworks,
reject_non_fqdn_sender,
reject_unknown_sender_domain,
permit
#
reject_rbl_client zen.spamhaus.org,
reject_rbl_client bl.spamcop.net,
check_policy_service unix:postgrey/socket,
permit
# Postfix AntiSpam Configuration
disable_vrfy_command = yes
smtpd_helo_required = yes
smtpd_helo_restrictions = permit_mynetworks,
reject_non_fqdn_hostname,
reject_invalid_hostname,
permit
#
smtpd_sasl_auth_enable = yes
smtpd_sasl_local_domain = $myhostname
#
broken_sasl_auth_clients = yes
smtpd_recipient_restrictions = permit_mynetworks permit_inet_interfaces permit_sasl_authenticated
#
smtpd_error_sleep_time = 1s
smtpd_soft_error_limit = 10
smtpd_hard_error_limit = 20
smtpd_client_restrictions = permit_mynetworks permit_inet_interfaces
#
smtpd_enforce_tls = yes
smtpd_tls_loglevel = 1
smtpd_use_tls = yes
smtpd_tls_key_file = /etc/postfix/smtpd.key
smtpd_tls_cert_file = /etc/postfix/smtpd.cert
# Experimental
smtpd_tls_security_level = may
smtpd_tls_auth_only = yes
smtpd_recipient_restrictions = permit_mynetworks permit_sasl_authenticated reject_unauth_destination
smtpd_sasl_security_options = noanonymous
smtpd_sasl_application_name = smtpd

🙂

Configure PostFIX to use TLS – CentOS7

This is an optional feature you don’t need to do to get everything working but if you want a secure setup you should do this. TLS will allow you to setup an SSL encrypted connection between the server and the mail client. This means that the authentication that is used will be send encrypted over the internet while the normal authentication will be send in clear text over the internet making it possible for others to read.

First you need to buy yourself a certificate at Thawte or Verisign, but as we are building a server on the cheap we are going to create our own certificate. The only problem you will encounter when using your own certificates is that users explicitly have to accept and verify your root certificate in contrast with certificates you buy which are already accepted in most email clients by default. If they for instance try to send their email for the first time via your secure server they need to accept your certificate. When using Mail.app in OS X they will get the following warning:

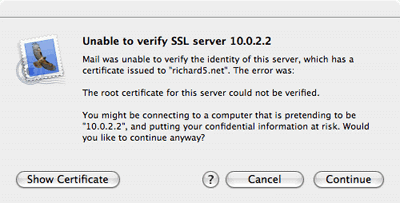
They need to press continue and from then on your certificate will be accepted and they won’t be asked again.

Just open a Terminal and execute the following command in the directory /etc/postfix:

sudo openssl req -new -outform PEM -out smtpd.cert \
   -newkey rsa:2048 -nodes -keyout smtpd.key -keyform PEM \
   -days 365 -x509

This will create a 2048 bit encryption key that, for now, is secure enough for you mailserver to use. If you are paranoid and want a bigger key just increase the number after rsa:. The key will be valid for a year, if you want a longer period just increase the number after the -days option. When the key is finished you will be asked a couple of questions you need to answer. The information will be shown to people who want to see your certificate when their mail client complains. The most important one is the ‘Common Name’, make sure that that one is the same as the mail server name.

Country Name (2 letter code) [CA]:
State or Province Name (full name) [Some-State]:
Locality Name (eg, city) []:
Organization Name (eg, company) [Internet Widgits Pty Ltd]:
Organizational Unit Name (eg, section) []:
Common Name (eg, YOUR name) []:your.mailserver.tld
Email Address []:you@yourdomain.tld

Now you have created the certificate you will have to configure Postfix to make use of it and to enforce the usage of TLS to securely communicate with the email client. You’ll have to add the following lines to the configuration file main.cf in /etc/postfix :

smtpd_enforce_tls                = no
smtpd_tls_loglevel               = 1
smtpd_use_tls                    = yes
smtpd_tls_key_file               = /etc/postfix/smtpd.key
smtpd_tls_cert_file              = /etc/postfix/smtpd.cert

Issue the command sudo postfix reload to refresh the configuration of your mail server and your ready to test it out. Start a terminal session and issue the following commands:

telnet your.mailserver.tld 25

The server will answer with:

Trying your.mailserver.tld...
Connected to your.mailserver.tld.
Escape character is ^]
220 your.mailserver.tld ESMTP Postfix

Then type in:

EHLO your.mailserver.tld

And again your server will answer it’s capabilities:

250-your.mailserver.tld
250-PIPELINING
250-SIZE 10240000
250-ETRN
250-STARTTLS
250 8BITMIME

Now it’s time to test TLS and enter in capitals:

STARTTLS

and the server should respond with:

220 Ready to start TLS

Then you know it will work, you could give your favorite email client a try.

Restart postfix : systemctl restart postfix

NOTES:

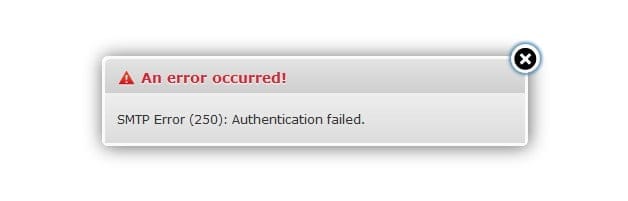
After this fix, roundcube cannot send email anymore, investigating this!

Testing ClamAV for Virus in Emails

To verify ClamAV is working properly, let’s download a test virus (which we can get from http://www.eicar.org/download/eicar.com) to the Maildir

# cd /home/[username]/Maildir
# wget http://www.eicar.org/download/eicar.com

And then scan the /home/[username]/Maildir directory recursively:

# clamscan --infected --remove --recursive /home/[username]/Maildir

Now, feel free to set up this scan to run through a cronjob. Create a file named /etc/cron.daily/dailyclamscan, insert the following lines:

#!/bin/bash
SCAN_DIR="/home/[username]/Maildir"
LOG_FILE="/var/log/clamav/dailyclamscan.log"
touch $LOG_FILE
/usr/bin/clamscan --infected --remove --recursive $SCAN_DIR >> $LOG_FILE

and grant execute permissions:

# chmod +x /etc/cron.daily/dailyclamscan

The above cronjob will scan the mail server directory recursively and leave a log of its operation in /var/log/clamav/dailyclamscan.log (make sure the /var/log/clamav directory exists).

NOTES:
# man clamscan
# clamscan -r -i /home

Configuring SpamAssassin for Postfix

In the process of receiving email, spamassassin will stand between the outside world and the email services running on your server itself. If it finds, according to its definition rules and configuration, that an incoming message is spam, it will rewrite the subject line to clearly identify it as such. Let’s see how.

The main configuration file is /etc/mail/spamassassin/local.cf, and we should make sure the following options are available (add them if they are not present or uncomment if necessary):

local.cf
report_safe 0
required_score 8.0
rewrite_header Subject [SPAM]
  1. When report_safe is set to 0 (recommended value), incoming spam is only modified by modifying the email headers as per rewrite_header. If it is set to 1, the message will be deleted.
  2. To set the aggressivity of the spam filter, required_score must be followed by an integer or decimal number. The lesser the number, the more sensitive the filter becomes. Setting required_score to a value somewhere between 8.0 and 10.0 is recommended for a large system serving many (~100s) email accounts.

Once you’ve saved those changes, enable and start the spam filter service, and then update the spam rules:

# systemctl enable spamassassin
# systemctl start spamassassin
# sa-update

Integrating Postfix and SpamAssassin

In order to efficiently integrate Postfix and spamassassin, we will need to create a dedicated user and group to run the spam filter daemon:

# useradd spamd -s /bin/false -d /var/log/spamassassin

Next, add the following line at the bottom of /etc/postfix/master.cf:

master.cf
spamassassin unix - n n - - pipe flags=R user=spamd argv=/usr/bin/spamc -e /usr/sbin/sendmail -oi -f ${sender} ${recipient}

And indicate (at the top) that spamassassin will serve as content_filter:

Finally, restart Postfix to apply changes:

# systemctl restart postfix

To verify that SpamAssassin is working properly and detecting incoming spam, a test known as GTUBE (Generic Test for Unsolicited Bulk Email) is provided.

To perform this test, send an email from a domain outside your network (such as Yahoo!, Hotmail, or Gmail) to an account residing in your email server. Set the Subject line to whatever you want and include the following text in the message body:

XJS*C4JDBQADN1.NSBN3*2IDNEN*GTUBE-STANDARD-ANTI-UBE-TEST-EMAIL*C.34X

And shows the corresponding notice in the logs:

Additionally, you can test spamassassin right from the command line:

# spamassassin -D < /usr/share/doc/spamassassin-3.4.0/sample-spam.txt

Install chkrootkit on CentOS

What is chkrootkit and the steps to Install chkrootkit

The chkrootkit is a security scanner to check if the system is infected with the ‘rootkit’. A rootkit is a malicious software which is capable of having administrator-level access to a computer or network. The rootkit allows the hackers to take the control of a system without the user knowing it. This means that the rootkit is capable of executing files and changing system configurations on the target machine and many more which can be done only as the super user of the Linux machine.

Please note that scanning for rootkits will not stop all attacks, it is not an active defense. If your server has been compromised then a scan will not stop the rootkit.

Install chkrootkit

The following steps will help you to install chkrootkit on CentOS.

 
cd /usr/local/src
wget ftp://ftp.pangeia.com.br/pub/seg/pac/chkrootkit.tar.gz
tar xvf chkrootkit.tar.gz
cd chkrootkit-*
make sense

Now, you can run the chkrootkit to scan the server. Please note that the present working directory should be “/usr/local/src/chkrootkit-0.50”.

 
./chkrootkit

Daily scan report script

Create a file named scan.sh

 
vim /etc/cron.daily/chkrootkit.sh
 
#!/bin/bash
cd /usr/local/src/chkrootkit-*/ ; ./chkrootkit |grep -v not| /bin/mail -s 'CHROOTKIT Scan Result' your@email.com

Make it executable

 
chmod +x /etc/cron.daily/chkrootkit.sh

The script will email your daily scan report. Also the above steps can also be used to install chkrootkit on cPanel server. Also, please keep this in mind that, using chkrootkit, you can’t remove and found 100% rootkits. You can secure your server from rootkits by ensuring that all applications and softwares are up-to-date and the system kept patched against all known vulnerabilities.

ISPProtect malware and outdated web software scanner

ISPProtect is a Malware and Antivirus scanner for web servers. It contains a signature based scan engine and a heuristic scan engine to detect Malware in websites, CMS- and shop systems like WordPress, Joomla, Drupal, Magentocommerce etc. A third scan level in ISPProtect detects outdated installations of e. g. WordPress, Joomla, Drupal, … and shows their location on the web server. ISPProtect is developed by the ISPConfig developer team. ISPConfig is a widely used OpenSource Webhosting Control Panel.

ISPProtect use cases

Do I need ISPProtect on my server? Yes, when you run your own web server, are a hosting company or provide support for web servers.

  • Your web server started to send out spam emails? ISPProtect can help you to find the malicious software.
  • You recognize a high load on your web server that does not correlate with the website access statistics? Use ISPProtect to find malware that uses your server to attack other systems and IRC bots.
  • You are a hosting company and like to keep your server safe and warn your customers when a site got infected? Use ISPProtect to get a detailed Malware report by email daily, weekly, monthly or in the interval you want.
  • Do your clients miss to install Updates of their WordPress, Joomla and Mediawiki sites or store copies of their old and vulnerable sites in folders like „old_site“ on the server that get never removed and are a target for hackers? Use ISPProtect to get a report on outdated CMS versions that are installed on your server.
  • You are a Linux support company and get contacted by clients with their web server issues? Add ISPProtect to your tool set and use it to scan the systems of your clients and detect malware easily.

Try ISPProtect for free
https://ispprotect.com

Try ISPProtect for free on your server now, no registration required. Just download it and start the scan, enter the word „trial“ when the scanner asks for the license key.

cd /tmp
wget http://www.ispprotect.com/download/ispp_scan.tar.gz
tar xzf ispp_scan.tar.gz
./ispp_scan

Problems with YUM -Y UPDATE

Check this out ~

http://www.linuxquestions.org/questions/centos-111/centos-yum-update-depency-problem-4175541770/

https://www.centos.org/forums/viewtopic.php?f=19&t=14128&sid=f0771137550b57aab58066711d223c78&start=10

Yum commands :

# yum repolist all         [verifie the installed repos]
# rm -rf /var/cache/yum/*  [clear yum cache]
# rpm -Va                  [check all packages]
# yum clean all            [clean yum]
# rpm --rebuilddb          [rebuild database]
# yum update -d6           [yum update]
# yum check-update -d6 --noplugins
# rpm -qa yum \*           [output yum infos]

,,,…maybe,,, the Time Protocol? 😉 and more to this…,,,,,

have a FUN_YUM!

FIXED on a live server, Thanks to a wizard of OZ!!! Don’t ask me how!

Cheers!

P.S Do not do complex commands on a live server ,,, or just have fun, in the learning 😉