Cryptsetup on Centos 7 Server

Linux encryption methods

There are two methods to encrypt your data:

#1: Filesystem stacked level encryption

  1. eCryptfs – It is a cryptographic stacked Linux filesystem. eCryptfs stores cryptographic metadata in the header of each file written, so that encrypted files can be copied between hosts; the file will be decrypted with the proper key in the Linux kernel keyring. This solution is widely used, as the basis for Ubuntu’s Encrypted Home Directory, natively within Google’s ChromeOS, and transparently embedded in several network attached storage (NAS) devices.
  2. EncFS -It provides an encrypted filesystem in user-space. It runs without any special permissions and uses the FUSE library and Linux kernel module to provide the filesystem interface. You can find links to source and binary releases below. EncFS is open source software, licensed under the GPL.

#2: Block device level encryption

  1. Loop-AES – Fast and transparent file system and swap encryption package for linux. No source code changes to linux kernel. Works with 3.x, 2.6, 2.4, 2.2 and 2.0 kernels.
  2. VeraCrypt – It is free open-source disk encryption software for Windows 7/Vista/XP, Mac OS X and Linux based on TrueCrypt codebase.
  3. dm-crypt+LUKS – dm-crypt is a transparent disk encryption subsystem in Linux kernel v2.6+ and later and DragonFly BSD. It can encrypt whole disks, removable media, partitions, software RAID volumes, logical volumes, and files.

In this post, I will explain how to encrypt your partitions using Linux Unified Key Setup-on-disk-format (LUKS) on your Linux based computer or laptop.

Step #1: Install cryptsetup utility

You need to install the following package. It contains cryptsetup, a utility for setting up encrypted filesystems using Device Mapper and the dm-crypt target. Debian / Ubuntu Linux user type the following apt-get command or apt command:
# apt-get install cryptsetup
OR
$ sudo apt install cryptsetup
Sample outputs:

Reading package lists... Done
Building dependency tree       
Reading state information... Done
The following additional packages will be installed:
  console-setup console-setup-linux cryptsetup-bin kbd keyboard-configuration xkb-data
Suggested packages:
  dosfstools keyutils
The following NEW packages will be installed:
  console-setup console-setup-linux cryptsetup cryptsetup-bin kbd keyboard-configuration xkb-data
0 upgraded, 7 newly installed, 0 to remove and 0 not upgraded.
Need to get 3,130 kB of archives.
After this operation, 13.2 MB of additional disk space will be used.
Do you want to continue? [Y/n] y
Get:1 http://deb.debian.org/debian stretch/main amd64 kbd amd64 2.0.3-2+b1 [343 kB]
Get:2 http://deb.debian.org/debian stretch/main amd64 keyboard-configuration all 1.164 [644 kB]
Get:3 http://deb.debian.org/debian stretch/main amd64 console-setup-linux all 1.164 [983 kB]
Get:4 http://deb.debian.org/debian stretch/main amd64 xkb-data all 2.19-1 [648 kB]
Get:5 http://deb.debian.org/debian stretch/main amd64 console-setup all 1.164 [117 kB]
Get:6 http://deb.debian.org/debian stretch/main amd64 cryptsetup-bin amd64 2:1.7.3-4 [221 kB]
Get:7 http://deb.debian.org/debian stretch/main amd64 cryptsetup amd64 2:1.7.3-4 [174 kB]
Fetched 3,130 kB in 0s (7,803 kB/s)
Preconfiguring packages ...
Selecting previously unselected package kbd.
(Reading database ... 22194 files and directories currently installed.)
Preparing to unpack .../0-kbd_2.0.3-2+b1_amd64.deb ...
Unpacking kbd (2.0.3-2+b1) ...
Selecting previously unselected package keyboard-configuration.
Preparing to unpack .../1-keyboard-configuration_1.164_all.deb ...
Unpacking keyboard-configuration (1.164) ...
Selecting previously unselected package console-setup-linux.
Preparing to unpack .../2-console-setup-linux_1.164_all.deb ...
Unpacking console-setup-linux (1.164) ...
Selecting previously unselected package xkb-data.
Preparing to unpack .../3-xkb-data_2.19-1_all.deb ...
Unpacking xkb-data (2.19-1) ...
Selecting previously unselected package console-setup.
Preparing to unpack .../4-console-setup_1.164_all.deb ...
Unpacking console-setup (1.164) ...
Selecting previously unselected package cryptsetup-bin.
Preparing to unpack .../5-cryptsetup-bin_2%3a1.7.3-4_amd64.deb ...
Unpacking cryptsetup-bin (2:1.7.3-4) ...
Selecting previously unselected package cryptsetup.
Preparing to unpack .../6-cryptsetup_2%3a1.7.3-4_amd64.deb ...
Unpacking cryptsetup (2:1.7.3-4) ...
Setting up keyboard-configuration (1.164) ...
Setting up xkb-data (2.19-1) ...
Setting up kbd (2.0.3-2+b1) ...
Processing triggers for systemd (232-25+deb9u1) ...
Setting up cryptsetup-bin (2:1.7.3-4) ...
Processing triggers for man-db (2.7.6.1-2) ...
Setting up console-setup-linux (1.164) ...
Created symlink /etc/systemd/system/sysinit.target.wants/keyboard-setup.service → /lib/systemd/system/keyboard-setup.service.
Created symlink /etc/systemd/system/multi-user.target.wants/console-setup.service → /lib/systemd/system/console-setup.service.
Setting up console-setup (1.164) ...
Setting up cryptsetup (2:1.7.3-4) ...
update-initramfs: deferring update (trigger activated)
Processing triggers for systemd (232-25+deb9u1) ...
Processing triggers for initramfs-tools (0.130) ...
update-initramfs: Generating /boot/initrd.img-4.9.0-3-amd64

RHEL / CentOS / Oracle / Scientific Linux user type the following yum command:
# yum install cryptsetup-luks
OR Fedora Linux user use the dnf command:
# dnf install cryptsetup-luks

Step #2: Configure LUKS partition

WARNING! The following command will remove all data on the partition that you are encrypting. You WILL lose all your information! So make sure you backup your data to an external source such as NAS or hard disk before typing any one of the following command.

In this example, I’m going to encrpt /dev/xvdc. Type the following command:
# cryptsetup -y -v luksFormat /dev/xvdc
Sample outputs:

WARNING!
========
This will overwrite data on /dev/xvdc irrevocably.
 
Are you sure? (Type uppercase yes): YES
Enter LUKS passphrase: 
Verify passphrase: 
Command successful.

This command initializes the volume, and sets an initial key or passphrase. Please note that the passphrase is not recoverable so do not forget it.Type the following command create a mapping:
# cryptsetup luksOpen /dev/xvdc backup2
Sample outputs:

Enter passphrase for /dev/xvdc:

You can see a mapping name /dev/mapper/backup2 after successful verification of the supplied key material which was created with luksFormat command extension:
# ls -l /dev/mapper/backup2
Sample outputs:

lrwxrwxrwx 1 root root 7 Oct 19 19:37 /dev/mapper/backup2 -> ../dm-0

You can use the following command to see the status for the mapping:
# cryptsetup -v status backup2
Sample outputs:

/dev/mapper/backup2 is active.
  type:    LUKS1
  cipher:  aes-cbc-essiv:sha256
  keysize: 256 bits
  device:  /dev/xvdc
  offset:  4096 sectors
  size:    419426304 sectors
  mode:    read/write
Command successful.

You can dump LUKS headers using the following command:
# cryptsetup luksDump /dev/xvdc
Sample outputs:

LUKS header information for /dev/xvdc
 
Version:       	1
Cipher name:   	aes
Cipher mode:   	xts-plain64
Hash spec:     	sha256
Payload offset:	4096
MK bits:       	256
MK digest:     	21 07 68 54 77 96 11 34 f2 ec 17 e9 85 8a 12 c3 1f 3e cf 5f 
MK salt:       	8c a6 3d 8c e9 de 16 fb 07 fd 8e d3 72 d7 db 94 
               	7e e0 75 f9 e0 23 24 df 50 26 fb 92 f8 b5 dd 70 
MK iterations: 	222000
UUID:          	4dd563a9-5bff-4fea-b51d-b4124f7185d1
 
Key Slot 0: ENABLED
	Iterations:         	2245613
	Salt:               	05 a8 b4 a2 54 f7 c6 ee 52 db 60 b6 12 7f 2f 53 
	                      	3f 5d 2d 62 fb 5a b1 c3 52 da d5 5f 7b 2d 38 32 
	Key material offset:	8
	AF stripes:            	4000
Key Slot 1: DISABLED
Key Slot 2: DISABLED
Key Slot 3: DISABLED
Key Slot 4: DISABLED
Key Slot 5: DISABLED
Key Slot 6: DISABLED
Key Slot 7: DISABLED

Step #3: Format LUKS partition

First, you need to write zeros to /dev/mapper/backup2 encrypted device. This will allocate block data with zeros. This ensures that outside world will see this as random data i.e. it protect against disclosure of usage patterns:
# dd if=/dev/zero of=/dev/mapper/backup2
The dd command may take many hours to complete. I suggest that you use pv command to monitor the progress:
# pv -tpreb /dev/zero | dd of=/dev/mapper/backup2 bs=128M
Sample outputs:

dd: error writing '/dev/mapper/backup2': No space left on device                                                                                                            ]
 200GiB 0:16:47 [ 203MiB/s] [                      <=>                                                                                                                      ]
1600+1 records in
1599+1 records out
214746267648 bytes (215 GB, 200 GiB) copied, 1008.19 s, 213 MB/s

You can also pass the status=progress option to the dd command:
# dd if=/dev/zero of=/dev/mapper/backup2 status=progress
Sample outputs:

2133934592 bytes (2.1 GB, 2.0 GiB) copied, 142 s, 15.0 MB/s

Next, create a filesystem i.e. format filesystem, enter:
# mkfs.ext4 /dev/mapper/backup2
Sample outputs:

mke2fs 1.42.13 (17-May-2015)
Creating filesystem with 52428288 4k blocks and 13107200 inodes
Filesystem UUID: 1c71b0f4-f95d-46d6-93e0-cbd19cb95edb
Superblock backups stored on blocks: 
	32768, 98304, 163840, 229376, 294912, 819200, 884736, 1605632, 2654208, 
	4096000, 7962624, 11239424, 20480000, 23887872

Allocating group tables: done                            
Writing inode tables: done                            
Creating journal (32768 blocks): done
Writing superblocks and filesystem accounting information: done

To mount the new filesystem at /backup2, enter:
# mkdir /backup2
# mount /dev/mapper/backup2 /backup2
# df -H
# cd /backup2
# ls -l

How do I unmount and secure data?

Type the following commands:
# umount /backup2
# cryptsetup luksClose backup2

How do I mount or remount encrypted partition?

Type the following command:
# cryptsetup luksOpen /dev/xvdc backup2
# mount /dev/mapper/backup2 /backup2
# df -H
# mount

Sample outputs:

Fig.01: Encrypted partition mounted on /backup2

See shell script wrapper that opens LUKS partition and sets up a mapping for nas devices.

Can I run fsck on LUKS based partition / LVM volume?

Yes, you can use the fsck command On LUKS based systems:
# umount /backup2
# fsck -vy /dev/mapper/backup2
# mount /dev/mapper/backup2 /backu2

See how to run fsck On LUKS (dm-crypt) based LVM physical volume for more details.

How do I change LUKS passphrase (password) for encrypted partition?

Type the following command
### see key slots, max -8 i.e. max 8 passwords can be setup for each device ####
# cryptsetup luksDump /dev/xvdc
# cryptsetup luksAddKey /dev/xvdc

Enter any passphrase: 
Enter new passphrase for key slot: 
Verify passphrase: 

Remove or delete the old password:
# cryptsetup luksRemoveKey /dev/xvdc
Please note that you need to enter the old password / passphrase.

What next?

You can store files or store backups using following software:

Check out related media

This tutorial also available in video format:

(Video 01: cryptsetup command demo)

Conclusion

You now have an encrypted partition for all of your data.

Pros:

  1. LUKS encrypts entire block devices and is therefore well-suited for protecting the contents of mobile devices such as removable storage media (usb pen) or laptop disk drives.
  2. You can also use with your nas server to protect backups.
  3. Intel and AMD cpus with AES-NI (Advanced Encryption Standard Instruction Set) can accelerate dm-crypt based encryption for Linux kernel v2.6.32+. This will speed up harddisk encryption.
  4. Works with swap partition too so that your laptop can use hibernation feature (suspend-to-disk) that writes out the contents of RAM to the swap partition before turning off the machine.

Cons:

  1. LUKS only support up to 8 passwords i.e. only 8 users can have distinct access keys to the same device.
  2. LUKS is also not recommend for applications requiring file-level encryption.

For more information see cryptsetup man page and read RHEL 6.x documentation.

Create a Chat Server Using Matrix Synapse and Riot on CentOS 7

Matrix is an open standard communication protocol for decentralized real time communication. Matrix is implemented as home servers which are distributed over the internet; hence there is no single point of control or failure. Matrix provides a RESTful HTTP API for creating and managing the distributed chat servers that includes sending and receiving messages, inviting and managing chat room members, maintaining user accounts, and providing advanced chat features such as VoIP and Video calls, etc. Matrix also establishes a secure synchronization between home servers which are distributed across the globe.

Synapse is the implementation of Matrix home server written by the Matrix team. The Matrix ecosystem consists of the network of many federated home servers distributed across the globe. A Matrix user uses a chat client to connect to the home server, which in turn connects to the Matrix network. Homeserver stores the chat history and the login information of that particular user.

Prerequisites

  • A Vultr CentOS 7 server instance.
  • A sudo user.

In this tutorial, we will use matrix.example.com as the domain name used for Matrix Synapse. Replace all occurrences of matrix.example.com with your actual domain name you want to use for your Synapse home server.

Update your base system using the guide How to Update CentOS 7. Once your system is updated, proceed to install Python.

Install Development Tools

Matrix Synapse needs Python 2.7 to work. Python 2.7 comes preinstalled in all CentOS server instances. You can check the installed version of Python.

python -V

You should get a similar output.

[user@vultr ~]$ python -V
Python 2.7.5

Changing the default version of Python may break YUM repository manager. However, if you want the most recent version of Python, you can make an alternative install, without replacing the default Python.

Install the packages in the Development tools group that are required for compiling the installer files.

sudo yum groupinstall -y "Development tools"

Install a few more required dependencies.

sudo yum -y install libtiff-devel libjpeg-devel libzip-devel freetype-devel lcms2-devel libwebp-devel tcl-devel tk-devel redhat-rpm-config python-virtualenv libffi-devel openssl-devel 

Install Python pip. Pip is the dependency manager for Python packages.

wget https://bootstrap.pypa.io/get-pip.py
sudo python get-pip.py

Install Synapse

Create a virtual environment for your Synapse application. Python virtual environment is used to create an isolated virtual environment for a Python project. A virtual environment contains its own installation directories and doesn’t share libraries with global and other virtual environments.

sudo virtualenv -p python2.7 /opt/synapse

Provide the ownership of the directory to the current user.

sudo chown -R $USER:$USER /opt/synapse/

Now activate the virtual environment.

source /opt/synapse/bin/activate

Ensure that you have the latest version of pip and setuptools.

pip install --upgrade pip 
pip install --upgrade setuptools

Install the latest version of Synapse using pip.

pip install https://github.com/matrix-org/synapse/tarball/master

The above command will take some time to execute as it pulls and installs the latest version of Synapse and all the dependencies from Github repository.

Installing and Configuring PostgreSQL

Synapse uses SQLite as the default database. SQLite stores the data in a database which is kept as a flat file on disk. Using SQLite is very simple, but not recommended for production as it is very slow compared to PostgreSQL.

PostgreSQL is an object relational database system. You will need to add the PostgreSQL repository in your system, as the application is not available in the default YUM repository.

sudo rpm -Uvh https://download.postgresql.org/pub/repos/yum/9.6/redhat/rhel-7-x86_64/pgdg-centos96-9.6-3.noarch.rpm

Install the PostgreSQL database server.

sudo yum -y install postgresql96-server postgresql96-contrib

Initialize the database.

sudo /usr/pgsql-9.6/bin/postgresql96-setup initdb

Edit the /var/lib/pgsql/9.6/data/pg_hba.conf to enable MD5 based authentication.

sudo nano /var/lib/pgsql/9.6/data/pg_hba.conf

Find the following lines and change peer to trust and idnet to md5.

# TYPE  DATABASE        USER            ADDRESS                 METHOD

# "local" is for Unix domain socket connections only
local   all             all                                     peer
# IPv4 local connections:
host    all             all             127.0.0.1/32            idnet
# IPv6 local connections:
host    all             all             ::1/128                 idnet

Once updated, the configuration should look like this.

# TYPE  DATABASE        USER            ADDRESS                 METHOD

# "local" is for Unix domain socket connections only
local   all             all                                     trust
# IPv4 local connections:
host    all             all             127.0.0.1/32            md5
# IPv6 local connections:
host    all             all             ::1/128                 md5

Start the PostgreSQL server and enable it to start automatically at boot.

sudo systemctl start postgresql-9.6
sudo systemctl enable postgresql-9.6

Change the password for the default PostgreSQL user.

sudo passwd postgres

Login.

sudo su - postgres

Create a new PostgreSQL user for Synapse.

createuser synapse

PostgreSQL provides the psql shell to run queries on the database. Switch to the PostgreSQL shell by running.

psql

Set a password for the newly created user for Synapse database.

ALTER USER synapse WITH ENCRYPTED password 'DBPassword';

Replace DBPassword with a strong password and make a note of it as we will use the password later. Create a new database for the PostgreSQL database.

CREATE DATABASE synapse ENCODING 'UTF8' LC_COLLATE='C' LC_CTYPE='C' template=template0 OWNER synapse;

Exit from the psql shell.

\q

Switch to the sudo user from current postgres user.

exit

You will also need to install the packages required for Synapse to communicate with the PostgreSQL database server.

sudo yum -y install postgresql-devel libpqxx-devel.x86_64
source /opt/synapse/bin/activate
pip install psycopg2

Configuring Synapse

Synapse requires a configuration file before it can be started. The configuration file stores the server settings. Switch to the virtual environment and generate the configuration for Synapse.

source /opt/synapse/bin/activate
cd /opt/synapse
python -m synapse.app.homeserver --server-name matrix.example.com --config-path homeserver.yaml --generate-config --report-stats=yes

Replace matrix.example.com with your actual domain name and make sure that the server name is resolvable to the IP address of your Vultr instance. Provide --report-stats=yes if you want the servers to generate the reports, provide --report-stats=no to disable the generation of reports and statistics.

You should see a similar output.

(synapse)[user@vultr synapse]$ python -m synapse.app.homeserver --server-name matrix.example.com --config-path homeserver.yaml --generate-config --report-stats=yes
A config file has been generated in 'homeserver.yaml' for server name 'matrix.example.com' with corresponding SSL keys and self-signed certificates. Please review this file and customise it to your needs.
If this server name is incorrect, you will need to regenerate the SSL certificates

By default, the homeserver.yaml is configured to use a SQLite database. We need to modify it to use the PostgreSQL database we have created earlier.

Edit the newly created homeserver.yaml.

nano homeserver.yaml

Find the existing database configuration which uses SQLite3. Comment out the lines as shown below. Also, add the new database configuration for PostgreSQL. Make sure that you use the correct database credentials.

# Database configuration
#database:
  # The database engine name
  #name: "sqlite3"
  # Arguments to pass to the engine
  #args:
    # Path to the database
    #database: "/opt/synapse/homeserver.db"


database:
    name: psycopg2
    args:
        user: synapse
        password: DBPassword
        database: synapse
        host: localhost
        cp_min: 5
        cp_max: 10

Registration of a new user from a web interface is disabled by default. To enable registration, you can set enable_registration to True. You can also set a secret registration key, which allows anyone to register who has the secret key, even if registration is disabled.

enable_registration: False

registration_shared_secret: "YPPqCPYqCQ-Rj,ws~FfeLS@maRV9vz5MnnV^r8~pP.Q6yNBDG;"

Save the file and exit from the editor. Now you will need to register your first user. Before you can register a new user, though, you will need to start the application first.

source /opt/synapse/bin/activate && cd /opt/synapse
synctl start

You should see the following lines.

2017-09-05 11:10:41,921 - twisted - 131 - INFO - - SynapseSite starting on 8008
2017-09-05 11:10:41,921 - twisted - 131 - INFO - - Starting factory <synapse.http.site.SynapseSite instance at 0x44bbc68>
2017-09-05 11:10:41,921 - synapse.app.homeserver - 201 - INFO - - Synapse now listening on port 8008
2017-09-05 11:10:41,922 - synapse.app.homeserver - 442 - INFO - - Scheduling stats reporting for 3 hour intervals
started synapse.app.homeserver('homeserver.yaml')

Register a new Matrix user.

register_new_matrix_user -c homeserver.yaml https://localhost:8448

You should see the following.

(synapse)[user@vultr synapse]$ register_new_matrix_user -c homeserver.yaml https://localhost:8448
New user localpart [user]: admin
Password:
Confirm password:
Make admin [no]: yes
Sending registration request...
Success.

Finally, before you can use the Homeserver, you will need to allow port 8448 through the Firewall. Port 8448 is used as the secured federation port. Homeservers use this port to communicate with each other securely. You can also use the built-in Matrix web chat client through this port.

sudo firewall-cmd --permanent --zone=public --add-port=8448/tcp
sudo firewall-cmd --reload

You can now log in to the Matrix web chat client by going to https://matrix.example.com:8448 through your favorite browser. You will see a warning about the SSL certificate as the certificates used are self-signed. We will not use this web chat client as it is outdated and not maintained anymore. Just try to check if you can log in using the user account you just created.

Setting up Let’s Encrypt Certificates

Instead of using a self-signed certificate for securing federation port, we can use Let’s Encrypt free SSL. Let’s Encrypt free SSL can be obtained through the official Let’s Encrypt client called Certbot.

Install Certbot.

sudo yum -y install certbot

Adjust your firewall setting to allow the standard HTTP and HTTPS ports through the firewall. Certbot needs to make an HTTP connection to verify the domain authority.

sudo firewall-cmd --permanent --zone=public --add-service=http
sudo firewall-cmd --permanent --zone=public --add-service=https
sudo firewall-cmd --reload

To obtain certificates from Let’s Encrypt CA, you must ensure that the domain for which you wish to generate the certificates is pointed towards the server. If it is not, then make the necessary changes to the DNS records of your domain and wait for the DNS to propagate before making the certificate request again. Certbot checks the domain authority before providing the certificates.

Now use the built-in web server in Certbot to generate the certificates for your domain.

sudo certbot certonly --standalone -d matrix.example.com

The generated certificates are likely to be stored in /etc/letsencrypt/live/matrix.example.com/. The SSL certificate will be stored as fullchain.pem and the private key will be stored as privkey.pem.

Copy the certificates.

sudo cp /etc/letsencrypt/live/matrix.example.com/fullchain.pem /opt/synapse/letsencrypt-fullchain.pem

sudo cp /etc/letsencrypt/live/matrix.example.com/privkey.pem /opt/synapse/letsencrypt-privkey.pem

You will need to change the path to the certificates and keys from the homeserver.yaml file. Edit the configuration.

nano /opt/synapse/homeserver.yaml

Find the following lines and modify the path.

tls_certificate_path: "/opt/synapse/letsencrypt-fullchain.pem"

# PEM encoded private key for TLS
tls_private_key_path: "/opt/synapse/letsencrypt-privkey.pem"

Save the file and exit from the editor. Restart the Synapse server so that the changes can take effect.

source /opt/synapse/bin/activate && cd /opt/synapse
synctl restart

Let’s Encrypt certificates are due to expire in 90 days, so it is recommended that you setup auto renewal for the certificates using cron jobs. Cron is a system service which is used to run periodic tasks.

Create a new script to renew certificates and copy the renewed certificates to the Synapse directory.

sudo nano /opt/renew-letsencypt.sh  

Populate the file.

#!/bin/sh

/usr/bin/certbot renew --quiet --nginx
cp /etc/letsencrypt/live/matrix.example.com/fullchain.pem /opt/synapse/letsencrypt-fullchain.pem
cp /etc/letsencrypt/live/matrix.example.com/privkey.pem /opt/synapse/letsencrypt-privkey.pem

Provide the execution permission.

sudo chmod +x /opt/renew-letsencypt.sh

Open the cron job file.

sudo crontab -e

Add the following line at the end of the file.

30 5 * * 1 /opt/renew-letsencypt.sh

The above cron job will run every Monday at 5:30 AM. If the certificate is due to expire, it will automatically renew them.

Now you can visit https://matrix.example.com:8448. You will see that there is no SSL warning before connection.

Setup Nginx With Let’s Encrypt

Apart from the secured federation port 8448, Synapse also listens to the unsecured client port 8008. We will now configure Nginx as a reverse proxy to the Synapse application.

sudo yum -y install nginx

Create a new configuration file.

sudo nano /etc/nginx/conf.d/synapse.conf

Populate the file with the following content.

server {
    listen 80;
    server_name matrix.example.com;
    return 301 https://$host$request_uri;
}
server {

    listen 443;
    server_name matrix.example.com;

    ssl_certificate           /etc/letsencrypt/live/matrix.example.com/fullchain.pem;
    ssl_certificate_key       /etc/letsencrypt/live/matrix.example.com/privkey.pem;

    ssl on;
    ssl_session_cache  builtin:1000  shared:SSL:10m;
    ssl_protocols  TLSv1 TLSv1.1 TLSv1.2;
    ssl_ciphers HIGH:!aNULL:!eNULL:!EXPORT:!CAMELLIA:!DES:!MD5:!PSK:!RC4;
    ssl_prefer_server_ciphers on;

    access_log    /var/log/nginx/synapse.access.log;

    location /_matrix {

      proxy_pass          http://localhost:8008;
      proxy_set_header X-Forwarded-For $remote_addr;

    }
  }

Restart and enable Nginx to automatically start at boot time.

sudo systemctl restart nginx
sudo systemctl enable nginx

Finally, you can verify if Synapse can be accessed through the reverse proxy.

curl https://matrix.example.com/_matrix/key/v2/server/auto

You should get similar output.

[user@vultr ~]$ curl https://matrix.example.com/_matrix/key/v2/server/auto
{"old_verify_keys":{},"server_name":"matrix.example.com","signatures":{"matrix.example.com":{"ed25519:a_ffMf":"T/Uq/UN5vyc4w7v0azALjPIJeZx1vQ+HC6ohUGkTSqiFI4WI/ojGpb2763arwSSQLr/tP/2diCi1KLU2DEnOCQ"}},"tls_fingerprints":[{"sha256":"eorhQj/kubI2PEQZyBZvGV7K1x3EcQ7j/AO2MtZMplw"}],"valid_until_ts":1504876080512,"verify_keys":{"ed25519:a_ffMf":{"key":"Gc1hxkpPmQv71Cvjyk+uzR5UtrpmgV/UwlsLtosawEs"}}}

Setting up the Systemd Service

It is recommended to use the Systemd service to manage the Synapse server process. Using Systemd will ensure that the server is automatically started on system startup and failures.

Create a new Systemd service file.

sudo nano /etc/systemd/system/matrix-synapse.service

Populate the file.

[Unit]
Description=Matrix Synapse service
After=network.target

[Service]
Type=forking
WorkingDirectory=/opt/synapse/
ExecStart=/opt/synapse/bin/synctl start
ExecStop=/opt/synapse/bin/synctl stop
ExecReload=/opt/synapse/bin/synctl restart
Restart=always
StandardOutput=syslog
StandardError=syslog
SyslogIdentifier=synapse

[Install]
WantedBy=multi-user.target

Now you can quickly start the Synapse server.

sudo systemctl start matrix-synapse

To stop or restart the server using following commands.

sudo systemctl stop matrix-synapse
sudo systemctl restart matrix-synapse

You can check the status of service.

sudo systemctl status matrix-synapse

Using Riot

Matrix Synapse server is now installed and configured on your server. As the built-in web client for Matrix is outdated, you can choose from the variety of the client applications available for chat. Riot is the most popular chat client, which is available on almost all platforms. You can use the hosted version of Riot’s web chat client, or you can also host a copy of it on your own server. Apart from this, you can also use Riot’s desktop and mobile chat clients, which are available for Windows, Mac, Linux, IOS and Android.

If you wish to host your own copy of Riot web client, you can read further for the instructions to install Riot on your server. For hosted, desktop and mobile client, you can use your username and password to login directly to your homeserver. Just choose my Matrix ID from the dropdown menu of the Sign In option and provide the username and password you have created during the registration of a new user. Click on the Custom server and use the domain name of your Synapse instance. As we have already configured Nginx, we can just use https://matrix.example.com as the Home server and https://matrix.org as Identity server URL.

Riot Login Example

Setup Riot on Your Own Server.

Riot is also open source and free to host on your own server. It does not require any database or dependencies. As we already have an Nginx server running, we can host it on the same server.

The domain or subdomain you are using for Synapse and Riot must be different to avoid cross-site scripting. However, you can use two subdomains of the same domain. In this tutorial, we will be using riot.example.com as the domain for the Riot application. Replace all occurrence of riot.example.com with your actual domain or subdomain for the Riot application.

Download Riot on your server.

cd /opt/
sudo wget https://github.com/vector-im/riot-web/releases/download/v0.12.3/riot-v0.12.3.tar.gz

You can always find the link to the latest version on Riot’s Github.

Extract the archive.

sudo tar -xzf riot-v*.tar.gz

Rename the directory for handling convenience.

sudo mv riot-v*/ riot/

Because we have already installed Certbot, we can generate the certificates directly. Make sure that the domain or subdomain you are using is pointed towards the server.

sudo systemctl stop nginx
sudo certbot certonly --standalone -d riot.example.com

The generated certificates are likely to be stored in the /etc/letsencrypt/live/riot.example.com/ directory.

Create a virtual host for the Riot application.

sudo nano /etc/nginx/conf.d/riot.conf

Populate the file.

server {
    listen 80;
    server_name riot.example.com;
    return 301 https://$host$request_uri;
}
server {

    listen 443;
    server_name riot.example.com;

    ssl_certificate           /etc/letsencrypt/live/riot.example.com/fullchain.pem;
    ssl_certificate_key       /etc/letsencrypt/live/riot.example.com/privkey.pem;

    ssl on;
    ssl_session_cache  builtin:1000  shared:SSL:10m;
    ssl_protocols  TLSv1 TLSv1.1 TLSv1.2;
    ssl_ciphers HIGH:!aNULL:!eNULL:!EXPORT:!CAMELLIA:!DES:!MD5:!PSK:!RC4;
    ssl_prefer_server_ciphers on;

    root /opt/riot;
    index index.html index.htm;

    location / {
            try_files $uri $uri/ =404;
    }

    access_log    /var/log/nginx/riot.access.log;

  }

Copy the sample configuration file.

sudo cp /opt/riot/config.sample.json /opt/riot/config.json

Now edit the configuration file to make few changes.

sudo nano /opt/riot/config.json

Find the following lines.

"default_hs_url": "https://matrix.org",
"default_is_url": "https://vector.im",

Replace the value of the default home server URL with the URL of your Matrix server. For the identity server URL, you can use the default option, or you can also provide its value to the Matrix identity server, which is https://matrix.org.

"default_hs_url": "https://matrix.example.com",
"default_is_url": "https://matrix.org",

Save the file and exit. Provide ownership of the files to the Nginx user.

sudo chown -R nginx:nginx /opt/riot/

Restart Nginx.

sudo systemctl restart nginx

You can access Riot on https://riot.example.com. You can now log in using the username and password which you have created earlier. You can connect using the default server as we have already changed the default Matrix server for our application.

You now have a Matrix Synapse home server up and running. You also have a hosted copy of Riot, which you can use to send a message to other people using their Matrix ID, email or mobile number. Start by creating a chat room on your server and invite your friends on Matrix to join the chat room you have created.

Have fun!

Install REDIS on Centos 7

Redis is an open-source, in-memory data structure store which excels at caching. A non-relational database, Redis is known for its flexibility, performance, scalability, and wide language support.

Redis was designed for use by trusted clients in a trusted environment, and has no robust security features of its own. Redis does, however, have a few security features that include a basic unencrypted password and command renaming and disabling. This tutorial provides instructions on how to configure these security features, and also covers a few other settings that can boost the security of a standalone Redis installation on CentOS 7.

Prerequisites

To follow along with this tutorial, you will need:

  • One CentOS 7 Droplet configured using our Initial Server Setup for CentOS 7.
  • Firewalld installed and configured using this guide, up to and including the “Turning on the Firewall” step.

With those prerequisites in place, we are ready to install Redis and perform some initial configuration tasks.

Step 1 — Installing Redis

Before we can install Redis, we must first add Extra Packages for Enterprise Linux (EPEL) repository to the server’s package lists. EPEL is a package repository containing a number of open-source add-on software packages, most of which are maintained by the Fedora Project.

We can install EPEL using yum:

sudo yum install epel-release

Once the EPEL installation has finished you can install Redis, again using yum:

sudo yum install redis -y

This may take a few minutes to complete. After the installation finishes, start the Redis service:

sudo systemctl start redis.service

If you’d like Redis to start on boot, you can enable it with the enable command:

sudo systemctl enable redis

You can check Redis’s status by running the following:

sudo systemctl status redis.service
Output
● redis.service - Redis persistent key-value database
   Loaded: loaded (/usr/lib/systemd/system/redis.service; disabled; vendor preset: disabled)
  Drop-In: /etc/systemd/system/redis.service.d
           └─limit.conf
   Active: active (running) since Thu 2018-03-01 15:50:38 UTC; 7s ago
 Main PID: 3962 (redis-server)
   CGroup: /system.slice/redis.service
           └─3962 /usr/bin/redis-server 127.0.0.1:6379

Once you’ve confirmed that Redis is indeed running, test the setup with this command:

redis-cli ping

This should print PONG as the response. If this is the case, it means you now have Redis running on your server and we can begin configuring it to enhance its security.

Step 2 — Binding Redis and Securing it with a Firewall

An effective way to safeguard Redis is to secure the server it’s running on. You can do this by ensuring that Redis is bound only to either localhost or to a private IP address and that the server has a firewall up and running.

However, if you chose to set up a Redis cluster using this tutorial, then you will have updated the configuration file to allow connections from anywhere, which is not as secure as binding to localhost or a private IP.

To remedy this, open the Redis configuration file for editing:

sudo vi /etc/redis.conf

Locate the line beginning with bind and make sure it’s uncommented:

/etc/redis.conf
bind 127.0.0.1

If you need to bind Redis to another IP address (as in cases where you will be accessing Redis from a separate host) we strongly encourage you to bind it to a private IP address. Binding to a public IP address increases the exposure of your Redis interface to outside parties.

/etc/redis.conf
bind your_private_ip

If you’ve followed the prerequisites and installed firewalld on your server and you do not plan to connect to Redis from another host, then you do not need to add any extra firewall rules for Redis. After all, any incoming traffic will be dropped by default unless explicitly allowed by the firewall rules. Since a default standalone installation of Redis server is listening only on the loopback interface (127.0.0.1 or localhost), there should be no concern for incoming traffic on its default port.

If, however, you do plan to access Redis from another host, you will need to make some changes to your firewalld configuration using the firewall-cmd command. Again, you should only allow access to your Redis server from your hosts by using their private IP addresses in order to limit the number of hosts your service is exposed to.

To begin, add a dedicated Redis zone to your firewalld policy:

sudo firewall-cmd --permanent --new-zone=redis

Then, specify which port you’d like to have open. Redis uses port 6397 by default:

sudo firewall-cmd --permanent --zone=redis --add-port=6379/tcp

Next, specify any private IP addresses which should be allowed to pass through the firewall and access Redis:

sudo firewall-cmd --permanent --zone=redis --add-source=client_server_private_IP

After running those commands, reload the firewall to implement the new rules:

sudo firewall-cmd --reload

Under this configuration, when the firewall sees a packet from your client’s IP address, it will apply the rules in the dedicated Redis zone to that connection. All other connections will be processed by the default public zone. The services in the default zone apply to every connection, not just those that don’t match explicitly, so you don’t need to add other services (e.g. SSH) to the Redis zone because those rules will be applied to that connection automatically.

If you chose to set up a firewall using Iptables, you will need to grant your secondary hosts access to the port Redis is using with the following commands:

  • sudo iptables -A INPUT -i lo -j ACCEPT
  • sudo iptables -A INPUT -m conntrack –ctstate ESTABLISHED,RELATED -j ACCEPT
  • sudo iptables -A INPUT -p tcp -s client_servers_private_IP/32 –dport 6397 -m conntrack –ctstate NEW,ESTABLISHED -j ACCEPT
  • sudo iptables -P INPUT DROP

Make sure to save your Iptables firewall rules using the mechanism provided by your distribution.

Keep in mind that using either firewall tool will work. What’s important is that the firewall is up and running so that unknown individuals cannot access your server. In the next step, we will configure Redis to only be accessible with a strong password.

Step 3 — Configuring a Redis Password

If you installed Redis using the How To Configure a Redis Cluster on CentOS 7 tutorial, you should have configured a password for it. At your discretion, you can make a more secure password now by following this section. If you haven’t set up a password yet, instructions in this section show how to set the database server password.

Configuring a Redis password enables one of its built-in security features — the auth command — which requires clients to authenticate before being allowed access to the database. Like the bind setting, the password is configured directly in Redis’s configuration file, /etc/redis.conf. Reopen that file:

sudo vi /etc/redis.conf

Scroll to the SECURITY section and look for a commented directive that reads:

/etc/redis.conf
# requirepass foobared

Uncomment it by removing the #, and change foobared to a very strong password of your choosing. Rather than make up a password yourself, you may use a tool like apg or pwgen to generate one. If you don’t want to install an application just to generate a password, though, you may use the command below.

Note that entering this command as written will generate the same password every time. To create a password different from the one that this would generate, change the word in quotes to any other word or phrase.

echo "easy-admin" | sha256sum

Though the generated password will not be pronounceable, it is a very strong and very long one, which is exactly the type of password required for Redis. After copying and pasting the output of that command as the new value for requirepass, it should read:

/etc/redis.conf
requirepass password_copied_from_output

If you prefer a shorter password, use the output of the command below instead. Again, change the word in quotes so it will not generate the same password as this one:

echo "easy-admin" | sha1sum

After setting the password, save and close the file then restart Redis:

sudo systemctl restart redis.service

To test that the password works, access the Redis command line:

redis-cli

The following is a sequence of commands used to test whether the Redis password works. The first command tries to set a key to a value before authentication.

127.0.0.1:6379> set key1 10

That won’t work as we have not yet been authenticated, so Redis returns an error.

Output
(error) NOAUTH Authentication required.

The following command authenticates with the password specified in the Redis configuration file.

127.0.0.1:6379> auth your.redis.password

Redis will acknowledge that we have been authenticated:

Output
OK

After that, running the previous command again should be successful:

127.0.0.1:6379> set key1 10

Output
OK

The get key1 command queries Redis for the value of the new key.

127.0.0.1:6379>  quit

It should now be very difficult for unauthorized users to access your Redis installation. Please note, though, that without SSL or a VPN the unencrypted password will still be visible to outside parties if you’re connecting to Redis remotely.

Next, we’ll look at renaming Redis commands to further protect Redis from malicious actors.

Step 4 — Renaming Dangerous Commands

The other security feature built into Redis allows you to rename or completely disable certain commands that are considered dangerous. When run by unauthorized users, such commands can be used to reconfigure, destroy, or otherwise wipe your data. Some of the commands that are known to be dangerous include:

  • FLUSHDB
  • FLUSHALL
  • KEYS
  • PEXPIRE
  • DEL
  • CONFIG
  • SHUTDOWN
  • BGREWRITEAOF
  • BGSAVE
  • SAVE
  • SPOP
  • SREM RENAME DEBUG

This is not a comprehensive list, but renaming or disabling all of the commands in that list is a good starting point.

Whether you disable or rename a command is site-specific. If you know you will never use a command that can be abused, then you may disable it. Otherwise, you should rename it instead.

Like the authentication password, renaming or disabling commands is configured in the SECURITY section of the /etc/redis.conf file. To enable or disable Redis commands, open the configuration file for editing one more time:

sudo vi  /etc/redis.conf

NOTE: These are examples. You should choose to disable or rename the commands that make sense for you. You can check the commands for yourself and determine how they might be misused at redis.io/commands.

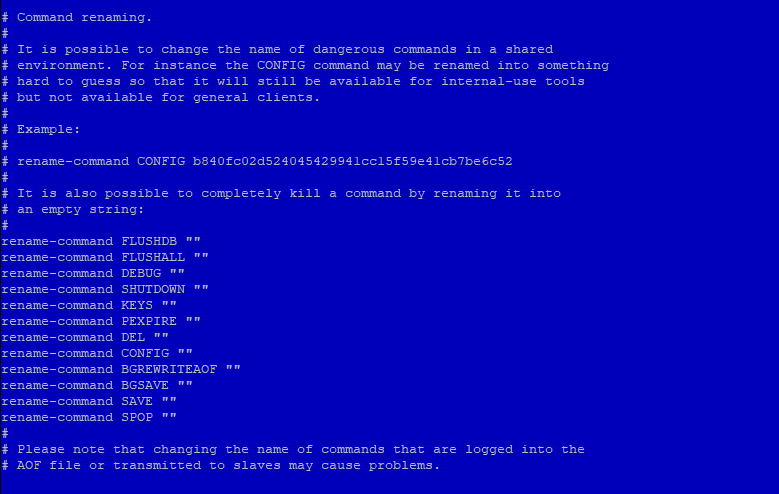
To disable or kill a command, simply rename it to an empty string, as shown below:

/etc/redis.conf
# It is also possible to completely kill a command by renaming it into
# an empty string:
#
rename-command FLUSHDB ""
rename-command FLUSHALL ""
rename-command DEBUG ""

To rename a command, give it another name like in the examples below. Renamed commands should be difficult for others to guess, but easy for you to remember:

/etc/redis.conf
rename-command CONFIG ""
rename-command SHUTDOWN SHUTDOWN_MENOT
rename-command CONFIG ASC12_CONFIG


Save your changes and close the file, and then apply the change by restarting Redis:

sudo systemctl restart redis.service

To test the new command, enter the Redis command line:

redis-cli

Authenticate yourself using the password you defined earlier:

127.0.0.1:6379> auth your_redis_password

Output
OK

Assuming that you renamed the CONFIG command to ASC12_CONFIG, attempting to use the config command should fail.

127.0.0.1:6379> config get requirepass

Output
(error) ERR unknown command 'config'

Calling the renamed command should be successful (it’s case-insensitive):

127.0.0.1:6379> asc12_config get requirepass

Output
1) "requirepass"
2) "your_redis_password"

Finally, you can exit from redis-cli:

127.0.0.1:6379> exit

Note that if you’re already using the Redis command line and then restart Redis, you’ll need to re-authenticate. Otherwise, you’ll get this error if you type a command:

Output
NOAUTH Authentication required.

Regarding renaming commands, there’s a cautionary statement at the end of the SECURITY section in the /etc/redis.conf file, which reads:

Please note that changing the name of commands that are logged into the AOF file or transmitted to slaves may cause problems.

That means if the renamed command is not in the AOF file, or if it is but the AOF file has not been transmitted to slaves, then there should be no problem. Keep that in mind as you’re renaming commands. The best time to rename a command is when you’re not using AOF persistence or right after installation (that is, before your Redis-using application has been deployed).

When you’re using AOF and dealing with a master-slave installation, consider this answer from the project’s GitHub issue page. The following is a reply to the author’s question:

The commands are logged to the AOF and replicated to the slave the same way they are sent, so if you try to replay the AOF on an instance that doesn’t have the same renaming, you may face inconsistencies as the command cannot be executed (same for slaves).

The best way to handle renaming in cases like that is to make sure that renamed commands are applied to all instances of master-slave installations.

Step 5 — Setting Data Directory Ownership and File Permissions

In this step, we’ll consider a couple of ownership and permissions changes you can make to improve the security profile of your Redis installation. This involves making sure that only the user that needs to access Redis has permission to read its data. That user is, by default, the redis user.

You can verify this by grep-ing for the Redis data directory in a long listing of its parent directory. The command and its output are given below.

ls -l /var/lib | grep redis
Output
drwxr-xr-x 2 redis   redis   4096 Aug  6 09:32 redis

You can see that the Redis data directory is owned by the redis user, with secondary access granted to the redis group. This ownership setting is secure, but the folder’s permissions (which are set to 755) are not. To ensure that only the Redis user has access to the folder and its contents, change the permissions setting to 770:

sudo chmod 770 /var/lib/redis

The other permission you should change is that of the Redis configuration file. By default, it has a file permission of 644 and is owned by root, with secondary ownership by the root group:

ls -l /etc/redis.conf
Output
-rw-r--r-- 1 root root 30176 Aug 10  2018 /etc/redis.conf

That permission (644) is world-readable. This presents a security issue as the configuration file contains the unencrypted password you configured in Step 4, meaning we need to change the configuration file’s ownership and permissions. Ideally, it should be owned by the redis user, with secondary ownership by the redis group. To do that, run the following command:

sudo chown redis:redis /etc/redis.conf

Then change the permissions so that only the owner of the file can read and/or write to it:

sudo chmod 660 /etc/redis.conf

You may verify the new ownership and permissions using:

ls -l /etc/redis.conf
Output
total 40
-rw------- 1 redis redis 29716 Sep 22 18:32 /etc/redis.conf

Finally, restart Redis:

sudo systemctl restart redis.service

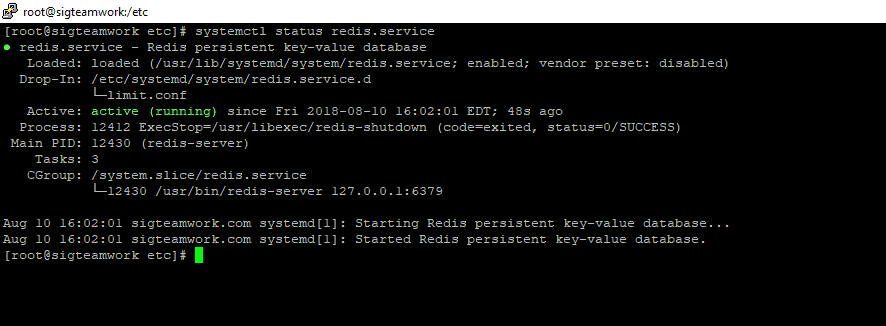
Check the status of redis.service

systemctl status redis.service

Congratulations, your Redis installation should now be more secure!

SIGPROTEK & SIGTEAMWORK

SIGPROTEK and SIGTEAMWORK are small form factor network appliance built for use as a firewall router or other application and is compatible with a variety of open source projects.

The unit is small and it’s fanless, so there’s no noise. The 4 Intel NIC ports are proven to be the most reliable for use with high throughput packet switching applications and the units can route at gigabit wire speeds.

SIGPROTEK SECURITY FIREWALL SYSTEM

SPECIFICATIONS
– Quad Core J1900 CPU 2.0GHZ
– 4 LAN Gigabit Network
– 8 GB DDR3 Memory
– 2 USB 3.0 Ports
– 2 USB 2.0 Ports
– 1 VGA Connector
– mSATA 64GB SSD *3ME MLC
– Non-Industrial mSATA up to 1TB
* Industrial embedded for Aerospace industries
– Firewall: PFSENSE / CLEAROS / UnTANGLE
– Optional WIFI Hi-Speed Router

SIGTEAMWORK COMMUNICATION SYSTEM

SPECIFICATIONS
– Quad Core J1900 CPU 2.0GHZ
– 4 LAN Gigabit Network
– 8 GB DDR3 Memory
– 2 USB 3.0 Ports
– 2 USB 2.0 Ports
– 1 VGA Connector
– mSATA 64GB SSD *3ME MLC
– Non-Industrial mSATA up to 1TB
* Industrial embedded for Aerospace industries
– Up to 5TB 2.5″ SATA3 Storage
– CENTOS 7.x
– APACHE / Webmin / CSF
– FREE Integrated Dynamic IP Server

Developed by SIG INC. (Montreal) CANADA
https://www.sigsolution.net

IT DEV Dejan Janosevic (Belgrade) SERBIA
http://dejanjanosevic.com/

How to Install the Dynamic Update Client on Linux

This guide will walk you through the installation and setup of the Dynamic Update Client (DUC) on a computer running Linux. If you are using Ubuntu or Debian Linux please check our support site for guides on their specific setup.

Installing the Client

The below commands should be executed from a terminal window (command prompt) after logging in as the “root” user.  You can become the root user from the command line by entering “sudo su -” followed by the root password on your machine.

Note: If you do not have privileges on the machine you are on, you may add the “sudo” command in front of steps (5 and 6).

  1. cd /usr/local/src
  2. wget http://www.no-ip.com/client/linux/noip-duc-linux.tar.gz
  3. tar xzf noip-duc-linux.tar.gz
  4. cd no-ip-2.1.9
  5. make
  6. make install

If you get “make not found” or “missing gcc” then you do not have the gcc compiler tools on your machine. You will need to install these in order to proceed.

To Configure the Client

As root again (or with sudo) issue the below command:

  • /usr/local/bin/noip2 -C   (dash capital C, this will create the default config file)

You will then be prompted for your username and password for No-IP, as well as which hostnames you wish to update.  Be careful, one of the questions is “Do you wish to update ALL hosts”.  If answered incorrectly this could affect hostnames in your account that are pointing at other locations.

Now that the client is installed and configured, you just need to launch it.  Simply issue this final command to launch the client in the background:

  • /usr/local/bin/noip2

Setup dynamic DNS using ddclient and configure for noip.com on CENTOS 7

yum install ddclient

There are some dependencies, however all of them should be installable from mainstream repos:

bash perl perl-Digest-SHA1 perl-Getopt-Long perl perl-IO-Socket-SSL shadow-utils systemd

Now that ddclient and it’s dependencies are installed it is time to edit it’s config file /etc/ddclient.conf:

[root@easy ~]# cat /etc/ddclient.conf
 ######################################################################
 ### (CC BY 3.0 IE) int21hex at https://laptopdoctor.wordpress.com/
 ### Based on https://www.andreagrandi.it/ blog post
 ### /etc/ddclient.conf
 ### Setup Environment

daemon=900                                     # go easy on the server
 syslog=yes
 #mail-failure=root # no place like /dev/null, leaving in for later
 pid=/var/run/ddclient/ddclient.pid
 ssl=yes

#######################################################################
 ### Workaround for ddclient to work with no-ip.com
 ### Grab external IP dyndns.com, use that for connection to noip.com
 ### Your $dynamicFQDN should be already setup

protocol=dyndns2
 use=web, web=checkip.dyndns.com/, web-skip='IP Address'
 server=dynupdate.no-ip.com
 login=$YourUsername
 password=$YourPasswd
 $dynamicFQDN
 mx=mail.$dynamicFQDN
 backupmx=no
 #wildcard=yes|no                                 # left for later

It’s not bad idea to update /etc/hosts with new domain name:

[root@easy ~]# cat /etc/hosts
 127.0.0.1 localhost.locadomain localhost
 127.0.0.1 customname.localdom customname
 192.168.xxx.xxx $dynamicFQDN

With that out of the way, it is time to set up and enable system service:

[root@easy ~]# systemctl enable ddclient.service
[root@easy ~]# systemctl start ddclient
[root@easy ~]# systemctl status ddclient
 ● ddclient.service - A Perl Client Used To Update Dynamic DNS Loaded:
 loaded (/usr/lib/systemd/system/ddclient.service; enabled; vendor
 preset: disabled)
 Active: active (running) since Sat 2017-07-01 21:47:42 IST; 2h 47min ago
 Main PID: 1629 (ddclient - slee)
 CGroup: /system.slice/ddclient.service
 └─1629 ddclient - sleeping for 300 seconds

Jul 01 21:47:40 vger systemd[1]: Starting A Perl Client Used To Update
Dynamic DNS...
Jul 01 21:47:42 vger systemd[1]: Started A Perl Client Used To Update
Dynamic DNS.

You can test if it’s working in couple ways. Noip.com dashboard will tell you if hostname is active

After ports are forwarded you can try accessing any of the services running on the server, like Webmin!

https://yourname.no-ip

Third option is to check DNS records for your $dynamicFQDN:

[root@easy ~]# nslookup $dynamicFQDN
 Server: 89.101.160.4
 Address: 89.101.160.4#53

Non-authoritative answer:
 Name: $dynamicFQDN
 Address: xxx.xxx.xxx.xxx

Enjoy!