Scanning for malware with Linux Malware Detect (LMD)

Linux Malware Detect (LMD), also known as Maldet, is a malware scanner for Linux released under the GNU GPLv2 license. It is particularly effective for the detection of php backdoors, darkmailers and many other malicious files that can be uploaded on a compromised website. It will help you do detect infected websites and clean the infection, however securing the compromised user or website is still necessary to avoid re-infection.

If the server has cPanel , we recommend you install ClamAV first, as maldet will use the ClamAV scan engine.

You will need to be logged in as root to the server over SSH.

1 – Install maldet

cd /usr/local/src/ && wget http://www.rfxn.com/downloads/maldetect-current.tar.gz && tar -xzvf maldetect-current.tar.gz && cd maldetect-* && sh install.sh

This will automatically install a cronjob inside /etc/cron.daily/maldet so a daily scan will be run for local cPanel or Plesk accounts.
2 – Make sure to update to the latest version and virus signatures:

maldet -d && maldet -u

3 – Run the first scan manually

To scan a specific user’s home directory, run the following command:

maldet -a /home/user

To launch a background scan for all user’s public_html and public_ftp in all home directories, run the following command:

maldet -b –scan-all /home?/?/public_?

(We also recommend you to scan /tmp and /dev/shm/)

4 – Verify the scan report

We recommend you to always read the scan reports before doing a quarantine. You will also be able to identify infected websites for further actions.

List all scan reports time and SCANID:

maldet –report list

Show a specific report details :

maldet –report SCANID


Show all scan details from log file:

grep “{scan}” /usr/local/maldetect/event_log


5 – Clean the malicious files

By default the quarantine is disabled. You will have to launch it manually.

maldet -q SCANID

6 – (optional) Automatically quarantine detected malware

Please review these configuration variables in /usr/local/maldetect/conf.maldet
variable     value     description
quar_hits     number     if the number is different than 0, enables automatic quarantine

7- (optional) Configure scan reports e-mail alerts

Maldet can send you and email alert each time it detects malware. Please review these configuration variables in /usr/local/maldetect/conf.maldet
variable     value     description
email_alert     1 or 0     enable or disable e-mail alerts
email_addr      e-mail address      target e-mail for notifications, should be put in quotes like: “myuser@mydomain.com”

easy-admin.ca is SSL ready!

Let’s Encrypt is a free, automated, and open certificate authority (CA), run for the public’s benefit. It is a service provided by the
Internet Security Research Group (ISRG)

We give people the digital certificates they need in order to enable HTTPS (SSL/TLS) for websites, for free, in the most user-friendly way we can. We do this because we want to create a more secure and privacy-respecting Web.

The key principles behind Let’s Encrypt are:

  • Free: Anyone who owns a domain name can use Let’s Encrypt to obtain a trusted certificate at zero cost.
  • Automatic: Software running on a web server can interact with Let’s Encrypt to painlessly obtain a certificate, securely configure it for use, and automatically take care of renewal.
  • Secure: Let’s Encrypt will serve as a platform for advancing TLS security best practices, both on the CA side and by helping site operators properly secure their servers.
  • Transparent: All certificates issued or revoked will be publicly recorded and available for anyone to inspect.
  • Open: The automatic issuance and renewal protocol will be published as an open standard that others can adopt.
  • Cooperative: Much like the underlying Internet protocols themselves, Let’s Encrypt is a joint effort to benefit the community, beyond the control of any one organization.

We have a page with more detailed information about
how the Let’s Encrypt CA works

Had a good external help from Eugene, I thank you for your great help!

Works with Webmin, Virtualmin,,, checking postfix!

have phun!

Install Let’s Encrypt

Run an ssh shell to your server.
Run the following command:

cd /usr/local/src/
git clone https://github.com/letsencrypt/letsencrypt
cd letsencrypt/
./letsencrypt-auto --help all

Now login to your webmin admin panel at:
https://siteaddress:10000/ using root username.

Webmin configuration>SSL Encryption>Let’s Encrypt

It will show you:

Let's Encrypt is a free, automated, and open certificate authority that can be used to generate an SSL certificate for use by Webmin.
Unfortunately, Let's Encrypt cannot be used on your system : The client command letsencrypt was not found on your system.
Check the module configuration page to ensure you are using the correct path to the letsencrypt or letsencrypt-auto command.

Click on “module configuration”
and type in the path and click Save:

Configuration
For module Webmin Configuration
Full path to Let's Encrypt client command: /usr/local/src/letsencrypt/letsencrypt-auto

To enable SSL certificate for a site, Go to:
Virtualmin>Edit Virtual Server>Enabled features

Enable “SSL website enabled”

To Manage the certificate:
Virtualmin>Server configuration>Manage SSL certificates

Click on Let’s Encrypt and generate a new certificate

NOTES:

To force http:// to https:// include a .htaccess with the following code

RewriteEngine On
RewriteCond %{HTTPS} off
RewriteRule (.*) https://%{HTTP_HOST}%{REQUEST_URI} [R=301,L]

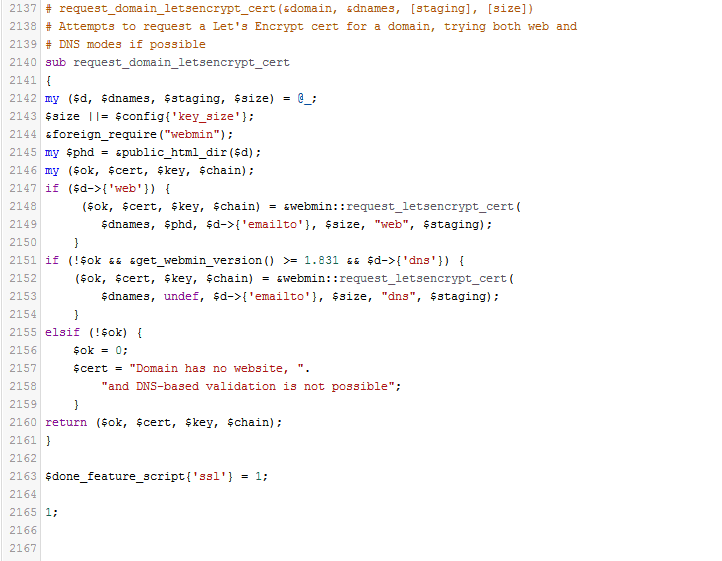
Edit the following /usr/libexec/webmin/virtual-server/feature-ssl.pl lines 2148 and 2152

Save the file and then restart Webmin. I did so from the terminal with the command:

sudo service webmin restart

Source : https://www.virtualmin.com/node/48121

StarWind Virtual SAN® Free

StarWind Virtual SAN Free targets those who need a SAN or NAS for their home lab, educational or research purposes. It is free for production use, but comes with a basic restricted set of features, compared to the full VSAN. In case a serious project is starting, StarWind Virtual SAN will come in handy. It offers a wider set of features unlocked and more usage scenarios, also being backed by StarWind support. Getting qualified assistance from expert engineers simplifies the building and maintenance of virtualization infrastructure. The complete list of differences between free and paid versions can be found here. In case there is no time for “Do-It-Yourself” tinkering, StarWind offers a turnkey solution – StarWind HyperConverged Appliance. It unifies best-of-breed software and hardware from multiple vendors and covers it with one “support umbrella”.