This is an optional feature you don’t need to do to get everything working but if you want a secure setup you should do this. TLS will allow you to setup an SSL encrypted connection between the server and the mail client. This means that the authentication that is used will be send encrypted over the internet while the normal authentication will be send in clear text over the internet making it possible for others to read.
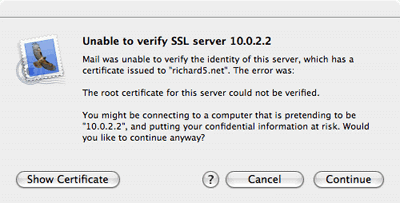
First you need to buy yourself a certificate at Thawte or Verisign, but as we are building a server on the cheap we are going to create our own certificate. The only problem you will encounter when using your own certificates is that users explicitly have to accept and verify your root certificate in contrast with certificates you buy which are already accepted in most email clients by default. If they for instance try to send their email for the first time via your secure server they need to accept your certificate. When using Mail.app in OS X they will get the following warning:

They need to press continue and from then on your certificate will be accepted and they won’t be asked again.
Just open a Terminal and execute the following command in the directory /etc/postfix:
sudo openssl req -new -outform PEM -out smtpd.cert \
   -newkey rsa:2048 -nodes -keyout smtpd.key -keyform PEM \
   -days 365 -x509
This will create a 2048 bit encryption key that, for now, is secure enough for you mailserver to use. If you are paranoid and want a bigger key just increase the number after rsa:. The key will be valid for a year, if you want a longer period just increase the number after the -days option. When the key is finished you will be asked a couple of questions you need to answer. The information will be shown to people who want to see your certificate when their mail client complains. The most important one is the ‘Common Name’, make sure that that one is the same as the mail server name.
Country Name (2 letter code) [CA]:
State or Province Name (full name) [Some-State]:
Locality Name (eg, city) []:
Organization Name (eg, company) [Internet Widgits Pty Ltd]:
Organizational Unit Name (eg, section) []:
Common Name (eg, YOUR name) []:your.mailserver.tld
Email Address []:you@yourdomain.tld
Now you have created the certificate you will have to configure Postfix to make use of it and to enforce the usage of TLS to securely communicate with the email client. You’ll have to add the following lines to the configuration file main.cf in /etc/postfix :
smtpd_enforce_tls                = no
smtpd_tls_loglevel               = 1
smtpd_use_tls                    = yes
smtpd_tls_key_file               = /etc/postfix/smtpd.key
smtpd_tls_cert_file              = /etc/postfix/smtpd.cert
Issue the command sudo postfix reload to refresh the configuration of your mail server and your ready to test it out. Start a terminal session and issue the following commands:
telnet your.mailserver.tld 25
The server will answer with:
Trying your.mailserver.tld...
Connected to your.mailserver.tld.
Escape character is ^]
220 your.mailserver.tld ESMTP Postfix
Then type in:
EHLO your.mailserver.tld
And again your server will answer it’s capabilities:
250-your.mailserver.tld
250-PIPELINING
250-SIZE 10240000
250-ETRN
250-STARTTLS
250 8BITMIME
Now it’s time to test TLS and enter in capitals:
STARTTLS
and the server should respond with:
220 Ready to start TLS
Then you know it will work, you could give your favorite email client a try.
Restart postfix : systemctl restart postfix
NOTES:
After this fix, roundcube cannot send email anymore, investigating this!
