
Author: root
Linux Backup with TAR and Cron
[flowplayer src=”https://easy-admin.ca/my_uploads/2016/03/Linux_Backup_with_TAR_and_Cron Jobs.mp4″ width=”100%”]
Level: Intermediate
Length of Class: 35 Minutes
Backup commands
# sudo tar -cvpzf backupnamedate.tar.gz –exclude=/mnt /
Recovery commands (Create /recover directory first)
sudo tar -xvpzf backupnamedate.tar.gz -C /recover
Introduction to Linux
Installing Linux
Basic Linux Tasks
VIM for File Editing
Navigation in Linux
Users, Groups and Permissions in Linux
Purpose of Class
This class teaches students how to backup directories using TAR, and demonstrates how to schedule tasks using Cron Jobs.
Topics Covered
Backing Up Directories with TAR
Recovering Directories with TAR
Setting Up Cron Jobs for Scheduled Tasks
Class Notes
Backup Using TAR
Backup = sudo tar –cvpzf backup.taz.gz –exclude/=directory (recursive) PATH
–c = create new file (overwrites old file)
–v = verbose
–p = preserve permissions
–z = compress
–f = filename (very important)
–exclude=DIRCECTORY is Recursive
Naming Files with time = filename-$(date +%F-%T)
Recover Files from a TAR File
Recover = sudo tar –xvpzf FILE –C /DIRECTORY
Capital -C = change to directory
-x = extract
Cron Jobs
To Edit the Crontab File = sudo cron –e (first time it will ask you your default editor)
Format = minute (0-59), hour (0-23, 0 = midnight), day (1-31), month (1-12), weekday (0-6, 0 = Sunday), command
* Wildcard for Every Minute/Day/Hour/Month?Day of Week
Example to Backup Entire Server for 1am Every Morning = 0 1 * * * sudo tar -cvpzf /backup.tar.gz –exclude=/mnt /
Redo Backup & Recovery

Redo Backup and Recovery for Linux or Windows system is so simple that anyone can use it and the best it’s FREE!!!. It is the easiest, most complete disaster recovery solution available. It allows bare-metal restore. Bare metal restore is not only the best solution for hardware failure, it is also the ultimate antivirus: Even if your hard drive melts or gets completely erased by a virus, you can have a completely-functional system back up and running in as little as 10 minutes.

https://sourceforge.net/projects/redobackup/
All your documents and settings will be restored to the exact same state they were in when the last snapshot was taken. Redo Backup and Recovery is a live CD, so it does not matter if you use Windows or Linux. You can use the same tool to backup and restore every machine. And because it is open source released under the GPL, it is completely free for personal and commercial use.
More Features, Less Complex
Redo Backup has the most features coupled with the simplest, most user-friendly interface:
– Easy graphical user interface boots from CD in less than a minute
– No installation needed; runs from a CD-ROM or a USB stick
– Saves and restores Windows and Linux machines
– Automatically finds local network shares
– Access your files even if you can’t log in
– Recover deleted pictures, documents, and other files
– Internet access with a full-featured browser to download drivers
– Live CD download size is only about 250MB
Will test this tool tomorrow 😉 & keep you posted! 3/6/2016 11:18pm

Perfect tool to have,!!! Worked like a charm!
3/7/2016 7:57pm
Suggestion : Backup the /www/html/ folders before & reborn the webserver files after! 😉

~ The best bare metal LINUX or WINDOWS system backup & restore tool out there for free!
How to install Perl SYSLOG on Centos 7
I was running into some problem with CSF (Config Server Security Firewall)
In the Edit Config Server Firewall (Loggin Settings) I noticed that LFD was not automatically blocking attacks on the server.
Log lfd messages to SYSLOG in addition to /var/log/lfd.log. You must have the
perl module Sys::Syslog installed to use this feature
I had to install the Sys::Syslog perl module to make it work.
[root]# yum install perl-Sys-Syslog
Restart CSF and check the message log to see if there is any error like:
localhost systemd: Unit lfd.service entered failed state.
localhost systemd: lfd.service failed.
All working good now 😉
What is ?

Usermin is a web-based interface for webmail, password changing, mail filters, fetchmail and much more. It is designed for use by regular non-root users on a Unix system, and limits them to tasks that they would be able to perform if logged in via SSH or at the console. See the standard modules page for a list of all the functions built into Usermin.
Who can use Usermin?
Most users of Usermin are sysadmins looking for a simple webmail interface to offer their customers. Unlike most other webmail solutions, it can be used to change passwords, read email with no additional servers installed (like IMAP or POP3), and setup users’ Procmail configurations for forwarding, spam filtering and autoreponders.
Usermin also provides web interfaces for viewing and managing data in MySQL and PostgreSQL databases, editing Apache .htaccess configuration files, and running commands on the server. The administrator has full control over which of these modules are available to users.
Usermin and Webmin integration
By far the easiest way to configure Usermin is via the Usermin Configuration module in Webmin. All functionality can be managed via a browser, and because both products come from the same developer the management user interface is always up to date.
Using Virtualmin: Managing unlimited Drupal sites with your own VPS
Install Dovecot on CentOS 7
Install Dovecot to configure POP/IMAP server. POP uses 110/TCP, IMAP uses 143/TCP
This example shows to configure to provide SASL function to Postfix.
[root@mail ~]# vi /etc/dovecot/dovecot.conf
# line 24: uncomment
protocols = imap pop3 lmtp
# line 30: uncomment and change ( if not use IPv6 )
listen = *
[root@mail ~]# vi /etc/dovecot/conf.d/10-auth.conf
# line 10: uncomment and change ( allow plain text auth )
disable_plaintext_auth = no
# line 100: add
auth_mechanisms = plain login
[root@mail ~]# vi /etc/dovecot/conf.d/10-mail.conf
# line 30: uncomment and add
mail_location = maildir:~/Maildir
[root@mail ~]# vi /etc/dovecot/conf.d/10-master.conf
# line 96-98: uncomment and add like follows
# Postfix smtp-auth
unix_listener /var/spool/postfix/private/auth {
mode = 0666
user = postfix
group = postfix
}
[root@mail ~]# vi /etc/dovecot/conf.d/10-ssl.conf
# line 8: change (not require SSL)
ssl = no
[root@mail ~]# systemctl start dovecot
[root@mail ~]# systemctl enable dovecot
Dovecot automatically create a folders for us 🙂
vim /etc/dovecot/conf.d/20-imap.conf
At the end of file paste following code
plugin {
autocreate = Trash
autocreate2 = Junk
autocreate3 = Drafts
autocreate4 = Sent
autosubscribe = Trash
autosubscribe2 = Junk
autosubscribe3 = Drafts
autosubscribe4 = Sent
}
Results:
# Space separated list of plugins to load (default is global mail_plugins).
mail_plugins = $mail_plugins
plugin {
autocreate = Trash
autocreate2 = Junk
autocreate3 = Drafts
autocreate4 = Sent
autosubscribe = Trash
autosubscribe2 = Junk
autosubscribe3 = Drafts
autosubscribe4 = Sent
}
Having problems with folders?
Check out the /home/username/Maildir to see if all the directory are created. If not here is the list of folder to create:
.Trash
.Junk
.Drafts
.Sent
* Make sure to add the folders to roundcube in the “Manage Folders”
Also you have to Change ownership to user:user you have created.
Working now on the .Inbox problem, will keep you posted
Why I don’t receive my email into the .Inbox?
…,,,
Install phpmyadmin in CENTOS 7
Step 1: Add the EPEL Repository
phpMyAdmin is part of Extra Packages for Enterprise Linux (EPEL), which is a community repository of non-standard packages for the RHEL distribution. First, we’ll install the EPEL repository:
rpm -iUvh http://dl.fedoraproject.org/pub/epel/7/x86_64/e/epel-release-7-5.noarch.rpm
Step 2: Install phpMyAdmin
First, you’ll follow a simple best practice: ensuring the list of available packages is up to date before installing anything new.
yum -y update
Then it’s a matter of just running one command for installation via apt-get:
yum -y install phpmyadmin
Step 3: Find Your IP Address
Step 4: Basic Configuration for phpMyAdmin
To secure phpMyAdmin we should lock down access to a specific IP address. When the phpMyAdmin package is installed, an Apache Virtual Host file is added to configure web access. Let’s edit that file:
vim /etc/httpd/conf.d/phpMyAdmin.conf
By default, the configuration for phpMyAdmin only allows access from the server on which it is installed. Find the following sections and change each IP address to the one you found in Step 3, or another IP address that will be connecting to phpMyAdmin remotely:
Require ip 127.0.0.1
Allow from 127.0.0.1
Require ip 127.0.0.1
Allow from 127.0.0.1
Then exit and save the file with the command :wq .
Restart Apache:
systemctl restart httpd
Verify that phpMyAdmin is working by visiting http://the_IP_of_your_server/phpmyadmin. For example: http://1.2.3.4/phpmyadmin
Also you will have to go remove the password authetification in the phpmyadmin conf file
After those steps simply create a user with the desired password and all privilege granted!
Et voilà!
HP Proliant Server Deployed

Up and running good

“Linux Disaster Recovery”
Relax-and-Recover is a setup-and-forget Linux bare metal disaster recovery solution. It is easy to set up and requires no maintenance so there is no excuse for not using it.

How to enable GZIP compression on Apache
Enable GZIP compression on Apache

The instructions and code below will work on Apache. If they are not working there is another way that may work for you. If the above code did not seem to work, remove it from your .htaccess file and try this one instead…
AddOutputFilterByType DEFLATE text/plain
AddOutputFilterByType DEFLATE text/html
AddOutputFilterByType DEFLATE text/xml
AddOutputFilterByType DEFLATE text/css
AddOutputFilterByType DEFLATE application/xml
AddOutputFilterByType DEFLATE application/xhtml+xml
AddOutputFilterByType DEFLATE application/rss+xml
AddOutputFilterByType DEFLATE application/javascript
AddOutputFilterByType DEFLATE application/x-javascript
This is working on the server now!

Magento WYSIWYG is not loading
The solution is (using filezilla)
- Go to: / js / mage / adminhtml / wysiwyg / tiny_mce / plugins / magentowidget
- Copy the file to the desktop: editor_plugin.js
- Go to: / js / mage / adminhtml / wysiwyg / tiny_mce / plugins /
- Create a directory called: magentotypo
- Paste the file into the directory magentotypo: editor_plugin.js
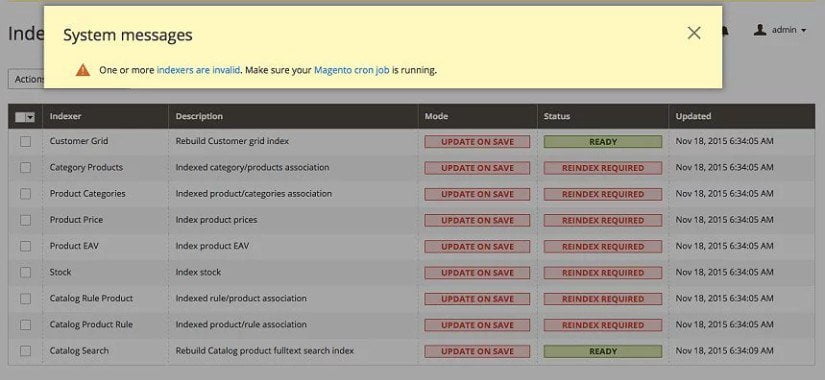
Magento “Indexers are Invalid”
After installing Magento, you have to take care of the “Indexers are invalid” problems.
To reindex in magento 2, go to the CLI and then the root folder of your magento installation and run the below command :
php bin/magento indexer:reindexThis will re-index all components of Magento
* Will find a way to make a automatic Cron job!

Magento problem after installing
Be sure to do the following only if you don’t see the /admin/ or the CSS
I had to go to my apache configuration (/etc/apache2/apache2.conf) and change this:
< Directory /var/www/>
Options Indexes FollowSymLinks
AllowOverride none
Require all granted
< /Directory>
To:
< Directory /var/www/>
Options Indexes FollowSymLinks
AllowOverride All
Require all granted
< /Directory>
et voilà!
Magento is working now,…! what a pain to install!
The biggest problem was to install the PHPmyAdmin Intl Component!
* Also, I had to upgrade MySQL5.4 to MySQL version 5.6.28
* Will upgrade to version 7.x.x soon,,, maybe!
Notice that in Webmin when you try to stop MySQL Database Server, not working anymore
Manual commands
START: systemctl start mysqld
STOP: systemctl stop mysqld
Restart: systemctl restart mysqld
Status: systemctl status mysqld
Enable at Start: systemctl enable mysqld
Don’t worry Webmin is aware about this situation, maybe in the next upgrade we will have a fix for that!
Running Webmin 1.770
CentOS7 all patched
Apache version 2.4.6
Latest PHPmyAdmin
MySQL version 5.6.28

Installing Magento on CentOS 7
Preparing Your Server for Magento
Have fun!!!!!
The following sections discuss how to download and install prerequisite software and install Magento CE or EE on a system running:
- Ubuntu 10 or later, or CentOS 6
- Apache 2.x
- nginx 1.7.x
- PHP 5.4 and required extensions
- MySQL database
SELinux Prerequisite
Security Enhanced Linux (SELinux) enables CentOS and Ubuntu administrators greater access control over their servers. If you’re using SELinux and Apache must initiate a connection to another host, you must run the commands discussed in this section.
If Apache and the database server are on the same host, you can skip this section and continue with Opening Ports In Your Firewall.
To enable Apache to initiate a connection to another host with SELinux enabled:
- To determine if SELinux is enabled, use the following command:
getenforce
Enforcingdisplays to confirm that SELinux is running. - Enter one of the following commands:
- CentOS
setsebool -P httpd_can_network_connect=1
- Ubuntu
setsebool -P apache2_can_network_connect=1
- CentOS
Opening Ports In Your Firewall
Depending on your security requirements, you might find it necessary to open port 80 and other ports in your firewall. Because of the sensitive nature of networking security, Magento strongly recommends you consult with your IT department before proceeding. Following are some suggested references:
Creating phpinfo.php
phpinfo.php displays a large amount of information about PHP and its extensions. Add the following code anywhere in your web server’s docroot:
<?php
// Show all information, defaults to INFO_ALL
phpinfo();
To view the results, enter the following URL in your browser’s location or address field:
http://web-server-ip-or-host/phpinfo.php
Installing phpmyadmin
phpmyadmin is an easy-to-use, free database administration utility. You can use it to check and manipulate the contents of your database. You must log in to phpmyadmin as the MySQL database administrative user.
For more information about phpmyadmin, see the phpmyadmin home page.
For more detailed information about installation, see the phpmyadmin installation documentation.
To install phpmyadmin on CentOS:
- Download the epel RPM for the version of CentOS you’re using. A sample follows.
cd /tmp
wget http://download.fedoraproject.org/pub/epel/6/i386/epel-release-6-8.noarch.rpm
rpm -ivh epel-release-6-8.noarch.rpm
- Install
phpmyadminas follows:yum -y install phpmyadmin
- Authorize access to phpmyadmin from your machine’s IP address.
- Open the following file for editing:
vim /etc/httpd/conf.d/phpMyAdmin.conf
- Replace the following IP address with your IP address
#Require ip 127.0.0.1
For example,
Require ip 192.51.100.101
- Replace the following IP with your IP address
#Allow from 127.0.0.1
For example,
Allow from 192.51.100.101
- Open the following file for editing:
- Save your changes to
/etc/httpd/conf.d/phpMyAdmin.confand exit the text editor. - Restart Apache.
service httpd restart
- To use phpmyadmin, enter the following command in your browser’s address or location field:
http://host-or-ip-address/phpmyadmin
- When prompted, log in using your MySQL database
rootor administrative user’s user name and password.
Creating a Magento Database Instance
This section discusses how to create a new database instance for Magento. Although a new database instance is recommended, you can optionally install Magento into an existing database instance. If you choose to do that, skip this section and continue with Installing Optional Sample Data.
To create a new database instance:
- Log in to your database server as any user.
- Enter the following commands in the order shown to create a database instance named
magento:mysql -u root -p #Enter the remaining commands at the mysql> prompt. create database magento; GRANT ALL ON magento.* TO magento@localhost IDENTIFIED BY 'magento';
- For MySQL versions between 5.0.2 and 5.1.6, you must enter this command:
GRANT SUPER ON *.* TO 'magento'@'localhost';
- After you’re done, enter
exit - Test the database instance.
mysql -u magento -p
Messages similar to the following display to confirm you successfully created the database instance. If errors display, repeat the preceding commands.
Welcome to the MySQL monitor.  Commands end with ; or \g.
Your MySQL connection id is 20
Server version: 5.1.67 Source distribution

Copyright (c) 2000, 2012, Oracle and/or its affiliates. All rights reserved.

Oracle is a registered trademark of Oracle Corporation and/or its
affiliates. Other names may be trademarks of their respective
owners.

Type 'help;' or '\h' for help. Type '\c' to clear the current input statement.
Extracting the Magento Installation Archive
Extract the Magento installation archive on your web server’s docroot.
The path on Ubuntu is typically /var/www
The path on CentOS is typically /var/www/html
Examples follow:
- Ubuntu
cd /var/www
cp /path/magento-install-archive .
tar -zxf magento-install-archive-name
- CentOS
cd /var/www/html
cp /path/magento-install-archive-name .
tar -zxf magento-install-archive
To optionally install Magento sample data, continue with the next section.
To install Magento without sample data, continue with Setting File and Directory Ownership and Privileges.
Installing Optional Sample Data
Magento provides sample data you can optionally install to give you an idea of what products look like in the Admin Panel and in your web store. You can use this sample data to learn how Magento works and to experiment with custom themes.
You must install sample data on the file system and in the database before you install Magento.
Note: Only if your database is shared between more than one Magento installation. Database table names used by the sample data are not configurable. To use sample data with a new Magento installation, you must manually add a prefix to all sample data tables and use the same prefix when you install Magento.
To skip sample data installation, continue with Setting File and Directory Ownership and Privileges.
To install Magento sample data:
- Download the sample data from one of the locations discussed in Getting Magento CE or EE.
- If necessary, transfer the sample data to your Magento server.
- On your Magento server, extract the sample data archive to a directory other than your Magento installation directory.
- Make note of the path to the sample data’s
mediasubdirectory. - Change to the
[your Magento install dir]/mediadirectory.#Ubuntu example cd /var/www/magento/media #CentOS example cd /var/www/html/magento/media
- As a user with privileges to write to the Magento installation directories (typically the web server user), copy the sample data’s
mediadirectory and subdirectories to your Magento installation directory.
For example, to copy Magento sample data from/home/usernameto/var/www/magento, entercp -R /home/username/media/* .
- Magento CE 1.9 and Magento EE 1.14 only. You must also copy the sample data’s
skindirectory to[your Magento install dir]/skinas follows:
For example, to copy Magento skin files from/home/username/skinto/var/www/magento/skin, entercd [your Magento install dir]/skin cp -R /home/username/skin/* .
- Import the CE or EE sample data into your MySQL database as follows:
mysql -u root -p magento-db-instance-name < path-to-sample-data-extract-dir/sample-data-filename.sql
EE 1.14 example
mysql -u root -p magento < /home/username/magento_sample_data_for_1.14.0.0.sql
Setting File and Directory Ownership and Privileges
Magento recommends the following ownership and privilege settings for files and directories in the Magento installation directory:
- The Magento installation directory and all subdirectories are owned by the web server user.
This enables the web server to change files in these subdirectories but other users cannot access them (except a higher-level user such asroot). - All directories have 700 permissions (
drwx------).
700 permissions give full control (that is, read/write/execute) to the owner and no permissions to anyone else. - All files have 600 permissions (
-rw-------).
600 permissions mean the owner can read and write but other users have no permissions.
Note: The way you set permissions and ownership depends on whether Magento is running on a dedicated or hosted system:
- Hosted: A Magento server located on a hosting provider. A hosted system typically does not enable you to elevate to
root. The web server typically runs as an ordinary user. Magento assumes you log in as this user to start and stop the web server and that you already own all the files and directories in the Magento installation directory. You can usechmodto change permissions on files and directories. - Dedicated: A Magento server you control and operate. Unlike a hosted system, you can elevate to
rootand, asroot, you can use thechownandchmodcommands to set ownership and privileges in the Magento installation directory.
To set privileges and ownership:
- Log in to your Magento server.
- Change to your Magento installation directory:
#Ubuntu example
cd /var/www/magento

#CentOS example
cd /var/www/html/magento
- Dedicated Magento server only. Enter the following command to set ownership of the Magento installation directory and all its subdirectories:
chown -R web-server-user-name .
For example, on Ubuntu where Apache usually runs as
www-data, enterchown -R www-data .
- Enter the following commands to set directory permissions to 700 and file permissions to 600:
find . -type d -exec chmod 700 {} \;
find . -type f -exec chmod 600 {} \;
Installing Magento CE or EE
This section discusses how to run the Magento installer, using Magento EE as an example. The Magento CE installer has exactly the same options; only the appearance is different.
Important: The procedure that follows assumes that your web server and database server are on the same host. If they are installed on different hosts, additional tasks are required. Get help before you continue your installation.
To install Magento CE or EE:
- Complete all of the tasks discussed earlier in this article.
- Enter the following URL in your web browser’s address or location field:
web-server-ip-or-host:port/magento-path/magento
For example, if your web server is
http://www.example.com, listens on port 80, and Magento is installed in the web server docroot’smagentosubdirectory, enterhttp://www.example.com/magento
Select the check box that indicates you agree to the terms and conditions, and click Continue.
- On the Localization page, enter the following information.
Option Meaning Locale From the list, click the option that best matches the locale in which your Magento server resides. Time Zone From the list, click the option that best matches the time zone in which your Magento server resides. Default currency From the list, click the default currency to use on your Magento web store. The following figure shows an example of configuring Magento for US English in the US Central time zone and using the US Dollar as the default currency.

- Click Continue.
The Configuration page displays. Each of its three sections is discussed in the following step. - In the Configuration page, enter the following information:
- In the Database Configuration section, enter the following information.
Option Meaning Database Type From the list, click MySQL. Host Enter the database server’s fully qualified host name or IP address. Use the default setting of localhost if your database server is on the same host as your web server. Database Name Enter the name of the Magento database instance in which you want to install the Magento database tables. User Name Enter the user name of the Magento database instance owner. User Password Enter the Magento database owner’s password. Tables Prefix (Optional.) Use only if you’re installing the Magento database tables in a database instance that has Magento tables in it already. In that case, enter a prefix to identify the Magento tables for this installation.Some customers have more than one Magento instance running on a server with all tables in the same database. This option enables those customers to share the database server with more than one Magento installation. A sample follows.

- In the Web Access Options section, enter the following information.
Option Meaning Base URL Enter the base URL to use to access the Magento Admin Panel and your Magento web store. Admin Path Enter the path to access the Admin Panel. This path is appended to Base URL.
For example, if Base URL ishttp://www.example.comand Admin Path isadmin, the Admin Panel’s URL ishttp://www.example.com/admin—provided you configured your web server for server rewrites.Enable Charts Select the check box to display charts on the Admin Panel. Skip Base URL Validation Before the Next Step Clearing this check box validates your server’s base URL by performing an HTTP GET. Clear this check box unless your web server’s base URL is not verifiable; for example, in a development or test environment. Use Web Server (Apache) Rewrites Select this check box to enable the use of the Apache mod_rewritemodule. You can select this check box only if you configured Apache to use server rewrites.Use Secure URLs (SSL) Select this check box only if your web server supports SSL. A sample follows.

- In the Session Storage Options section, click one of the following options:
- File to store user session data on the file system in the
[your Magento install dir]/var/sessiondirectory.
File-based session storage is appropriate unless the Magento file system access is slow or you have a clustered database. - Database to store user session data in the database.
Choose database storage if you have a clustered database; otherwise, there might not be much benefit over file-based storage.
- File to store user session data on the file system in the
- Click Continue.
 Important: If errors display, you must resolve them before continuing.
 - In the Create Admin Account page, enter the following information.
Option Meaning First Name Enter the first name of the user you want to identify as the Magento web store owner. Last Name Enter the user’s last name. Email Enter the user’s email address. Username Enter the Magento Admin Panel administrator’s user name. (You can create additional Magento administrators later.) Password Enter the user’s password. Confirm Password Enter the user’s password again for verification. Encryption Key If you have one, enter a key to encrypt sensitive data (such as passwords and personally identifiable customer information) in the Magento database. If you don’t have one, Magento generates one for you.
The encryption key is stored in[your Magento install dir]/app/etc/local.xml.A sample follows.

- Click Continue.
The following page displays to indicate a successful installation.
- In the Web Access Options section, enter the following information.
- In the Database Configuration section, enter the following information.


Verifying that Magento CE or Magento EE Installed Successfully
To make sure Magento installed properly, you should log in to the Admin Panel to verify the Magento version.
You can also import products into Magento or perform other tasks that verify you can write to the database.
- In a web browser’s location or address field, enter the URL to the Admin Panel. An example follows:
http://www.example.com/magento/admin
(The Admin Panel URL is a combination of the Base URL and Admin Path fields you entered when you installed Magento.
- Log in to the Admin Panel as an administrator.
- Scroll to the bottom of the page; the version should display as 1.14 (Magento EE) or 1.9.0.0 (Magento CE).
The following figure shows an example.


Congratulations! You successfully installed Magento!
Setting Up Cron Jobs
Several Magento features require at least one cron job, which schedules activities to occur in the future. A partial list of these activities follows:
- Catalog price rules
- Newsletters
- Generating Google sitemaps
- Customer Alerts/Notifications (product price change, product back in stock)
- Reindexing (Magento EE 1.13 only)
- Private sales (Magento EE only)
- Automatic updating of currency rates
- Magento EE 1.14.1 and later, Magento CE 1.9.1 and later All Magento e-mails (including order confirmation and transactional)
Note: Magento depends on proper cron job configuration for many important system functions, including indexing. Failure to set it up properly means Magento won’t function as expected.
Magento recommends running cron every minute for EE and every five minutes for CE.
UNIX systems schedule tasks to be performed by particular users using a crontab, which is a file that contains instructions to the cron daemon that tell the daemon in effect to “run this command at this time on this date”. Each user has its own crontab, and commands in any given crontab are executed as the user who owns the crontab.
For Magento, this user is the web server. To determine your web server’s user, enter the following command:
ps -o "user group command" -C httpd,apache2
In CentOS, the Apache user is typically apache; in Ubuntu, it’s typically www-data.
To create a cron job as the user who runs Apache, the following commands in the order shown:
- Create or edit a crontab for the Apache user:
crontab -u apache-user-name -e
- A text editor displays. (You might need to choose a text editor first.)
In the editor, enter the following:* * * * * /bin/sh /[your Magento install dir]/cron.sh
For example, for CentOS,
* * * * * /bin/sh /var/www/html/magento/cron.sh
- Save your changes to the crontab and exit the editor.
Setting Magento File System Permissions and Ownership After Installation
Setting Privileges and Ownership After You Install Magento
If you have installed Magento, you can set file system privileges and ownership as follows:
- For a dedicated Magento server, you set ownership of files and directory as the web server user. You set privileges as 500 (directories) and 400 (files).
- For a hosted Magento server on which the web server runs as the logged-in user name, you set privileges as as 500 (directories) and 400 (files).
Note: In both hosted and dedicated systems, you set the privileges for the
media/ and var/ directories at 700/600 because they must be writable.Following is an explanation of the privileges:
- 500 permissions for directories (
dr-x------) gives the web server user read and execute privileges to prevent the accidental deletion or modification of files in the directory. Other users have no access to Magento directories. - 400 permissions for files (
-r--------) prevent any user (even the web server user) from overwriting files.
This prevents attacks that depend on overwriting existing files with malicious content. - 700 permissions (
drwx------) for themedia/andvar/directories give full control (that is, read/write/execute) to the owner and no permissions to anyone else. - 600 permissions (
-rw-------) for files in themedia/andvar/directories enable the web server user to write to them and to overwrite them.
Note: On a dedicated system, all commands discussed in this article must be entered as a user with
root privileges. On a hosted system, commands must be entered as the web server user.To set up ownership and permissions on a dedicated Magento server:
- Dedicated Magento server only. As a user with
rootprivileges, find the web server user:- Apache:
- Ubuntu:
grep User /etc/apache2/apache2.conf - CentOS:
grep User /etc/httpd/conf/httpd.confNote: The preceding paths are samples only. The paths to these .conffiles on your system might be different. You can use the commandwhereis nginxto find the location of the configuration files.
Typically, the Apache web server user on CentOS is
apacheand the Apache web server user on Ubuntu iswww-data. - Ubuntu:
- nginx: Open the nginx configuration file, typically
/etc/nginx/nginx.conf. Theuserdirective specifies the user name. It might run as the Apache user if Apache is installed on the same system.
- Apache:
- Change to the Magento installation directory.
On CentOS, this is typically/var/www/html/magento. On Ubuntu, it is typically/var/www/magento. - Dedicated Magento server only. As a user with
rootprivileges, enter the following command to set ownership of the Magento installation directory and all its subdirectories:chown -R web-server-user-name .
For example, on Ubuntu where Apache usually runs as
www-data, enterchown -R www-data .
- Enter the following commands to set permissions:
find . -type f -exec chmod 400 {} \;
find . -type d -exec chmod 500 {} \;
find var/ -type f -exec chmod 600 {} \;
find media/ -type f -exec chmod 600 {} \;
find var/ -type d -exec chmod 700 {} \;
find media/ -type d -exec chmod 700 {} \;
chmod 700 includes
chmod 600 includes/config.php
Securing Magento Extensions
If you set permissions and ownership as discussed in this article, you must change permissions temporarily to be able to use the Magento Connect Manager in the Admin Panel. (System > Magento Connect > Magento Connect Manager). You can still install extensions manually, however; that is beyond the scope of this article.
You can confirm the issue when you access Magento Connect Manager in the Admin Panel. The following error displays on the Extensions tab page:
Warning: Your Magento folder does not have sufficient write permissions.
To use Magento Connect Manager, you must:
- Temporarily set 700/600 permissions on your Magento installation directory and subdirectories.
- Install the extension.
Magento Connect Manager typically installs extensions with 777 (world-writable) permissions. - Set permissions back to their recommended values.
In addition, if you have a dedicated Magento server, you should check ownership of files and directories and reset them if necessary. Often, Magento Connect Manager installs extensions with user and group ownership both set to the web server user.
Temporarily Resetting Permissions on Your Magento Installation Directory
To temporarily set file and directory permissions so you can use Magento Connect Manager:
- Change to the Magento installation directory.
On CentOS, this is typically/var/www/html/magento. On Ubuntu, it is typically/var/www/magento. - Enter the following commands:
find . -type d -exec chmod 700 {} \; find . -type f -exec chmod 600 {} \; - Install your extension using the Magento Connect Manager.
Restoring the Recommended Permissions
Enter the commands discussed in this section to return permissions and ownership to their recommended values after you have installed extensions.
To restore Magento installation directory permissions:
- Change to the Magento installation directory.
On CentOS, this is typically/var/www/html/magento. On Ubuntu, it is typically/var/www/magento. - Dedicated Magento server only. As a user with
rootprivileges, enter the following command to set ownership of the Magento installation directory and all its subdirectories:chown -R web-server-user-name .
For example, on Ubuntu where Apache usually runs as
www-data, enterchown -R www-data .
- Enter the following commands to set permissions:
find . -type f -exec chmod 400 {} \;
find . -type d -exec chmod 500 {} \;
find var/ -type f -exec chmod 600 {} \;
find media/ -type f -exec chmod 600 {} \;
find var/ -type d -exec chmod 700 {} \;
find media/ -type d -exec chmod 700 {} \;
Applying Magento Support Patches
Magento Support typically provides a shell script to patch various Magento issues. When you run the shell script, file and directory permissions are typically not changed; however, the files provided with the patch are owned by the user who applied the patch. If you have a dedicated Magento server, this is typically root; therefore, after applying the patch, you must change file ownership.
If you are required to apply a patch provided by Magento Support, use the following process:
- Get the patch from Magento Support.
- Follow the instructions provided with the patch.
Typically, you run a shell script as either a user withrootprivileges or as the owner of the Magento installation directory. - If you ran the patch as the owner of the Magento installation directory, you’re done. File permissions aren’t usually changed; however, you should check and reapply file and directory privileges if necessary.
- If you ran the patch as a user with
rootprivileges, use the following steps to reset file ownership: - Dedicated Magento server only. Find the web server user:
- Apache:
- Ubuntu:
grep User /etc/apache2/apache2.conf - CentOS:
grep User /etc/httpd/conf/httpd.conf
Typically, the Apache web server user on CentOS is
apacheand the Apache web server user on Ubuntu iswww-data. - Ubuntu:
- nginx: Open the nginx configuration file, typically
/etc/nginx/nginx.conf. Theuserdirective specifies the user name. It might run as the Apache user if Apache is installed on the same system.
- Apache:
- As a user with
rootprivileges, enter the following command from the Magento installation directory:
chown -R web-server-user-name .For example, on Ubuntu where Apache usually runs aswww-data, enterchown -R www-data.
During the installation, errors like the following display:
Path "/var/www/html/magento/app/etc" must be writable.

Allow HTTPD to send email
Allow HTTPD to send email SELinux
*****  Plugin httpd_can_sendmail (91.4 confidence) suggests   ****************

If you want to allow httpd to send mail
Then you must setup SELinux to allow this
Do
setsebool -P httpd_can_sendmail=1

*****  Plugin catchall (9.59 confidence) suggests   **************************

If you believe that sendmail.postfix should be allowed open access on the main.cf file by default.
Then you should report this as a bug.
You can generate a local policy module to allow this access.
Do
allow this access for now by executing:
# grep sendmail /var/log/audit/audit.log | audit2allow -M mypol
# semodule -i mypol.pp

Installing (CSF) on CentOS 7
Installing Config Security Firewall (CSF) on CentOS 7 and Webmin
ConfigServer Security & Firewall (CSF) is a stateful packet inspection firewall (SPI), login/intrusion detection, and security application for Linux servers. It is a very popular security suite, but isn’t officially supported yet on CentOS 7.
CentOS 7 uses firewalld rather than iptables. A quick internet search will show that many faithful CentOS users find firewalld far too complicated for their needs and are reverting back to iptables. Iptables was the standard firewall for CentOS 5 and 6.
This guide shows you how to disable firewalld, install IP tables, CSF dependencies, and CSF.
Install CSF
Stop and disable firewalld.
   systemctl disable firewalld
   systemctl stop firewalld
Install iptables.
yum -y install iptables-servicesCreate files needed by iptables.
  touch /etc/sysconfig/iptables
  touch /etc/sysconfig/iptables6
Start iptables.
  systemctl start iptables
  systemctl start ip6tables
Enable iptables at boot.
  systemctl enable iptables
  systemctl enable ip6tables
Install the CSF dependencies.
yum -y install wget perl unzip net-tools perl-libwww-perl perl-LWP-Protocol-https perl-GDGraph -yDownload and launch the CSF installer.
  cd /opt
  wget https://download.configserver.com/csf.tgz
  tar -xzf csf.tgz
  cd csf
  sh install.sh
Remove the installation files.
 rm -rf /opt/csf
 rm /opt/csf.tgz
(Optional) Webmin integration
If you use Webmin, then you can install the CSF Webmin module.
Login to Webmin and navigate to the following page.
Webmin > Webmin Configuration > Webmin Modules >Click “From local file” and insert the following.
/usr/local/csf/csfwebmin.tgz > Install the module & enjoy!

WordPress does not load outside my local network
My WordPress website will not load outside my local network!
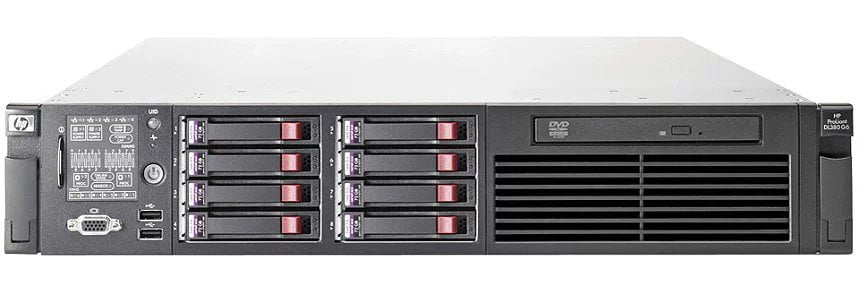
Server Specifications (HP PROLIANT DL380-G6 DUAL XEON)
CentOS 7
MySQL
PHP
Apache
WordPress
All latest version but….
* You should stick to MySQL version 5.5.44 for now! (25-12-2015)
Solutions
1. Check your wp-config.php file that reside in the root of your WordPress directory
You have to look for this code section
/**#@+
* Authentication Unique Keys and Salts.
*
* Change these to different unique phrases!
* You can generate these using the {@link https://api.wordpress.org/secret-key/1.1/salt/ WordPress.org secret-key service}
* You can change these at any point in time to invalidate all existing cookies. This will force all users to have to log in again.
*
* @since 2.6.0
*/
define(‘AUTH_KEY’, ‘@z]6-zHz-}c:i?+Dq14vez%2be~V93_Ig{X9c-|O.t9Ab?^+k;-m)bZ=qNvZ1,x$’);
define(‘SECURE_AUTH_KEY’, ‘ <;Sq]#!~a0xC|kqzVRuPG@DIJRnk:1FT(1qB[1v[bi/h >t@^/{ Lav24)BEO&[‘);
define(‘LOGGED_IN_KEY’, ‘A+;~!`7,W ,wE>=Kn4.BzCbdx34O_JMkOI)b2%Ez$RzT)O:2[b|+19mrh)IAWOGo’);
define(‘NONCE_KEY’, ‘s[L2u1&rpt8C)]bZqf7]`zof>fAswRg0y|qZZ)vcDX*/j-Ez[|PW}:eO-8AlHJ8k’);
define(‘AUTH_SALT’, ‘KW8wra;81,>O:k4Z8(2+(YZEDX>K/vF@KdYeS0a*Mom)*<g6e+1lf -n@_w>bFyn’);
define(‘SECURE_AUTH_SALT’, ‘e5if.r^`P?KK;nkv<h[[FbH^w&5nc]>Dy(Dx#z3sYg(-9
Hello world!
H A P P Y H O L I D A Y ‘ S