What is ?

usermin

Usermin is a web-based interface for webmail, password changing, mail filters, fetchmail and much more. It is designed for use by regular non-root users on a Unix system, and limits them to tasks that they would be able to perform if logged in via SSH or at the console. See the standard modules page for a list of all the functions built into Usermin.

Who can use Usermin?

Most users of Usermin are sysadmins looking for a simple webmail interface to offer their customers. Unlike most other webmail solutions, it can be used to change passwords, read email with no additional servers installed (like IMAP or POP3), and setup users’ Procmail configurations for forwarding, spam filtering and autoreponders.

Usermin also provides web interfaces for viewing and managing data in MySQL and PostgreSQL databases, editing Apache .htaccess configuration files, and running commands on the server. The administrator has full control over which of these modules are available to users.

Usermin and Webmin integration

By far the easiest way to configure Usermin is via the Usermin Configuration module in Webmin. All functionality can be managed via a browser, and because both products come from the same developer the management user interface is always up to date.

http://www.webmin.com/usermin.html

Install Dovecot on CentOS 7

Install Dovecot to configure POP/IMAP server. POP uses 110/TCP, IMAP uses 143/TCP

This example shows to configure to provide SASL function to Postfix.

[root@mail ~]# vi /etc/dovecot/dovecot.conf

# line 24: uncomment
protocols = imap pop3 lmtp

# line 30: uncomment and change ( if not use IPv6 )
listen = *

[root@mail ~]# vi /etc/dovecot/conf.d/10-auth.conf

# line 10: uncomment and change ( allow plain text auth )
disable_plaintext_auth = no

# line 100: add
auth_mechanisms = plain login

[root@mail ~]# vi /etc/dovecot/conf.d/10-mail.conf

# line 30: uncomment and add
mail_location = maildir:~/Maildir

[root@mail ~]# vi /etc/dovecot/conf.d/10-master.conf

# line 96-98: uncomment and add like follows
# Postfix smtp-auth
unix_listener /var/spool/postfix/private/auth {
mode = 0666
user = postfix
group = postfix
}

[root@mail ~]# vi /etc/dovecot/conf.d/10-ssl.conf
# line 8: change (not require SSL)
ssl = no

[root@mail ~]# systemctl start dovecot

[root@mail ~]# systemctl enable dovecot

Dovecot automatically create a folders for us 🙂

vim /etc/dovecot/conf.d/20-imap.conf

At the end of file paste following code

plugin {
autocreate = Trash
autocreate2 = Junk
autocreate3 = Drafts
autocreate4 = Sent
autosubscribe = Trash
autosubscribe2 = Junk
autosubscribe3 = Drafts
autosubscribe4 = Sent
}

Results:

# Space separated list of plugins to load (default is global mail_plugins).

mail_plugins = $mail_plugins
plugin {
autocreate = Trash
autocreate2 = Junk
autocreate3 = Drafts
autocreate4 = Sent
autosubscribe = Trash
autosubscribe2 = Junk
autosubscribe3 = Drafts
autosubscribe4 = Sent
}

Having problems with folders?

Check out the /home/username/Maildir to see if all the directory are created. If not here is the list of folder to create:

.Trash
.Junk
.Drafts
.Sent

* Make sure to add the folders to roundcube in the “Manage Folders”

Also you have to Change ownership to user:user you have created.

Working now on the .Inbox problem, will keep you posted

Why I don’t receive my email into the .Inbox?

…,,,

Install phpmyadmin in CENTOS 7

Step 1: Add the EPEL Repository

phpMyAdmin is part of Extra Packages for Enterprise Linux (EPEL), which is a community repository of non-standard packages for the RHEL distribution. First, we’ll install the EPEL repository:

rpm -iUvh http://dl.fedoraproject.org/pub/epel/7/x86_64/e/epel-release-7-5.noarch.rpm

Step 2: Install phpMyAdmin

First, you’ll follow a simple best practice: ensuring the list of available packages is up to date before installing anything new.

yum -y update

Then it’s a matter of just running one command for installation via apt-get:

yum -y install phpmyadmin

Step 3: Find Your IP Address

Step 4: Basic Configuration for phpMyAdmin

To secure phpMyAdmin we should lock down access to a specific IP address. When the phpMyAdmin package is installed, an Apache Virtual Host file is added to configure web access. Let’s edit that file:

vim /etc/httpd/conf.d/phpMyAdmin.conf

By default, the configuration for phpMyAdmin only allows access from the server on which it is installed. Find the following sections and change each IP address to the one you found in Step 3, or another IP address that will be connecting to phpMyAdmin remotely:

Require ip 127.0.0.1

Allow from 127.0.0.1

Require ip 127.0.0.1

Allow from 127.0.0.1

Then exit and save the file with the command :wq .

Restart Apache:

systemctl restart httpd

Verify that phpMyAdmin is working by visiting http://the_IP_of_your_server/phpmyadmin. For example: http://1.2.3.4/phpmyadmin

Also you will have to go remove the password authetification in the phpmyadmin conf file

After those steps simply create a user with the desired password and all privilege granted!

Et voilĂ !

How to enable GZIP compression on Apache

Enable GZIP compression on Apache

pagespeed-magento-2

The instructions and code below will work on Apache. If they are not working there is another way that may work for you. If the above code did not seem to work, remove it from your .htaccess file and try this one instead…

AddOutputFilterByType DEFLATE text/plain
AddOutputFilterByType DEFLATE text/html
AddOutputFilterByType DEFLATE text/xml
AddOutputFilterByType DEFLATE text/css
AddOutputFilterByType DEFLATE application/xml
AddOutputFilterByType DEFLATE application/xhtml+xml
AddOutputFilterByType DEFLATE application/rss+xml
AddOutputFilterByType DEFLATE application/javascript
AddOutputFilterByType DEFLATE application/x-javascript

This is working on the server now!

Magento WYSIWYG is not loading

The solution is (using filezilla)

  1. Go to: / js / mage / adminhtml / wysiwyg / tiny_mce / plugins / magentowidget
  2. Copy the file to the desktop: editor_plugin.js
  3. Go to: / js / mage / adminhtml / wysiwyg / tiny_mce / plugins /
  4. Create a directory called: magentotypo
  5. Paste the file into the directory magentotypo: editor_plugin.js

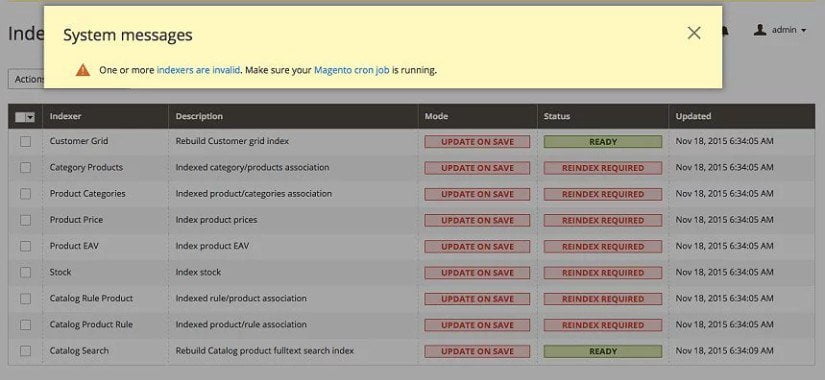
Magento “Indexers are Invalid”

After installing Magento, you have to take care of the “Indexers are invalid” problems.

To reindex in magento 2, go to the CLI and then the root folder of your magento installation and run the below command :

php bin/magento indexer:reindex

This will re-index all components of Magento

* Will find a way to make a automatic Cron job!

Magento problem after installing

Be sure to do the following only if you don’t see the /admin/ or the CSS

I had to go to my apache configuration (/etc/apache2/apache2.conf) and change this:

< Directory /var/www/>
Options Indexes FollowSymLinks
AllowOverride none
Require all granted
< /Directory>

To:

< Directory /var/www/>
Options Indexes FollowSymLinks
AllowOverride All
Require all granted
< /Directory>

et voilĂ !

Magento is working now,…! what a pain to install!

The biggest problem was to install the PHPmyAdmin Intl Component!

* Also, I had to upgrade MySQL5.4 to MySQL version 5.6.28
* Will upgrade to version 7.x.x soon,,, maybe!

Notice that in Webmin when you try to stop MySQL Database Server, not working anymore

Manual commands

START: systemctl start mysqld
STOP: systemctl stop mysqld
Restart: systemctl restart mysqld
Status: systemctl status mysqld
Enable at Start: systemctl enable mysqld

Don’t worry Webmin is aware about this situation, maybe in the next upgrade we will have a fix for that!

Running Webmin 1.770
CentOS7 all patched
Apache version 2.4.6
Latest PHPmyAdmin
MySQL version 5.6.28