Backup Server using Mondo Rescue

Good day! Here is a good tool to backup your entire CentOS server called Mondo Rescue.

First step! Download MondoRescue Repository for your Linux OS distribution version using following command:

cd /etc/yum.repos.d/
wget ftp://ftp.mondorescue.org/rhel/6/x86_64/mondorescue.repo

After downloading MondoRescue Repository, run the following command to install MondoRescue.

# yum install mondo

After installing Mondo, Run “mondoarchive” command from “root” user. Then follow steps according to screenshot that shows how to create Backup/Clone in ISO based backup media of your full system.

# mondoarchive

First you need to choose the backup media and press Enter.

mondo-rescue-step-1

Please enter the full path name to the directory for your ISO Images and press Enter.

mondo-rescue-step-2

Now select the type of compression type like: bzip2, gzip, lzo & lzma and press Enter.

mondo-rescue-step-3

Now select the compression level and press Enter.

mondo-rescue-step-4

Please enter how large you want each ISO image in MB (Megabytes) and press Enter.

mondo-rescue-step-5

Please give the name of ISO image filename and press Enter.

mondo-rescue-step-6

Please add the filesystems to backup (separated by “|“). The default filesystem is “/” means full backup.

mondo-rescue-step-7

Please exclude the filesystem that you don’t want to backup like /tmp.

mondo-rescue-step-8

Please enter your temporary directory path or select default one.

mondo-rescue-step-9

Now enter your scratch directory path or select default one.

mondo-rescue-step-10

If you would like to backup extended attributes. Just press “enter“.

mondo-rescue-step-11

It will found full path name of your Kernel.

mondo-rescue-step-12

If you want to Verify your backup, then Click “Yes“

mondo-rescue-step-13

If you want to proceed the backup then click on “Yes”

mondo-rescue-step-14

Creating a catalog of “/” filesystem.

mondo-rescue-step-15

Dividing filelist into sets.

mondo-rescue-step-16

Follow up the other setup and build your backup. You may also take a look at the log file located here:

# /var/log/mondoarchive.log

NOTE : Your backup will be located in /var/cache/mondo/

I ran into a problem with one of my HP Server

Error: Package: perl-IO-Interface-1.05-2.el6.x86_64 (mondorescue)
Requires: perl(:MODULE_COMPAT_5.10.1)

5_10_missing

5.10… 😉 missing!

Have fun!

Midnight Commander in ClearOS

Install Midnight Commander on ClearOS 7+

GNU Midnight Commander (also known as mc) is a free and visual file manager, licensed under GNU General Public License. It is a clone of Norton Commander. It was started by Miguel de Icaza in 1994. It’s a feature rich full-screen text mode application that allows you to copy, move and delete files and whole directory trees, search for files and run commands in the subshell. Internal viewer and editor are included.

Features

Midnight Commander is quite powerful and boasts an extensive set of features:

  • Performs all the common file and directory manipulations such as copying, moving, renaming, linking, and deleting.
  • Allows manipulation of file and directory permissions.
  • Can treat remote systems (via FTP or SSH) as though they were local directories.
  • Can treat archive files (like .tar and .zip) as though they were local directories.
  • Allows creation of a user-defined “hotlist” of frequently used directories.
  • Can search for files based on file name or file contents, and treat the search results like a directory.

Install Midnight Commander (mc) On Centos / RHEL / Fedora Linux / ClearOS

# yum -y install mc

How do I use mc?

Simply type the following command:

# mc

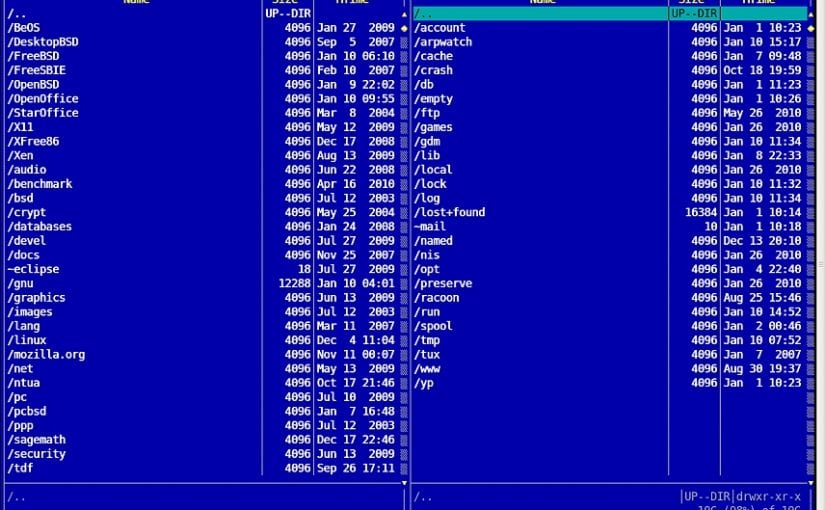
Sample outputs:

NOTE : Midnight Commander also support your mouse device 😉

Enjoy!

Prevent new user to browse your CentOS server using sFTP

Good day! I run into a problem yesterday that allowed a new created account to navigate my entire CentOS server when connecting using sFTP protocol. Here is the step by step guide to fix this major problem in CentOS/Webmin/VirtualMIN.

    1. Create a new account in VirtualMIN / Ex. mynewwebsite.com
      After you created the new account you will have to set things up so that when this new account user connect to your sFTP (I use proFTPD) they will not be able to navigate your entire server.

NOTE: You will have to create a new UserGroup : sftpusers

In webmin, navigate to this section /Others/File Manager/ Once you are there select the new created account

/home/mynewwebsite

You will have to do 3 more steps

  1. CHOWN the new created directory to ROOT
    NOTE : Do not use recursive!
  2. You have to set now the directory permissions to 0755
  3. Run this command in Shell # usermod -G sftpusers USERNAME

proftpd-root-01

NOTE : This will add your new created account to the sFTPusers group!

After this your new created account will only have permission to navigate into the directory /home/mynewwebsite/ when connecting with sFTP.

Enjoy!