NOTE: https://www.feistyduck.com/library/apache%2dsecurity/online/
Introduction
Apache is one of the most widely-used and popular web servers. It is also one of the most secure web servers available. In this article, I will explain some tips and tricks that will secure your Apache server.
Requirements
- A server running CentOS v. 7 with Apache installed
- A static IP address for your server
- Firefox browser with the Firebug add-on installed (for testing)
Hide the Apache version
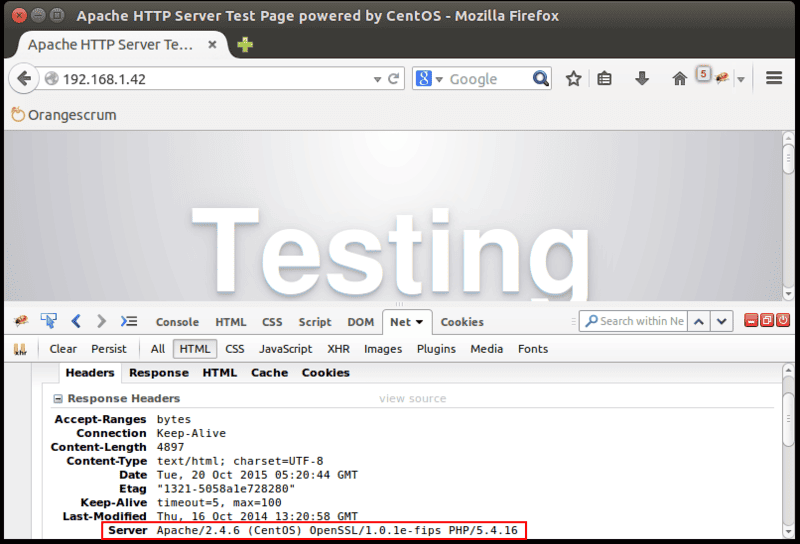
Visit your web server in Firefox. Activate Firebug by clicking the Firebug icon on the top right side.
If you check the HTTP response headers in Firebug, it will show the Apache version along with your operating system name and version, as shown in this screenshot:

To hide this information from browsers, you will need to make some changes in Apache’s main configuration file.
You can do this by editing the httpd.conf file:
sudo nano /etc/httpd/conf/httpd.conf
Add the following line at the end of file:
ServerSignature Off
ServerTokens Prod
Save the file and restart the Apache service to reflect these changes:
sudo apachectl restart
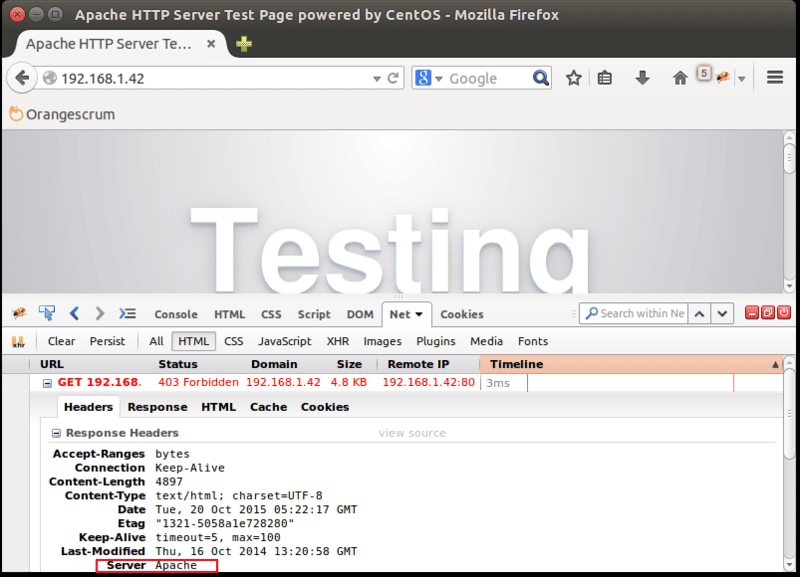
Now, open Firefox and access your web server. Check the HTTP response headers in Firebug, You can see that setting ServerSignature to Off has removed the version information from Server.

Turn off directory listing
Directory listing in the absence of an index file is enabled by default in Apache. Directory listing displays all the files from the Apache web root directory. If this is enabled, then a hacker can easily view any file, analyze it, and obtain sensitive information about an application of your Apache server.
You can turn off this setting by using the Options directive in the Apache configuration file for a specific web directory.
sudo nano /etc/httpd/conf/httpd.conf
Find the section that begins with Directory /var/www/html and add -Indexes in the Options directive:
<Directory /var/www/html/>
    Options -Indexes
    AllowOverride None
    Require all granted
</Directory>
Save the file and restart Apache service to reflect these changes.
sudo apachectl restart
Next, try to visit your website in a browser. You will get a “Forbidden” error.
Disable unnecessary modules
By default Apache comes with lots of unnecessary installed modules. It is a good policy to disable any unnecessary modules that are not in use.
You can list all enabled modules on your server using the following command:
sudo grep LoadModule /etc/httpd/conf.modules.d/00-base.conf
From the enabled modules in 00-base.conf file, some modules like mod_info, mod_userdir, mod_autoindex are enabled but not needed.
You can disable this modules by editing the 00-base.conf file:
sudo nano /etc/httpd/conf.modules.d/00-base.conf
Insert a # at the beginning of the following lines to disable the modules:
#LoadModule info_module modules/mod_info.so
#LoadModule userdir_module modules/mod_userdir.so</code></pre>
Save the file and restart Apache service to reflect these changes.
sudo apachectl restart
Disable Apache’s FollowSymLinks
By default Apache follows symbolic links (symlinks). Turning this off is recommended for security.
To do this, you need to edit httpd.conf file:
sudo nano /etc/httpd/conf/httpd.conf
Find the section that begins with Directory /var/www/html. Add -FollowSymLinks in option directive:
<Directory /var/www/html/>
    Options -Indexes -FollowSymLinks
    AllowOverride None
    Require all granted
</Directory>
Now restart Apache to reflect changes.
sudo apachectl restart
Turn off server-side includes (SSI) and CGI execution
Server-side includes (SSI) are directives present on Web applications that are placed in HTML pages. An SSI attack allows a web application to be exploited by remotely executing arbitrary codes. The attacker can access sensitive information like password files, and execute shell commands. It is recommended that you disable server side includes and CGI execution if they are not needed.
To do this, edit the main Apache config file:
sudo nano /etc/httpd/conf/httpd.conf</code></pre>
Find the section that begins with Directory /var/www/html, Add -ExecCGI and -Includes in option directive:
<Directory /var/www/html/>
    Options -Indexes -FollowSymLinks -ExecCGI -Includes
    AllowOverride None
    Require all granted
</Directory>
Now restart Apache to reflect the changes.
sudo apachectl restart
You can also do this for specific web directories. For example, to turn off Includes and CGI file executions for /var/www/html/www.vhost1.com directory:
sudo nano /etc/httpd/conf/httpd.conf
Add the following line:
<Directory /var/www/html/www.vhost1.com/>
    Options -Includes -ExecCGI
</Directory>
Save the file and restart Apache.
sudo apachectl restart
Limit request size
By default Apache has no limit on the size of the HTTP request. This can allow hackers to send large number of data.
You can limit the requests size by using the Apache directive LimitRequestBody in combination with the Directory tag. This can help protect your web server from a denial of service (DOS) attack.
Suppose you have a site (www.example.com), where you allow uploads, and you want to limit the upload size on this site.
You can set value from 0 (unlimited) to 2147483647 (2GB) in the main Apache config file.
For example, to limit the request size for the /var/www/html/www.example.com directory to 200K:
sudo nano /etc/httpd/conf/httpd.conf
Add the following line:
<Directory /var/www/html/www.example.com>
    LimitRequestBody 204800
</Directory>
Save the file and restart Apache.
sudo apachectl restart
Disallow browsing outside the document root
Unless you have a specific need, it is recommended to restrict Apache to being only able to access the document root.
You can secure the root directory / with Allow and Deny options in the httpd.conf file.
sudo nano /etc/httpd/conf/httpd.conf
Add/edit the following line:
<Directory />
    Options None
    Order deny,allow
    Deny from all
</Directory>
Save the file and restart Apache:
sudo apachectl restart
- Options None : This will turn off all options
- Order deny,allow : The order in which the allow and deny commands are applied
- Deny from all : This will deny request from all to the root directory
Keep Apache up to date
The Apache Server has a good record for security. New Apache updates will contain patches that will reduce vulnerability of your Apache server. You should always be using the most recent version of Apache server.
You can update your Apache to the most recent version by running the following command:
sudo yum update httpd
Secure Apache from clickjacking attacks
Clickjacking, also known as “User Interface redress attack,” is a malicious technique to collect an infected user’s clicks. Clickjacking tricks the victim (visitor) into clicking on an infected site.
To avoid this, you need to use X-FRAME-OPTIONS to prevent your website from being used by clickjackers.
You can do this by editing the httpd.conf file:
sudo nano /etc/httpd/conf/httpd.conf
Add the following line:
Header append X-FRAME-OPTIONS "SAMEORIGIN"
Save the file and restart Apache:
sudo apachectl restart
Now, open Firefox and visit your website. When you check the HTTP response headers in Firebug, you should see X-Frame-Options
Disable ETag
ETags (entity tags) are a well-known point of vulnerability in Apache web server. ETag is an HTTP response header that allows remote users to obtain sensitive information like inode number, child process ids, and multipart MIME boundary. ETag is enabled in Apache by default.
To prevent this vulnerability, disabling ETag is recommended.
You can do this by editing httpd.conf file:
sudo nano /etc/httpd/conf/httpd.conf
Add the following line:
FileETag None
Save the file and restart Apache:
sudo apachectl restart
Now, open Firefox and visit your website. When you check the HTTP response headers in Firebug, you should not see Etag listed.
HTTP request methods
Apache support the OPTIONS, GET, HEAD, POST, CONNECT, PUT, DELETE, and TRACE method in HTTP 1.1 protocol. Some of these may not be required, and may pose a potential security risk. It is a good idea to only enable HEAD, POST, and GET for web applications.
You can do this by editing the httpd.conf file:
sudo nano /etc/httpd/conf/httpd.conf
Find the section that begins with Directory /var/www/html. Add the following lines under this section:
<LimitExcept GET POST HEAD>
    deny from all
</LimitExcept>
Save the file and restart Apache:
sudo apachectl restart
Secure Apache from XSS attacks
Cross-site scripting (XSS) is one of the most common application-layer vulnerabilities in Apache server. XSS enables attackers to inject client-side script into web pages viewed by other users. Enabling XSS protection is recommended.
You can do this by editing the httpd.conf file:
sudo nano /etc/httpd/conf/httpd.conf
Add the following line:
<IfModule mod_headers.c>
    Header set X-XSS-Protection "1; mode=block"
</IfModule>
Save the file and restart Apache to reflect changes.
sudo apachectl restart
Now, open Firefox and visit your website. When you check HTTP response headers in Firebug, you should see that XSS Protection is enabled and mode is blocked.
Protect cookies with HTTPOnly flag
You can protect your Apache server from most of the common Cross Site Scripting attacks using the HttpOnly and Secure flags for cookies.
You can do this by editing the httpd.conf file:
sudo nano /etc/httpd/conf/httpd.conf
Add the following line:
<IfModule mod_headers.c>
    Header edit Set-Cookie ^(.*)$ $1;HttpOnly;Secure
</IfModule>
Save the file and restart Apache to reflect changes.
sudo apachectl restart