We’re making it possible for everyone to experience a secure and privacy-respecting Web. We make it easy to get certificates for HTTPS, because ease of use is critical for adoption. We provide certificates free of charge, because cost excludes people. Our certificates are available in every country in the world, because the secure Web is for everyone. We strive to be open and transparent, because these values are essential for trust.
Author: root
Quality open source alternative to SonicWALL and WatchGuard
Untangle’s Firewall filters traffic based on IP address, protocol and ports and allows administrators to designate which systems and services (http, ftp, etc.) are publicly available, create a DMZ and perform NAT (with Router), and run as a transparent bridge to complement existing hardware.
Untangle is much more than a firewall. It is, in fact, a Linux distribution that includes a host of software written by other developers. Software includes a Web Filter, Spam Blocker, Spyware Blocker, Virus Blocker, Phish Blocker, Instrusion Prevention, Attack Blocker, OpenVPN, Router, Untangle Reports, and Untangle Platform.
Features include:
- Blocks sessions based on simple rules
- Rules can be based on a variety of attributes
- Custom logging, blocking or passing rules can be created by:
- protocol
- direction
- source address
- destination address
- source port
- destination port
Source : https://www.untangle.com/
Install Bro on CentOS 7.X/6.X

Required Dependencies
Bro requires following dependancies to work properly
- Libpcap (Package name=libpcap-devel)
- OpenSSL libraries (openssl-devel)
- BIND8 library (already installed in centos)
- Libz (already install in centos)
- Bash (for BroControl)
- Python (for BroControl) (python-devel)
To build Bro from source following addition dependancies are required
- CMake 2.6.3 or greater (http://www.cmake.org)(cmake)
- Make(make)
- C/C++ compiler(gcc-c++, gcc)
- SWIG (http://www.swig.org)(swig)
- Bison (GNU Parser Generator)(bison)
- Flex (Fast Lexical Analyzer)(flex)
- Libpcap headers (http://www.tcpdump.org)(libpcap-devel)
- OpenSSL headers (http://www.openssl.org)(openssl-devel)
- zlib headers(zlib-devel)
- Perl (perl)
Let us install all of above dependancies first
sudo yum install cmake make gcc gcc-c++ flex bison libpcap-devel openssl-devel python-devel swig zlib-devel perl
Optional Dependencies
Following are the optional dependancies, bro can make use of them if they are availble at build time
- LibGeoIP (for geolocating IP addresses)
- sendmail (enables Bro and BroControl to send mail)
- gawk (enables all features of bro-cut)
- curl (used by a Bro script that implements active HTTP)
- gperftools (tcmalloc is used to improve memory and CPU usage)
- ipsumdump (for trace-summary; http://www.cs.ucla.edu/~kohler/ipsumdump)
- Ruby executable, library, and headers (for Broccoli Ruby bindings)
LibgeoIP
During the process of creating policy scripts the need may arise to find the geographic location for an IP address. Bro has support for the GeoIP library at the policy script level beginning with release 1.3 to account for this need. To use this functionality, you need to first install the libGeoIP software, and then install the GeoLite city database before building Bro.
Libgeoip allows bro to
sudo yum install GeoIP-devel
A country database for GeoIPLite is included when you do the C API install, but for Bro, we are using the city database which includes cities and regions in addition to countries.
Download the GeoLite city binary database.
wget http://geolite.maxmind.com/download/geoip/database/GeoLiteCity.dat.gz
#unzip the database
gunzip GeoLiteCity.dat.gz
move data base to required diretory
sudo mv GeoLiteCity.dat /usr/share/GeoIP/GeoIPCity.dat
Install gawk
GNU implementation of famous awk utility
sudo yum install gawk
Install gperftools(google performance tools)
Gperftools is a collection of a high-performance multi-threaded malloc() implementation, plus some pretty nifty performance analysis tools
sudo yum install gperftools
Ipsumdump
The ipsumdump program reads IP packets from one or more data sources, then summarizes those packets into a line-based ASCII file. The resulting summary dump is easy to process with text-based tools
#Download the latest version from here
wget http://www.read.seas.harvard.edu/~kohler/ipsumdump/ipsumdump-1.85.tar.gz
tar -xvf ipsumdump-1.85.tar.gz
cd ipsumdump-1.85
./configure --prefix=/usr/
make
sudo make install
Install Bro
Download the latest version from here
wget https://www.bro.org/downloads/release/bro-2.5.tar.gz
tar -xvf bro-2.5.tar.gz

Now change to this directory
/bro/bro-2.5   assuming you created a /bro/ and install in this directory!
./configure
make
sudo make install
The installation will take a while!
by default bro will be install to /usr/local/bro/bin
Modifiy you PATH environment variable to include bro binaries
export PATH=/usr/local/bro/bin:$PATH
To make changes permanent add above line to ~/.bashrc file
A Minimal Starting Configuration
These are the basic configuration changes to make for a minimal BroControl installation that will manage a single Bro instance on the localhost:
- In
$PREFIX/etc/node.cfg, set the right interface to monitor. - In
$PREFIX/etc/networks.cfg, comment out the default settings and add the networks that Bro will consider local to the monitored environment. - In
$PREFIX/etc/broctl.cfg, change theMailToemail address to a desired recipient and theLogRotationIntervalto a desired log archival frequency.
Now start the BroControl shell like:
broctl
Since this is the first-time use of the shell, perform an initial installation of the BroControl configuration:
[BroControl] > install
Then start up a Bro instance:
[BroControl] > start
If there are errors while trying to start the Bro instance, you can can view the details with the diag command. If started successfully, the Bro instance will begin analyzing traffic according to a default policy and output the results in $PREFIX/logs.
Note
The user starting BroControl needs permission to capture network traffic. If you are not root, you may need to grant further privileges to the account you’re using; see the FAQ. Also, if it looks like Bro is not seeing any traffic, check out the FAQ entry on checksum offloading.
You can leave it running for now, but to stop this Bro instance you would do:
[BroControl] > stop
Browsing Log Files
By default, logs are written out in human-readable (ASCII) format and data is organized into columns (tab-delimited). Logs that are part of the current rotation interval are accumulated in $PREFIX/logs/current/ (if Bro is not running, the directory will be empty). For example, the http.log contains the results of Bro HTTP protocol analysis. Here are the first few columns of http.log:
# ts          uid          orig_h        orig_p  resp_h         resp_p
1311627961.8  HSH4uV8KVJg  192.168.1.100 52303   192.150.187.43 80
Logs that deal with analysis of a network protocol will often start like this: a timestamp, a unique connection identifier (UID), and a connection 4-tuple (originator host/port and responder host/port). The UID can be used to identify all logged activity (possibly across multiple log files) associated with a given connection 4-tuple over its lifetime.
The remaining columns of protocol-specific logs then detail the protocol-dependent activity that’s occurring. E.g. http.log‘s next few columns (shortened for brevity) show a request to the root of Bro website:
# method   host         uri  referrer  user_agent
GET        bro.org  /    -         <...>Chrome/12.0.742.122<...>
Some logs are worth explicit mention:
conn.log- Contains an entry for every connection seen on the wire, with basic properties such as time and duration, originator and responder IP addresses, services and ports, payload size, and much more. This log provides a comprehensive record of the network’s activity.
notice.log- Identifies specific activity that Bro recognizes as potentially interesting, odd, or bad. In Bro-speak, such activity is called a “notice”.
By default, BroControl regularly takes all the logs from $PREFIX/logs/current and archives/compresses them to a directory named by date, e.g. $PREFIX/logs/2011-10-06. The frequency at which this is done can be configured via the LogRotationInterval option in $PREFIX/etc/broctl.cfg
Bro as a Command-Line Utility
If you prefer not to use BroControl (e.g. don’t need its automation and management features), here’s how to directly control Bro for your analysis activities from the command line for both live traffic and offline working from traces.
Monitoring Live Traffic
Analyzing live traffic from an interface is simple:
bro -i en0 <list of scripts to load>
en0 can be replaced by the interface of your choice and for the list of scripts, you can just use “all” for now to perform all the default analysis that’s available.
Bro will output log files into the working directory.
Note
The FAQ entries about capturing as an unprivileged user and checksum offloading are particularly relevant at this point.
To use the site-specific local.bro script, just add it to the command-line:
bro -i en0 local
This will cause Bro to print a warning about lacking the Site::local_nets variable being configured. You can supply this information at the command line like this (supply your “local” subnets in place of the example subnets):
bro -r mypackets.trace local "Site::local_nets += { 1.2.3.0/24, 5.6.7.0/24 }"Reading Packet Capture (pcap) Files
Capturing packets from an interface and writing them to a file can be done like this:
sudo tcpdump -i en0 -s 0 -w mypackets.trace
Where en0 can be replaced by the correct interface for your system as shown by e.g. ifconfig. (The -s 0 argument tells it to capture whole packets; in cases where it’s not supported use -s 65535 instead).
After a while of capturing traffic, kill the tcpdump (with ctrl-c), and tell Bro to perform all the default analysis on the capture which primarily includes :
bro -r mypackets.trace
Bro will output log files into the working directory.
If you are interested in more detection, you can again load the local script that we include as a suggested configuration:
bro -r mypackets.trace local
Telling Bro Which Scripts to Load
A command-line invocation of Bro typically looks like:
bro <options> <policies...>
Where the last arguments are the specific policy scripts that this Bro instance will load. These arguments don’t have to include the .bro file extension, and if the corresponding script resides under the default installation path, $PREFIX/share/bro, then it requires no path qualification. Further, a directory of scripts can be specified as an argument to be loaded as a “package” if it contains a __load__.bro script that defines the scripts that are part of the package.
This example does all of the base analysis (primarily protocol logging) and adds SSL certificate validation.
bro -r mypackets.trace protocols/ssl/validate-certs
You might notice that a script you load from the command line uses the @load directive in the Bro language to declare dependence on other scripts. This directive is similar to the #include of C/C++, except the semantics are, “load this script if it hasn’t already been loaded.”
Note
If one wants Bro to be able to load scripts that live outside the default directories in Bro’s installation root, the BROPATH environment variable will need to be extended to include all the directories that need to be searched for scripts. See the default search path by doing bro --help.
Running Bro Without Installing
For developers that wish to run Bro directly from the build/ directory (i.e., without performing make install), they will have to first adjust BROPATH to look for scripts and additional files inside the build directory. Sourcing either build/bro-path-dev.sh or build/bro-path-dev.csh as appropriate for the current shell accomplishes this and also augments your PATH so you can use the Bro binary directly:
./configure
make
source build/bro-path-dev.sh
bro <options>
Video Tutorial
Have fun!
Scanning for malware with Linux Malware Detect (LMD)

Linux Malware Detect (LMD), also known as Maldet, is a malware scanner for Linux released under the GNU GPLv2 license. It is particularly effective for the detection of php backdoors, darkmailers and many other malicious files that can be uploaded on a compromised website. It will help you do detect infected websites and clean the infection, however securing the compromised user or website is still necessary to avoid re-infection.
If the server has cPanel , we recommend you install ClamAV first, as maldet will use the ClamAV scan engine.
You will need to be logged in as root to the server over SSH.
1 – Install maldet
cd /usr/local/src/ && wget http://www.rfxn.com/downloads/maldetect-current.tar.gz && tar -xzvf maldetect-current.tar.gz && cd maldetect-* && sh install.sh
This will automatically install a cronjob inside /etc/cron.daily/maldet so a daily scan will be run for local cPanel or Plesk accounts.
2 – Make sure to update to the latest version and virus signatures:
maldet -d && maldet -u
3 – Run the first scan manually
To scan a specific user’s home directory, run the following command:
maldet -a /home/user
To launch a background scan for all user’s public_html and public_ftp in all home directories, run the following command:
maldet -b –scan-all /home?/?/public_?
(We also recommend you to scan /tmp and /dev/shm/)
4 – Verify the scan report
We recommend you to always read the scan reports before doing a quarantine. You will also be able to identify infected websites for further actions.
List all scan reports time and SCANID:
maldet –report list
Show a specific report details :
maldet –report SCANID
Show all scan details from log file:
grep “{scan}” /usr/local/maldetect/event_log
5 – Clean the malicious files
By default the quarantine is disabled. You will have to launch it manually.
maldet -q SCANID
6 – (optional) Automatically quarantine detected malware
Please review these configuration variables in /usr/local/maldetect/conf.maldet
variable value description
quar_hits number if the number is different than 0, enables automatic quarantine
7- (optional) Configure scan reports e-mail alerts
Maldet can send you and email alert each time it detects malware. Please review these configuration variables in /usr/local/maldetect/conf.maldet
variable value description
email_alert 1 or 0 enable or disable e-mail alerts
email_addr e-mail address target e-mail for notifications, should be put in quotes like: “myuser@mydomain.com”
KALI LINUX TOOLS!
easy-admin.ca is SSL ready!

Let’s Encrypt is a free, automated, and open certificate authority (CA), run for the public’s benefit. It is a service provided by the
Internet Security Research Group (ISRG)
We give people the digital certificates they need in order to enable HTTPS (SSL/TLS) for websites, for free, in the most user-friendly way we can. We do this because we want to create a more secure and privacy-respecting Web.
The key principles behind Let’s Encrypt are:
- Free: Anyone who owns a domain name can use Let’s Encrypt to obtain a trusted certificate at zero cost.
- Automatic: Software running on a web server can interact with Let’s Encrypt to painlessly obtain a certificate, securely configure it for use, and automatically take care of renewal.
- Secure: Let’s Encrypt will serve as a platform for advancing TLS security best practices, both on the CA side and by helping site operators properly secure their servers.
- Transparent: All certificates issued or revoked will be publicly recorded and available for anyone to inspect.
- Open: The automatic issuance and renewal protocol will be published as an open standard that others can adopt.
- Cooperative: Much like the underlying Internet protocols themselves, Let’s Encrypt is a joint effort to benefit the community, beyond the control of any one organization.
We have a page with more detailed information about
how the Let’s Encrypt CA works
Had a good external help from Eugene, I thank you for your great help!
Works with Webmin, Virtualmin,,, checking postfix!
have phun!
Install Let’s Encrypt
Run an ssh shell to your server.
Run the following command:
cd /usr/local/src/git clone https://github.com/letsencrypt/letsencryptcd letsencrypt/./letsencrypt-auto --help allNow login to your webmin admin panel at:
https://siteaddress:10000/ using root username.
Webmin configuration>SSL Encryption>Let’s Encrypt
It will show you:
Let's Encrypt is a free, automated, and open certificate authority that can be used to generate an SSL certificate for use by Webmin.Unfortunately, Let's Encrypt cannot be used on your system : The client command letsencrypt was not found on your system.Check the module configuration page to ensure you are using the correct path to the letsencrypt or letsencrypt-auto command.Click on “module configuration”
and type in the path and click Save:
ConfigurationFor module Webmin ConfigurationFull path to Let's Encrypt client command: /usr/local/src/letsencrypt/letsencrypt-autoTo enable SSL certificate for a site, Go to:
Virtualmin>Edit Virtual Server>Enabled features
Enable “SSL website enabled”
To Manage the certificate:
Virtualmin>Server configuration>Manage SSL certificates
Click on Let’s Encrypt and generate a new certificate
NOTES:
To force http:// to https:// include a .htaccess with the following code
RewriteEngine On
RewriteCond %{HTTPS} off
RewriteRule (.*) https://%{HTTP_HOST}%{REQUEST_URI} [R=301,L]
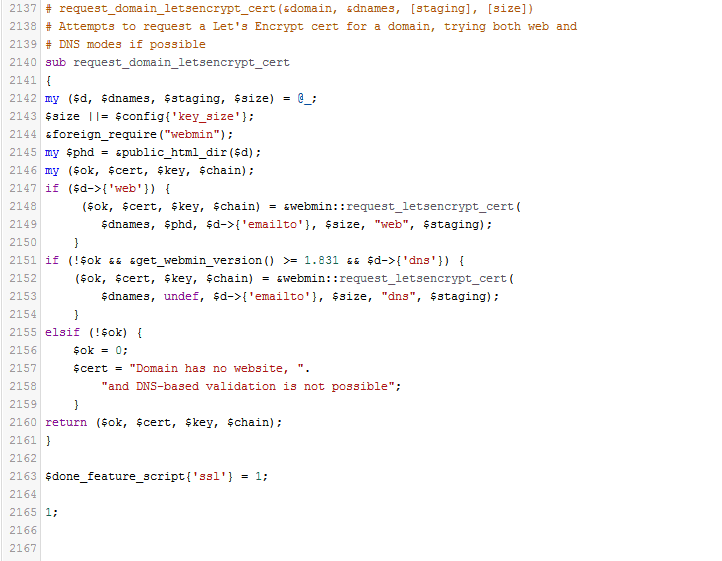
Edit the following /usr/libexec/webmin/virtual-server/feature-ssl.pl lines 2148 and 2152
Save the file and then restart Webmin. I did so from the terminal with the command:
sudo service webmin restart
StarWind Virtual SAN® Free
StarWind Virtual SAN Free targets those who need a SAN or NAS for their home lab, educational or research purposes. It is free for production use, but comes with a basic restricted set of features, compared to the full VSAN. In case a serious project is starting, StarWind Virtual SAN will come in handy. It offers a wider set of features unlocked and more usage scenarios, also being backed by StarWind support. Getting qualified assistance from expert engineers simplifies the building and maintenance of virtualization infrastructure. The complete list of differences between free and paid versions can be found here. In case there is no time for “Do-It-Yourself” tinkering, StarWind offers a turnkey solution – StarWind HyperConverged Appliance. It unifies best-of-breed software and hardware from multiple vendors and covers it with one “support umbrella”.
SMTP Error (250): Authentication failed. Cannot Send Email in Roundcube
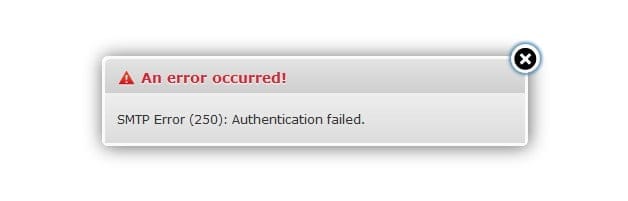
This only apply after you have installed : TLS/SASL/SSL !
I am using “Virtualmin” so locate your roundcube in here:
/home/[username]/public_html/webmail/config/config.inc.php
Locate this configuration: $config[‘smtp_server’] = ‘localhost’;
Easy fix here!
Remove ‘localhost‘: $config[‘smtp_server’] = ‘ ‘;
Now roundcube will use PHP instead of SMTP
Enjoy!
CRAM-MD5 authentication for Dovecot
This entry documents the basic process for setting up CRAM-MD5 authentication for Dovecot.
Firstly, you need to enable the mechanism and specify a passwd database file in Dovecot. The mechanism and passdb file are specified in the dovecot.conf configuration file, on a Red Hat or similar system this is located in the /usr/local/etc/ directory.
# Space separated list of wanted authentication mechanisms:
# plain login digest-md5 cram-md5 ntlm rpa apop anonymous gssapi
auth_mechanisms = plain login cram-md5

# passwd-like file with specified location
passdb {
  driver = passwd-file
  # Path for passwd-file. Also set the default password scheme.
  args = scheme=cram-md5 /etc/cram-md5.pwd
}
You see that I’ve added the cram-md5 mechanism to the mechanisms statement and then added a passdb file, /etc/cram-md5.pwd.
Next, you need to create this passdb file and set appropriate permissions.
# touch /etc/cram-md5.pwd
# chmod 0600 /etc/cram-md5.pwd
After creating the file you need to add your users and hashed passwords to the passdb file. The users and passwords are added in the format:
username:passwordhash
You can generate password hashes using “doveadm pw”:
# doveadm pw
Enter new password: password
Retype new password: password
{CRAM-MD5}26b633ec8bf9dd526293c5897400bddeef9299fad
Enter the user’s password when prompted and it will be converted and outputted as a hash. The default hashed output is in the CRAM-MD5 scheme. You can change the scheme of the outputted hashes using the -s command line switch.
Now add the generated password to the passdb file, /etc/cram-md5.pwd.
username:26b633ec8bf9dd526293c5897400bddeef9299fad
Finally, restart Dovecot and test authentication by enabling the appropriate mechanism in your email client. For example, to enable CRAM-MD5 authentication in Thunderbird you need to check the “Use secure authentication” checkbox in the Account Settings page.
I recommend that you also use TLS/SSL to encrypt the authentication process as well.
Postfix SMTP Auth Error “no SASL authentication mechanisms”

I have been setting up a new mail server recently with Postfix and SMTP Auth, and got the error message “no SASL authentication mechanisms”.
If you have enabled SMTP Auth with Postfix like this:
smtpd_sasl_auth_enable = yes
smtpd_sasl_security_options = noanonymous
smtpd_sasl_local_domain = $myhostname
broken_sasl_auth_clients = yes
smtpd_recipient_restrictions =
    permit_sasl_authenticated,
    permit_mynetworks,
    reject_unauth_destination
and are getting messages like this (the extract below is from the mail log file):
Nov  2 15:31:09 vps131 postfix/smtpd[14007]: warning: dict_nis_init: NIS domain name not set - NIS lookups disabled
Nov  2 15:31:09 vps131 postfix/smtpd[14007]: warning: xsasl_cyrus_server_get_mechanism_list: no applicable SASL mechanisms
Nov  2 15:31:09 vps131 postfix/smtpd[14007]: fatal: no SASL authentication mechanisms
Nov  2 15:31:10 vps131 postfix/master[12004]: warning: process /usr/libexec/postfix/smtpd pid 14007 exit status 1
Nov  2 15:31:10 vps131 postfix/master[12004]: warning: /usr/libexec/postfix/smtpd: bad command startup -- throttling
then you need to install the cyrus-sasl-plain package like so:
yum install cyrus-sasl-plain
The above method will install the cyrus-sasl-plain packages on CentOS and other RPM/Yum based Linux distributions, so you would need to use the appropriate package manager (and software package) for other Linux distros.
- Also make sure the SASAUTHD is running on your system
# systemctl status saslauthd
# systemctl start saslauthd
# systemctl enable saslauthd
NOTES :
# SASL CONFIGURATION
smtpd_sasl_auth_enable = yes
smtpd_sasl_security_options = noanonymous
smtpd_sasl_local_domain = $myhostname
broken_sasl_auth_clients = yes
smtpd_recipient_restrictions = permit_mynetworks permit_inet_interfaces permit_sasl_authenticated
#
You may verified your email server security score here:
http://www.emailsecuritygrader.com

Here is a part of my /etc/postfix/main.cf
# Sender restrictions
smtpd_sender_restrictions =
permit_mynetworks,
reject_non_fqdn_sender,
reject_unknown_sender_domain,
permit
#
reject_rbl_client zen.spamhaus.org,
reject_rbl_client bl.spamcop.net,
check_policy_service unix:postgrey/socket,
permit
# Postfix AntiSpam Configuration
disable_vrfy_command = yes
smtpd_helo_required = yes
smtpd_helo_restrictions = permit_mynetworks,
reject_non_fqdn_hostname,
reject_invalid_hostname,
permit
#
smtpd_sasl_auth_enable = yes
smtpd_sasl_local_domain = $myhostname
#
broken_sasl_auth_clients = yes
smtpd_recipient_restrictions = permit_mynetworks permit_inet_interfaces permit_sasl_authenticated
#
smtpd_error_sleep_time = 1s
smtpd_soft_error_limit = 10
smtpd_hard_error_limit = 20
smtpd_client_restrictions = permit_mynetworks permit_inet_interfaces
#
smtpd_enforce_tls = yes
smtpd_tls_loglevel = 1
smtpd_use_tls = yes
smtpd_tls_key_file = /etc/postfix/smtpd.key
smtpd_tls_cert_file = /etc/postfix/smtpd.cert
# Experimental
smtpd_tls_security_level = may
smtpd_tls_auth_only = yes
smtpd_recipient_restrictions = permit_mynetworks permit_sasl_authenticated reject_unauth_destination
smtpd_sasl_security_options = noanonymous
smtpd_sasl_application_name = smtpd
🙂
Configure PostFIX to use TLS – CentOS7
This is an optional feature you don’t need to do to get everything working but if you want a secure setup you should do this. TLS will allow you to setup an SSL encrypted connection between the server and the mail client. This means that the authentication that is used will be send encrypted over the internet while the normal authentication will be send in clear text over the internet making it possible for others to read.
First you need to buy yourself a certificate at Thawte or Verisign, but as we are building a server on the cheap we are going to create our own certificate. The only problem you will encounter when using your own certificates is that users explicitly have to accept and verify your root certificate in contrast with certificates you buy which are already accepted in most email clients by default. If they for instance try to send their email for the first time via your secure server they need to accept your certificate. When using Mail.app in OS X they will get the following warning:
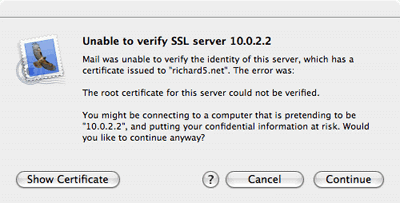
They need to press continue and from then on your certificate will be accepted and they won’t be asked again.
Just open a Terminal and execute the following command in the directory /etc/postfix:
sudo openssl req -new -outform PEM -out smtpd.cert \
   -newkey rsa:2048 -nodes -keyout smtpd.key -keyform PEM \
   -days 365 -x509
This will create a 2048 bit encryption key that, for now, is secure enough for you mailserver to use. If you are paranoid and want a bigger key just increase the number after rsa:. The key will be valid for a year, if you want a longer period just increase the number after the -days option. When the key is finished you will be asked a couple of questions you need to answer. The information will be shown to people who want to see your certificate when their mail client complains. The most important one is the ‘Common Name’, make sure that that one is the same as the mail server name.
Country Name (2 letter code) [CA]:
State or Province Name (full name) [Some-State]:
Locality Name (eg, city) []:
Organization Name (eg, company) [Internet Widgits Pty Ltd]:
Organizational Unit Name (eg, section) []:
Common Name (eg, YOUR name) []:your.mailserver.tld
Email Address []:you@yourdomain.tld
Now you have created the certificate you will have to configure Postfix to make use of it and to enforce the usage of TLS to securely communicate with the email client. You’ll have to add the following lines to the configuration file main.cf in /etc/postfix :
smtpd_enforce_tls                = no
smtpd_tls_loglevel               = 1
smtpd_use_tls                    = yes
smtpd_tls_key_file               = /etc/postfix/smtpd.key
smtpd_tls_cert_file              = /etc/postfix/smtpd.cert
Issue the command sudo postfix reload to refresh the configuration of your mail server and your ready to test it out. Start a terminal session and issue the following commands:
telnet your.mailserver.tld 25
The server will answer with:
Trying your.mailserver.tld...
Connected to your.mailserver.tld.
Escape character is ^]
220 your.mailserver.tld ESMTP Postfix
Then type in:
EHLO your.mailserver.tld
And again your server will answer it’s capabilities:
250-your.mailserver.tld
250-PIPELINING
250-SIZE 10240000
250-ETRN
250-STARTTLS
250 8BITMIME
Now it’s time to test TLS and enter in capitals:
STARTTLS
and the server should respond with:
220 Ready to start TLS
Then you know it will work, you could give your favorite email client a try.
Restart postfix : systemctl restart postfix
NOTES:
After this fix, roundcube cannot send email anymore, investigating this!
Testing ClamAV for Virus in Emails
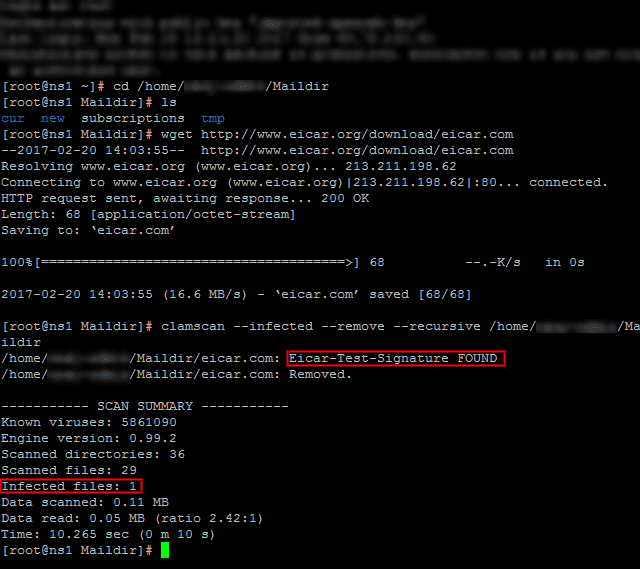
To verify ClamAV is working properly, let’s download a test virus (which we can get from http://www.eicar.org/download/eicar.com) to the Maildir
# cd /home/[username]/Maildir
# wget http://www.eicar.org/download/eicar.com
And then scan the /home/[username]/Maildir directory recursively:
# clamscan --infected --remove --recursive /home/[username]/Maildir
Now, feel free to set up this scan to run through a cronjob. Create a file named /etc/cron.daily/dailyclamscan, insert the following lines:
#!/bin/bash
SCAN_DIR="/home/[username]/Maildir"
LOG_FILE="/var/log/clamav/dailyclamscan.log"
touch $LOG_FILE
/usr/bin/clamscan --infected --remove --recursive $SCAN_DIR >> $LOG_FILE
and grant execute permissions:
# chmod +x /etc/cron.daily/dailyclamscan
The above cronjob will scan the mail server directory recursively and leave a log of its operation in /var/log/clamav/dailyclamscan.log (make sure the /var/log/clamav directory exists).
NOTES:
# man clamscan
# clamscan -r -i /home
Configuring SpamAssassin for Postfix
In the process of receiving email, spamassassin will stand between the outside world and the email services running on your server itself. If it finds, according to its definition rules and configuration, that an incoming message is spam, it will rewrite the subject line to clearly identify it as such. Let’s see how.
The main configuration file is /etc/mail/spamassassin/local.cf, and we should make sure the following options are available (add them if they are not present or uncomment if necessary):
local.cf
report_safe 0
required_score 8.0
rewrite_header Subject [SPAM]
- When report_safe is set to 0 (recommended value), incoming spam is only modified by modifying the email headers as per rewrite_header. If it is set to 1, the message will be deleted.
- To set the aggressivity of the spam filter, required_score must be followed by an integer or decimal number. The lesser the number, the more sensitive the filter becomes. Setting required_score to a value somewhere between 8.0 and 10.0 is recommended for a large system serving many (~100s) email accounts.
Once you’ve saved those changes, enable and start the spam filter service, and then update the spam rules:
# systemctl enable spamassassin
# systemctl start spamassassin
# sa-update
Integrating Postfix and SpamAssassin
In order to efficiently integrate Postfix and spamassassin, we will need to create a dedicated user and group to run the spam filter daemon:
# useradd spamd -s /bin/false -d /var/log/spamassassin
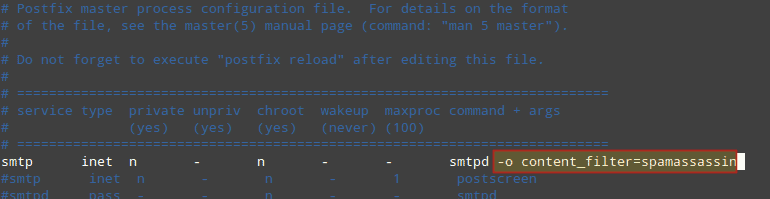
Next, add the following line at the bottom of /etc/postfix/master.cf:
master.cf
spamassassin unix - n n - - pipe flags=R user=spamd argv=/usr/bin/spamc -e /usr/sbin/sendmail -oi -f ${sender} ${recipient}
And indicate (at the top) that spamassassin will serve as content_filter:
Finally, restart Postfix to apply changes:
# systemctl restart postfix
To verify that SpamAssassin is working properly and detecting incoming spam, a test known as GTUBE (Generic Test for Unsolicited Bulk Email) is provided.
To perform this test, send an email from a domain outside your network (such as Yahoo!, Hotmail, or Gmail) to an account residing in your email server. Set the Subject line to whatever you want and include the following text in the message body:
XJS*C4JDBQADN1.NSBN3*2IDNEN*GTUBE-STANDARD-ANTI-UBE-TEST-EMAIL*C.34X
And shows the corresponding notice in the logs:
Additionally, you can test spamassassin right from the command line:
# spamassassin -D < /usr/share/doc/spamassassin-3.4.0/sample-spam.txt
Install chkrootkit on CentOS
What is chkrootkit and the steps to Install chkrootkit
The chkrootkit is a security scanner to check if the system is infected with the ‘rootkit’. A rootkit is a malicious software which is capable of having administrator-level access to a computer or network. The rootkit allows the hackers to take the control of a system without the user knowing it. This means that the rootkit is capable of executing files and changing system configurations on the target machine and many more which can be done only as the super user of the Linux machine.
Please note that scanning for rootkits will not stop all attacks, it is not an active defense. If your server has been compromised then a scan will not stop the rootkit.
Install chkrootkit
The following steps will help you to install chkrootkit on CentOS.
cd /usr/local/src
wget ftp://ftp.pangeia.com.br/pub/seg/pac/chkrootkit.tar.gz
tar xvf chkrootkit.tar.gz
cd chkrootkit-*
make sense
Now, you can run the chkrootkit to scan the server. Please note that the present working directory should be “/usr/local/src/chkrootkit-0.50”.
./chkrootkit
Daily scan report script
Create a file named scan.sh
vim /etc/cron.daily/chkrootkit.sh
#!/bin/bash
cd /usr/local/src/chkrootkit-*/ ; ./chkrootkit |grep -v not| /bin/mail -s 'CHROOTKIT Scan Result' your@email.com
Make it executable
chmod +x /etc/cron.daily/chkrootkit.sh
The script will email your daily scan report. Also the above steps can also be used to install chkrootkit on cPanel server. Also, please keep this in mind that, using chkrootkit, you can’t remove and found 100% rootkits. You can secure your server from rootkits by ensuring that all applications and softwares are up-to-date and the system kept patched against all known vulnerabilities.
ISPProtect malware and outdated web software scanner
ISPProtect is a Malware and Antivirus scanner for web servers. It contains a signature based scan engine and a heuristic scan engine to detect Malware in websites, CMS- and shop systems like WordPress, Joomla, Drupal, Magentocommerce etc. A third scan level in ISPProtect detects outdated installations of e. g. WordPress, Joomla, Drupal, … and shows their location on the web server. ISPProtect is developed by the ISPConfig developer team. ISPConfig is a widely used OpenSource Webhosting Control Panel.
ISPProtect use cases
Do I need ISPProtect on my server? Yes, when you run your own web server, are a hosting company or provide support for web servers.
- Your web server started to send out spam emails? ISPProtect can help you to find the malicious software.
- You recognize a high load on your web server that does not correlate with the website access statistics? Use ISPProtect to find malware that uses your server to attack other systems and IRC bots.
- You are a hosting company and like to keep your server safe and warn your customers when a site got infected? Use ISPProtect to get a detailed Malware report by email daily, weekly, monthly or in the interval you want.
- Do your clients miss to install Updates of their WordPress, Joomla and Mediawiki sites or store copies of their old and vulnerable sites in folders like „old_site“ on the server that get never removed and are a target for hackers? Use ISPProtect to get a report on outdated CMS versions that are installed on your server.
- You are a Linux support company and get contacted by clients with their web server issues? Add ISPProtect to your tool set and use it to scan the systems of your clients and detect malware easily.
Try ISPProtect for free
https://ispprotect.com
Try ISPProtect for free on your server now, no registration required. Just download it and start the scan, enter the word „trial“ when the scanner asks for the license key.
cd /tmp
wget http://www.ispprotect.com/download/ispp_scan.tar.gz
tar xzf ispp_scan.tar.gz
./ispp_scan
microcode.service, ignoring: Unit is not loaded properly: Invalid argument
systemd: Cannot add dependency job for unit microcode.service, ignoring: Unit is not loaded properly: Invalid argument.
# systemctl is-enabled microcode.service
enabled
# systemctl disable microcode.service
Removed symlink /etc/systemd/system/basic.target.wants/microcode.service.
# reboot
Problems with YUM -Y UPDATE
Check this out ~
http://www.linuxquestions.org/questions/centos-111/centos-yum-update-depency-problem-4175541770/
https://www.centos.org/forums/viewtopic.php?f=19&t=14128&sid=f0771137550b57aab58066711d223c78&start=10
Yum commands :
# yum repolist all         [verifie the installed repos]

# rm -rf /var/cache/yum/*  [clear yum cache]

# rpm -Va                  [check all packages]

# yum clean all            [clean yum]

# rpm --rebuilddb          [rebuild database]

# yum update -d6           [yum update]

# yum check-update -d6 --noplugins

# rpm -qa yum \*           [output yum infos]
,,,…maybe,,, the Time Protocol? 😉 and more to this…,,,,,
have a FUN_YUM!
FIXED on a live server, Thanks to a wizard of OZ!!! Don’t ask me how!
Cheers!
P.S Do not do complex commands on a live server ,,, or just have fun, in the learning 😉
How to clear the YUM cache?
# rm -rf /var/cache/yum/*
Introduction to FreeNAS
Let’s Encrypt on VirtualMIN
Guide to install FREE SSL certificate from Letsencrypt on Virtualmin & Webmin. 100% working.
I’ve been going at this for a little while but came up with the following steps to get it working.
*** 1. First install Let’s Encrypt script/programm. ***
Login to SSH and get root privileges (root/sudo -i):
cd /home/user/ && git clone https://github.com/letsencrypt/letsencrypt
OR
cd /root/ && git clone https://github.com/letsencrypt/letsencrypt
^^ This will download the Let’s Encrypt from github with executable script
*** 2. Create your directory where you will be saving your certificate later on. Reason for this is because Virtualmin has a protection where it only allows a certificate from the user/domains directory: ***
mkdir /home/MYUSERNAMEFORDOMAIN/ssl_certificates
*** 3. Setup your cronjobs by running: “sudo crontab -e” ***
It wil probably ask you which editor, i choose Nano, once in the editor enter the following somewhere on a new line (pick the option you choose on step 1!):
01 3 1 * * cd /home/user/letsencrypt/ && ./letsencrypt-auto certonly --email info@MYDOMAIN --agree-tos --webroot --renew-by-default -w /home/MYDOMAIN/public_html/ -d www.MYDOMAIN.net -d MYDOMAIN.net --authenticator webroot && cp -f /etc/letsencrypt/live/www.MYDOMAIN.net/cert.pem /home/MYUSERNAMEFORDOMAIN/ssl_certificates/cert.pem && cp -f /etc/letsencrypt/live/www.MYDOMAIN.net/chain.pem /home/MYUSERNAMEFORDOMAIN/ssl_certificates/chain.pem && cp -f /etc/letsencrypt/live/www.MYDOMAIN.net/fullchain.pem /home/MYUSERNAMEFORDOMAIN/ssl_certificates/fullchain.pem && cp -f /etc/letsencrypt/live/www.MYDOMAIN.net/privkey.pem /home/MYUSERNAMEFORDOMAIN/ssl_certificates/privkey.pem
OR
01 3 1 * * cd /root/letsencrypt/ && ./letsencrypt-auto certonly --email info@MYDOMAIN --agree-tos --webroot --renew-by-default -w /home/MYDOMAIN/public_html/ -d www.MYDOMAIN.net -d MYDOMAIN.net --authenticator webroot && cp /etc/letsencrypt/live/www.MYDOMAIN.net/cert.pem /home/MYUSERNAMEFORDOMAIN/ssl_certificates/cert.pem && cp -f /etc/letsencrypt/live/www.MYDOMAIN.net/chain.pem /home/MYUSERNAMEFORDOMAIN/ssl_certificates/chain.pem && cp -f /etc/letsencrypt/live/www.MYDOMAIN.net/fullchain.pem /home/MYUSERNAMEFORDOMAIN/ssl_certificates/fullchain.pem && cp -f /etc/letsencrypt/live/www.MYDOMAIN.net/privkey.pem /home/MYUSERNAMEFORDOMAIN/ssl_certificates/privkey.pem
^^ Above command will copy the certificates to the correct directory after requesting them (i gave a warning in step 2). It will do this every 1st of the month during the night. The reason we do this every month is because the certs are only valid 90 days and we have plenty of time to repair if something appears to be wrong with the cert later on..
Allright! The hard part is done!
*** 3.1 Please log into your Virtualmin admin panel, Select “Webmin -> System -> Scheduled Cron Jobs”. Go to your newly created Cronjob by clicking on it and select “RUN NOW”.
*** 4. in Virtualmin, select you domain and go to “Edit virtual server”, make sure that SSL is enabled under “Enabled features”.
*** 5. Under “Server configuration” go to “Manage SSL Certificate”. Select the tab “Update Certificate and Key” and under “Signed SSL certificate” select the option “File on server”, fill in the location of the certificate: "/home/MYUSERNAMEFORDOMAIN/ssl_certificates/cert.pem"
*** 6. Do the same for section “Matching private key”. Select: "/home/MYUSERNAMEFORDOMAIN/ssl_certificates/privkey.pem"
*** 7. Click on “Install Now”.
*** 8. Switch to tab “CA Certificate”, select “In file on server ” and fill in: "/home/MYUSERNAMEFORDOMAIN/ssl_certificates/fullchain.pem"
*** 9. Click on “Save Certificate”. ***
DONE! ! ! It will now update every month 🙂
Go to your website with HTTPS, what do you get??? 😀 🙂 😀
IF you run into any issues please let me know in the comments and i’ll try to help out!
NOTE: You can’t request a lot of different certificates. You will get the message: Too many certificates already issued for: xxx. If you want a lot of certificates for subdomains please consider using a paid wildcard certificate. Letsencrypt is a service to help out (starting/small) websites.
Multiple PHP instances on VirtualMIN
warning: connect to Milter service : Connection refused
The issue isn’t with postgrey or postfix, but with milter-greylist.
What you may want to do is edit /etc/postfix/main.cf, and comment out the lines beginning with “smtpd_milters” and “non_smtpd_milters”. After that, restart Postfix.
not working,,,, hummm 😉
NOTE: http://unix.stackexchange.com/questions/74477/postfix-smtpd-warning-connect-to-milter-service-unix-var-run-opendkim-opendki
warning: connect to Milter service local:/run/milter-greylist/milter-greylist.sock: Connection refused
note for warning: connect to Milter service local:/run/milter-greylist/milter-greylist.sock: Connection refused
http://unix.stackexchange.com/questions/74477/postfix-smtpd-warning-connect-to-milter-service-unix-var-run-opendkim-opendki
Enabling DKIM milter in Virtualmin
To enable DKIM signing of outgoing email messages, follow these steps :
- Login to Virutalmin as
rootand go to Email Messages -> DomainKeys Identified Mail - Change Signing of outgoing mail enabled? to Yes.
- In the Selector for DKIM record name field enter a short name that you will use to identify the signing key. This is typically just the current year, like
2010. Do NOT enterdefault, as this can trigger a bug in the current Virtualmin release which deletes the/etc/defaultdirectory! - Click the Save button.
Assuming all goes well, Virtualmin will report the steps taken to configure and enable DKIM.
Only virtual servers that have both the DNS and email features enabled will have DKIM activated, as the mail server needs to be setup to use a private signing key whose corresponding public key is added to DNS.
By default, Virtualmin will also configure the DKIM milter to verify incoming email that has the proper signatures. DKIM-signed messages where the signature is incorrect or cannot be checked with a DNS lookup will be bounced or delayed. If you want to disable verification, set the Verify DKIM signatures on incoming email? option to No.
To turn off DKIM signing completely, just do the following :
- Login to Virutalmin as
rootand go to Email Messages -> DomainKeys Identified Mail - Change Signing of outgoing mail enabled? to No.
- Click Save.
This will remove the public key from all domains, and stop your mail server from signing messages with the DKIM milter.
NOTES:
Common problems:
- Check if you have SPF, DKIM and DMARC records and if they are properly set
- Check if you have rDNS
- Check if your domain or IP is blacklisted
- From 1 to 3 plus several other settings can be checked with:
http://mxtoolbox.com/SuperTool.aspx - Check what services are active and their ports especially dovecot: http://www.cyberciti.biz/faq/how-do-i-find-out-what-ports-are-listeningo…
NOTES:
For rDNS should be easy to sort. Best and easiest solution would be to use the hostname (either way it should be FQDN), so if your hostname is “myserver.domain.tld” then check if you have in your DNS records “myserver.domain.tld. IN A your.server.IP.address”. If you are missing this record be sure to add it before you proceed to set rDNS. Once done go to your host control panel and set rDNS to “myserver.domain.tld”.
Tools like mxtoolbox.com should give you some info if there is a problem, another option is intodns.com but it will check only DNS (there are other solutions just use google). To test email only you can use https://www.unlocktheinbox.com/mail-tester . One thing you must know, every single thing what is not properly set or defined, it will increase spam score of your emails and more problems you have it will be easier for emails to end in spam or be rejected by receiver.
NOTES:
You can enable dmarc if you go virtualmin – domain – server configuration and click dns options. There you scroll down and click enabled on DMARC record enabled? also you can change policy there. You may perhaps wait 24 hours to apply this as its dns which could take time a bit.
NOTES:
I do see your point but I am hosting sites with emails without rDNS - that does not need to be concerned at all
Well based on RFC1912 we have:
2.1 Inconsistent, Missing, or Bad Data
Every Internet-reachable host should have a name. The consequences
of this are becoming more and more obvious. Many services available
on the Internet will not talk to you if you aren’t correctly
registered in the DNS.
Make sure your PTR and A records match. For every IP address, there
should be a matching PTR record in the in-addr.arpa domain. If a
host is multi-homed, (more than one IP address) make sure that all IP
addresses have a corresponding PTR record (not just the first one).
Failure to have matching PTR and A records can cause loss of Internet
services similar to not being registered in the DNS at all. Also,
PTR records must point back to a valid A record, not a alias defined
by a CNAME.
It is highly recommended that you use some software
which automates this checking, or generate your DNS data from a
database which automatically creates consistent data…So please read it you will find a lot of information there about rDNS.
For the rest there is difference between helping and hand holding and i will not do the later. If someone dont want to spend few minutes on google then he or she dont deserve any attention and if you want to do differently please be my guest, i’m sure no one will stop you.
P.S. Stop telling people wrong information, there are rules you must follow so instead of teaching people wrong things lets educate them to properly follow the rules.
Diabolico
https://www.virtualmin.com/node/41321
– I often come to the conclusion that my brain has too many tabs open. –
Failing at desktop publishing & graphic design since 1994.
postfix/anvil
ANVIL(8) ANVIL(8)
NAME
anvil - Postfix session count and request rate control
SYNOPSIS
anvil [generic Postfix daemon options]
DESCRIPTION
The Postfix anvil(8) server maintains statistics about client connec-
tion counts or client request rates. This information can be used to
defend against clients that hammer a server with either too many simul-
taneous sessions, or with too many successive requests within a config-
urable time interval. This server is designed to run under control by
the Postfix master(8) server.
In the following text, ident specifies a (service, client) combination.
The exact syntax of that information is application-dependent; the
anvil(8) server does not care.
CONNECTION COUNT/RATE CONTROL
To register a new connection send the following request to the anvil(8)
server:
request=connect
ident=string
The anvil(8) server answers with the number of simultaneous connections
and the number of connections per unit time for the (service, client)
combination specified with ident:
status=0
count=number
rate=number
To register a disconnect event send the following request to the
anvil(8) server:
request=disconnect
ident=string
The anvil(8) server replies with:
status=0
MESSAGE RATE CONTROL
To register a message delivery request send the following request to
the anvil(8) server:
request=message
ident=string
The anvil(8) server answers with the number of message delivery
requests per unit time for the (service, client) combination specified
with ident:
status=0
rate=number
RECIPIENT RATE CONTROL
To register a recipient request send the following request to the
anvil(8) server:
request=recipient
ident=string
The anvil(8) server answers with the number of recipient addresses per
unit time for the (service, client) combination specified with ident:
status=0
rate=number
TLS SESSION NEGOTIATION RATE CONTROL
The features described in this section are available with Postfix 2.3
and later.
To register a request for a new (i.e. not cached) TLS session send the
following request to the anvil(8) server:
request=newtls
ident=string
The anvil(8) server answers with the number of new TLS session requests
per unit time for the (service, client) combination specified with
ident:
status=0
rate=number
To retrieve new TLS session request rate information without updating
the counter information, send:
request=newtls_report
ident=string
The anvil(8) server answers with the number of new TLS session requests
per unit time for the (service, client) combination specified with
ident:
status=0
rate=number
AUTH RATE CONTROL
To register an AUTH request send the following request to the anvil(8)
server:
request=auth
ident=string
The anvil(8) server answers with the number of auth requests per unit
time for the (service, client) combination specified with ident:
status=0
rate=number
SECURITY
The anvil(8) server does not talk to the network or to local users, and
can run chrooted at fixed low privilege.
The anvil(8) server maintains an in-memory table with information about
recent clients requests. No persistent state is kept because standard
system library routines are not sufficiently robust for update-inten-
sive applications.
Although the in-memory state is kept only temporarily, this may require
a lot of memory on systems that handle connections from many remote
clients. To reduce memory usage, reduce the time unit over which state
is kept.
DIAGNOSTICS
Problems and transactions are logged to syslogd(8).
Upon exit, and every anvil_status_update_time seconds, the server logs
the maximal count and rate values measured, together with (service,
client) information and the time of day associated with those events.
In order to avoid unnecessary overhead, no measurements are done for
activity that isn't concurrency limited or rate limited.
BUGS
Systems behind network address translating routers or proxies appear to
have the same client address and can run into connection count and/or
rate limits falsely.
In this preliminary implementation, a count (or rate) limited server
process can have only one remote client at a time. If a server process
reports multiple simultaneous clients, state is kept only for the last
reported client.
The anvil(8) server automatically discards client request information
after it expires. To prevent the anvil(8) server from discarding
client request rate information too early or too late, a rate limited
service should always register connect/disconnect events even when it
does not explicitly limit them.
CONFIGURATION PARAMETERS
On low-traffic mail systems, changes to main.cf are picked up automati-
cally as anvil(8) processes run for only a limited amount of time. On
other mail systems, use the command "postfix reload" to speed up a
change.
The text below provides only a parameter summary. See postconf(5) for
more details including examples.
anvil_rate_time_unit (60s)
The time unit over which client connection rates and other rates
are calculated.
anvil_status_update_time (600s)
How frequently the anvil(8) connection and rate limiting server
logs peak usage information.
config_directory (see 'postconf -d' output)
The default location of the Postfix main.cf and master.cf con-
figuration files.
daemon_timeout (18000s)
How much time a Postfix daemon process may take to handle a
request before it is terminated by a built-in watchdog timer.
ipc_timeout (3600s)
The time limit for sending or receiving information over an
internal communication channel.
max_idle (100s)
The maximum amount of time that an idle Postfix daemon process
waits for an incoming connection before terminating voluntarily.
max_use (100)
The maximal number of incoming connections that a Postfix daemon
process will service before terminating voluntarily.
process_id (read-only)
The process ID of a Postfix command or daemon process.
process_name (read-only)
The process name of a Postfix command or daemon process.
syslog_facility (mail)
The syslog facility of Postfix logging.
syslog_name (see 'postconf -d' output)
A prefix that is prepended to the process name in syslog
records, so that, for example, "smtpd" becomes "prefix/smtpd".
SEE ALSO
smtpd(8), Postfix SMTP server
postconf(5), configuration parameters
master(5), generic daemon options
README FILES
TUNING_README, performance tuning
LICENSE
The Secure Mailer license must be distributed with this software.
HISTORY
The anvil service is available in Postfix 2.2 and later.
AUTHOR(S)
Wietse Venema
IBM T.J. Watson Research
P.O. Box 704
Yorktown Heights, NY 10598, USA
Wietse Venema
Google, Inc.
111 8th Avenue
New York, NY 10011, USA
I used Remi repo and PHP7 seems to work perfect. This is what I did (if someone sees something bad, just say because I am not 100% sure if it is perfect, but here it works).
yum install scl-utils

yum install https://dl.fedoraproject.org/pub/epel/epel-release-latest-7.noarch.rpm

yum install http://rpms.remirepo.net/enterprise/remi-release-7.rpm

yum install php70

yum install php70-php-mysqlnd

yum install php70-php-curl

yum install php70-php-simplexml

yum install php70-php-devel php70-php-gd php70-php-json php70-php-mcrypt php70-php-mbstring php70-php-opcache php70-php-pear php70-php-pecl-apcu php70-php-pecl-geoip php70-php-pecl-imagick php70-php-pecl-json-post php70-php-pecl-memcache php70-php-pecl-xmldiff php70-php-pecl-zip php70-php-pspell php70-php-soap php70-php-tidy php70-php-xml php70-php-xmlrpc
With this you have PHP7 and all important extensions running next to the other PHP versions!
If anyone sees room for improvement, then I am very interested. Would be good information on this topic.
And I know it would be better to not use third party repos, but I could not find PHP7 for CentOS 7.2 then. Is it correct you only can get this with a third party (Remi) repo?
Also I hope it wasn’t a bad choice to choose this repo.
Had a hard time installing the php 5.6.x version on VirtualMIN
module php5.x-mysql missing… when loading your WordPress?? 😉
# yum install scl-utils
# yum -y update
# yum -y install php56-php-mysql
Installation done!
Now test your wordpress, set VirtualMIN domain to use PHP version 5.6.x!
NOTE: Must “Re-Check Configuration” after adding a new php version into VirtualMIN
> VirtualMIN > System Settings > Re-Check Configuration
The following PHP versions are available : 5.4.16 (/bin/php-cgi), 5.5.38 (/bin/php55-cgi), 5.6.30 (/bin/php56-cgi), 7.0.15 (/bin/php70-cgi)
Et voilà!