Automated Webmin installation from repository

What is Webmin?

Webmin is a web-based interface for system administration for Unix. Using any modern web browser, you can setup user accounts, Apache, DNS, file sharing and much more. Webmin removes the need to manually edit Unix configuration files like /etc/passwd, and lets you manage a system from the console or remotely.

“install from RPM” VS “install from repository”

When installing from RPM by “rpm -U webmin-1.470-1.noarch.rpm” you will not be able to upgrade Webmin by simple yum upgrade. To upgrade such installation you will need to redownload and reinstall RPM manually. E.g. no automatic upgrades are done.

When Webmin is installed from a repository, bug fixes and security patches can be automated as are other system updates, and managed using yum.. Also, yum_updatesd daemon will warn you about updates and/or install them depending on it’s settings.

How to install from repository

Become root.

Copy and paste the following into console:

(echo "[Webmin]
name=Webmin Distribution Neutral
baseurl=http://download.webmin.com/download/yum
enabled=1" >/etc/yum.repos.d/webmin.repo
rpm --import http://www.webmin.com/jcameron-key.asc
yum -y install webmin)

Press enter if command hasn’t executed automatically.

Ok.

The Webmin repo and application are now installed.

Notice: Undefined variable: backup.tpl on line 43 – Opencart

<file path="admin/view/template/tool/backup">
      <operation>
         <search><![CDATA[
            <label class="col-sm-2 control-label"><?php echo $entry_export; ?></label>
            ]]></search>
         <add position="replace">
            <![CDATA[
         <label class="col-sm-2 control-label"><?php echo $entry_backup; ?></label>
            ]]>
         </add>
      </operation>
   </file>

Simply replace Line 43

<?php echo $entry_export;

for

<?php echo $entry_backup;

4 Ways to Identify Who is Logged-In on Your Linux System

As a system administrator, you may want to know who is on the system at any give point in time. You may also want to know what they are doing. In this article let us review 4 different methods to identify who is on your Linux system.

1. Get the running processes of logged-in user using w

w command is used to show logged-in user names and what they are doing. The information will be read from /var/run/utmp file. The output of the w command contains the following columns:

  • Name of the user
  • User’s machine number or tty number
  • Remote machine address
  • User’s Login time
  • Idle time (not usable time)
  • Time used by all processes attached to the tty (JCPU time)
  • Time used by the current process (PCPU time)
  • Command currently getting executed by the users

 
Following options can be used for the w command:

  • -h Ignore the header information
  • -u Display the load average (uptime output)
  • -s Remove the JCPU, PCPU, and login time.
# w
 23:04:27 up 29 days,  7:51,  3 users,  load average: 0.04, 0.06, 0.02
USER     TTY      FROM              LOGIN@   IDLE   JCPU   PCPU WHAT
sftpd-user   pts/0    dev-db-server        22:57    8.00s  0.05s  0.01s sshd: ramesh [priv]
www    pts/1    dev-db-server        23:01    2:53   0.01s  0.01s -bash
root     pts/2    dev-db-server        23:04    0.00s  0.00s  0.00s w

# w -h
sftpd-user   pts/0    dev-db-server        22:57   17:43   2.52s  0.01s sshd: ramesh [priv]
www    pts/1    dev-db-server        23:01   20:28   0.01s  0.01s -bash
root     pts/2    dev-db-server        23:04    0.00s  0.03s  0.00s w -h

# w -u
 23:22:06 up 29 days,  8:08,  3 users,  load average: 0.00, 0.00, 0.00
USER     TTY      FROM              LOGIN@   IDLE   JCPU   PCPU WHAT
sftpd-user   pts/0    dev-db-server        22:57   17:47   2.52s  2.49s top
www    pts/1    dev-db-server        23:01   20:32   0.01s  0.01s -bash
root     pts/2    dev-db-server        23:04    0.00s  0.03s  0.00s w -u

# w -s
 23:22:10 up 29 days,  8:08,  3 users,  load average: 0.00, 0.00, 0.00
USER         TTY      FROM               IDLE WHAT
sftpd-user   pts/0    dev-db-server        17:51  sshd: sftpd-user [priv]
www          pts/1    dev-db-server        20:36  -bash
root         pts/2    dev-db-server         1.00s w -s

2. Get the user name and process of logged in user using who and users command

who command is used to get the list of the usernames who are currently logged in. Output of the who command contains the following columns: user name, tty number, date and time, machine address.

# who
sftpd-user   pts/0        2009-03-28 22:57 (dev-db-server)
www          pts/1        2009-03-28 23:01 (dev-db-server)
root         pts/2        2009-03-28 23:04 (dev-db-server)

To get a list of all usernames that are currently logged in, use the following:

# who | cut -d' ' -f1 | sort | uniq
root
www
sftpd-user

Users Command

users command is used to print the user name who are all currently logged in the current host. It is one of the command don’t have any option other than help and version. If the user using, ‘n’ number of terminals, the user name will shown in ‘n’ number of time in the output.

# users
root www sftpd-user

3. Get the username you are currently logged in using whoami

whoami command is used to print the loggedin user name.

# whoami
root

whoami command gives the same output as id -un as shown below:

# id -un
root

who am i command will display the logged-in user name and current tty details. The output of this command contains the following columns: logged-in user name, tty name, current time with date and ip-address from where this users initiated the connection.

# who am i
root     pts/2        2009-03-28 23:04 (dev-db-server)

# who mom likes
root     pts/2        2009-03-28 23:04 (dev-db-server)

Warning: Don't try "who mom hates" command.

Also, if you do su to some other user, this command will give the information about the logged in user name details.

4. Get the user login history at any time

last command will give login history for a specific username. If we don’t give any argument for this command, it will list login history for all users. By default this information will read from /var/log/wtmp file. The output of this command contains the following columns:

  • User name
  • Tty device number
  • Login date and time
  • Logout time
  • Total working time
# last root
root   pts/0        dev-db-server   Fri Mar 27 22:57   still logged in
root   pts/0        dev-db-server   Fri Mar 27 22:09 - 22:54  (00:45)
root   pts/0        dev-db-server   Wed Mar 25 19:58 - 22:26  (02:28)
root   pts/1        dev-db-server   Mon Mar 16 20:10 - 21:44  (01:33)
root   pts/0        192.168.201.11  Fri Mar 13 08:35 - 16:46  (08:11)
root   pts/1        192.168.201.12  Thu Mar 12 09:03 - 09:19  (00:15)
root   pts/0        dev-db-server   Wed Mar 11 20:11 - 20:50  (00:39)

Security Hardening Linux using sysctl.conf


sysctl is an interface that allows you to make changes to a running Linux kernel. With /etc/sysctl.conf you can configure various Linux networking and system settings such as:

  1. Limit network-transmitted configuration for IPv4
  2. Limit network-transmitted configuration for IPv6
  3. Turn on execshield protection
  4. Prevent against the common ‘syn flood attack’
  5. Turn on source IP address verification
  6. Prevents a cracker from using a spoofing attack against the IP address of the server.
  7. Logs several types of suspicious packets, such as spoofed packets, source-routed packets, and redirects.

sysctl command

The sysctl command is used to modify kernel parameters at runtime. /etc/sysctl.conf is a text file containing sysctl values to be read in and set by sysct at boot time. To view current values, enter:

# sysctl -a
# sysctl -A
# sysctl net.ipv4.conf.all.rp_filter

Sample /etc/sysctl.conf

Edit /etc/sysctl.conf and update it as follows. The file is documented with comments.

# The following is suitable for dedicated web server, mail, ftp server etc. 
# ---------------------------------------
# BOOLEAN Values:
# a) 0 (zero) - disabled / no / false
# b) Non zero - enabled / yes / true
# --------------------------------------
# Controls IP packet forwarding
net.ipv4.ip_forward = 0
 
# Controls source route verification
net.ipv4.conf.default.rp_filter = 1
 
# Do not accept source routing
net.ipv4.conf.default.accept_source_route = 0
 
# Controls the System Request debugging functionality of the kernel
kernel.sysrq = 0
 
# Controls whether core dumps will append the PID to the core filename
# Useful for debugging multi-threaded applications
kernel.core_uses_pid = 1
 
# Controls the use of TCP syncookies
# net.ipv4.tcp_syncookies = 1
net.ipv4.tcp_synack_retries = 2
 
########## IPv4 networking start ##############
# Send redirects, if router, but this is just server
net.ipv4.conf.all.send_redirects = 0
net.ipv4.conf.default.send_redirects = 0
 
# Accept packets with SRR option? No
net.ipv4.conf.all.accept_source_route = 0
 
# Accept Redirects? No, this is not router
net.ipv4.conf.all.accept_redirects = 0
net.ipv4.conf.all.secure_redirects = 0
 
# Log packets with impossible addresses to kernel log? yes
net.ipv4.conf.all.log_martians = 1
net.ipv4.conf.default.accept_source_route = 0
net.ipv4.conf.default.accept_redirects = 0
net.ipv4.conf.default.secure_redirects = 0
 
# Ignore all ICMP ECHO and TIMESTAMP requests sent to it via broadcast/multicast
net.ipv4.icmp_echo_ignore_broadcasts = 1
 
# Prevent against the common 'syn flood attack'
net.ipv4.tcp_syncookies = 1
 
# Enable source validation by reversed path, as specified in RFC1812
net.ipv4.conf.all.rp_filter = 1
net.ipv4.conf.default.rp_filter = 1
 
########## IPv6 networking start ##############
# Number of Router Solicitations to send until assuming no routers are present.
# This is host and not router
net.ipv6.conf.default.router_solicitations = 0
 
# Accept Router Preference in RA?
net.ipv6.conf.default.accept_ra_rtr_pref = 0
 
# Learn Prefix Information in Router Advertisement
net.ipv6.conf.default.accept_ra_pinfo = 0
 
# Setting controls whether the system will accept Hop Limit settings from a router advertisement
net.ipv6.conf.default.accept_ra_defrtr = 0
 
# Router advertisements can cause the system to assign a global unicast address to an interface
net.ipv6.conf.default.autoconf = 0
 
# How many neighbor solicitations to send out per address?
net.ipv6.conf.default.dad_transmits = 0
 
# How many global unicast IPv6 addresses can be assigned to each interface?
net.ipv6.conf.default.max_addresses = 1
 
########## IPv6 networking ends ##############
 
# Enable ExecShield protection
kernel.exec-shield = 1
kernel.randomize_va_space = 1
 
# TCP and memory optimization 
# increase TCP max buffer size set using setsockopt()
#net.ipv4.tcp_rmem = 4096 87380 8388608
#net.ipv4.tcp_wmem = 4096 87380 8388608
 
# Increase Linux auto tuning TCP buffer limits
#net.core.rmem_max = 8388608
#net.core.wmem_max = 8388608
#net.core.netdev_max_backlog = 5000
#net.ipv4.tcp_window_scaling = 1
 
# Increase system file descriptor limit    
fs.file-max = 65535
 
# Allow for more PIDs 
kernel.pid_max = 65536
 
# Increase system IP port limits
net.ipv4.ip_local_port_range = 2000 65000

To use this settings paste the above sysctl variables in /etc/sysctl.conf and ask sysctl command to read and apply the newly added conf settings:

# sysctl -p

Hopefully you should not get errors while applying the sysctl settings, if you get some errors, it’s possible some of the variable is differently named (depending on the Linux kernel version) or the Linux distribution on which sysctl are implemented.

You don’t have permission to access /index.php on this server OpenCart + CentOS + Apache + MOD_SECURITY

oc-strange-bug

I noticed a problem after migrating a Opencart v2 project to a new server.  (Special thanks to Dejan)

Server Specs : HP Proliant Blade Server G7 Dual XEON ~ 24 Cores

Running : CentOS 7.x / Webmin / Apache / MySQL / CSF / MOD_SEC

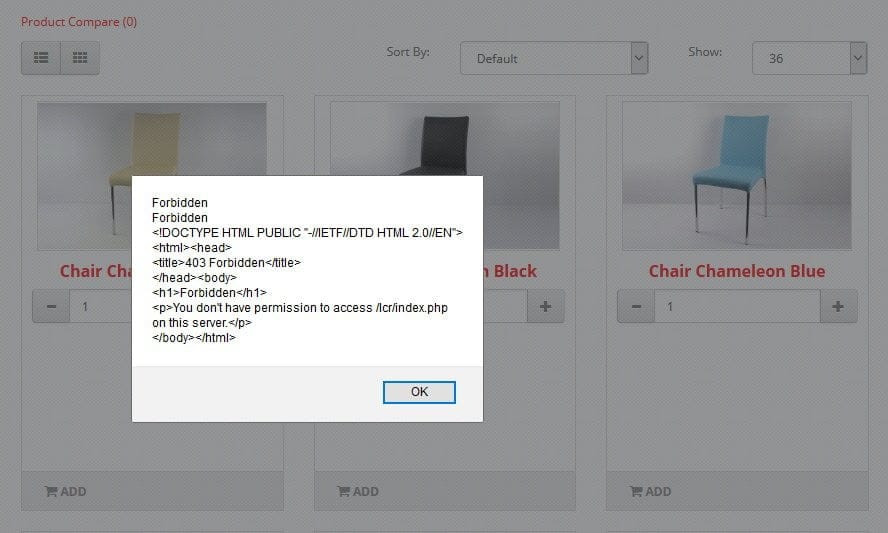
I ran into a problem when I was adding multiple products at the same time into the cart “A fresh OpenCart Install”. After the third click on Add to Cart… I received this error!

Forbidden “You don’t have permission to access /…/index.php”

After reading a lot of blog’s on this subject and many tests,,… I found out that this was caused by the server!

This apply only if you have installed MOD_SECURITY on your Apache Server.

How to fix this?

Open the following configuration file /etc/httpd/conf.f/mod_evasive.conf

# mod_evasive configuration
LoadModule evasive20_module modules/mod_evasive24.so

<IfModule mod_evasive24.c>
# The hash table size defines the number of top-level nodes for each
# child’s hash table.  Increasing this number will provide faster
# performance by decreasing the number of iterations required to get to the
# record, but consume more memory for table space.  You should increase
# this if you have a busy web server.  The value you specify will
# automatically be tiered up to the next prime number in the primes list
# (see mod_evasive.c for a list of primes used).
DOSHashTableSize    3097

# This is the threshhold for the number of requests for the same page (or
# URI) per page interval.  Once the threshhold for that interval has been
# exceeded, the IP address of the client will be added to the blocking
# list.
DOSPageCount        3  “CHANGE THIS TO 12”

# This is the threshhold for the total number of requests for any object by
# the same client on the same listener per site interval.  Once the
# threshhold for that interval has been exceeded, the IP address of the
# client will be added to the blocking list.
DOSSiteCount        50

Save the .conf file and then restart your Apache Server

Et voilà!

NOTE

http://stackoverflow.com/questions/23007551/the-fastcgi-process-exited-unexpectedly

Install wordpress over Windows 2012 R2 Server

Note: Install both version x64 and x86

Display SSH Login Message

To display Welcome or Warning message for SSH users before login. We use issue.net file to display a banner massages.

Open the following file with NANO editor

# yum -y install nano

nano /etc/issue.net

Add the following banner sample message and save the file.

######################################
#    W E L C O M E   TO  MY  SSHD  SERVER   #
######################################

save the issue.net document

To use the banner message you have to edit the sshd_config document located in

# /etc/ssh/sshd_config

or

# /etc/ssh/ssh_config

Edit the sshd_config document with NANO

# nano /etc/ssh/sshd_config

or

# nano /etc/ssh_config

Search for the word “Banner” and uncomment out the line

#Banner /some/path

Change #Banner /some/path

Banner /etc/issue.net (You can use any path you like!)

Save the document!

Restart your SSHD server

# systemctl restart sshd

Check if the SSHD server is running

# systemctl status sshd

Connect to your SSH server and you will see your new login message

CLEAROS ~ a good alternative to SonicWall vs Fortinet devices!

clearfoundation-logo

ClearOS was recently named by Linux Voice the #1 server distribution for it’s variety of server functions. Many have called ClearOS the Swiss Army Knife® of operating systems for the same reason, ClearOS offers 100+ IT functions all easily installable through ClearOS Marketplace. ClearOS is dedicated to delivering a stable, scalable, and affordable solution for the Server, Network, Gateway and many Cloud Integrated technologies. Linux Voice said it best when they said:

clearos_circles

Simple & Elegant Web Management

ClearOS is managed through Webconfig; a web-based user interface available through any browser on almost any web-connected device.

content_filter_bus

ClearOS is available in 3 Flavors

ClearOS in 3 flavors!

* Community edition is 100% Free!

The ClearOS TEAM!

clearos-team

See more ClearOS team

Note: All text, pictures or graphics are Copyrighted to the ClearOS Foundation.

https://www.montreal.poweredbyclear.com

Best command line tools for linux performance monitoring

Sometimes a system can be slow and many reasons can be the root cause. To identify the process that is consuming memory, disk I/O or processor capacity you need to use tools to see what is happening in an operation system.

There are many tools to monitor a GNU/Linux server. In this article, I am providing 6 monitoring tools and i hope it will help you.

First install EPEL RPM extras repo:

# sudo yum install epel-release

Htop

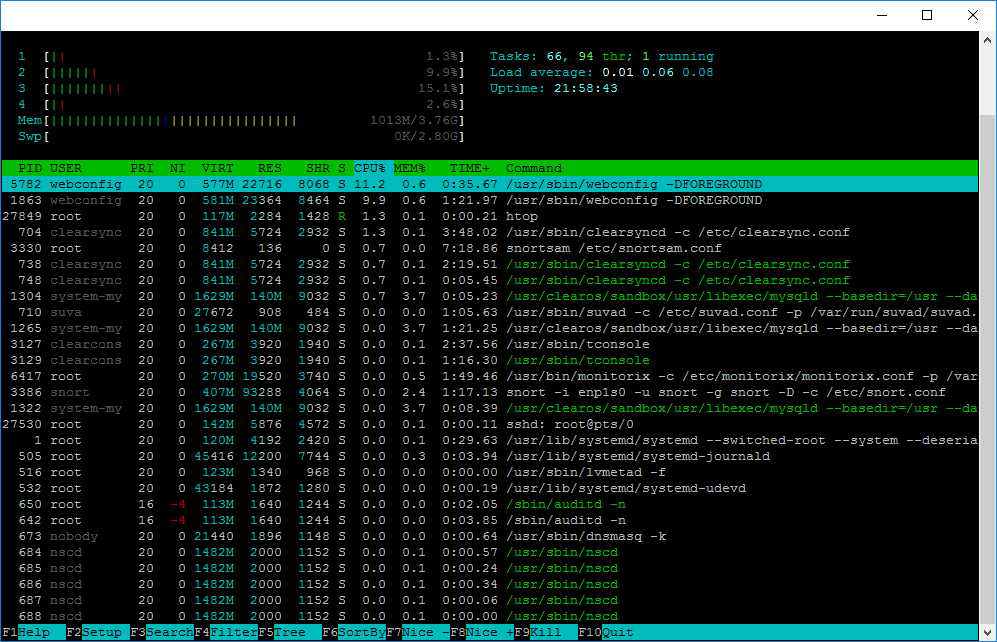
Htop is an alternative of top command but it provides interactive system-monitor process-viewer and more user friendly output than top.
htop also provides a better way to navigate to any process using keyboard Up/Down keys as well as we can also operate it using mouse.

htop

# yum -y install htop

To start Htop simply type the following

# htop

dstat

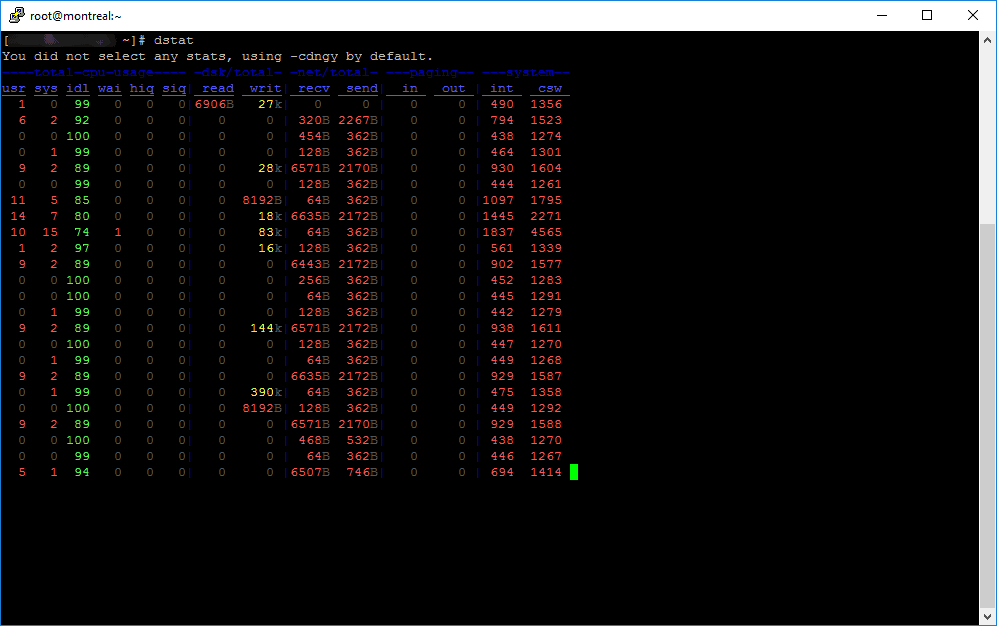
Dstat is a versatile replacement for vmstatiostatnetstat and ifstatDstat overcomes some of their limitations and adds some extra features, more counters and flexibility. Dstat is handy for monitoring systems during performance tuning tests, benchmarks or troubleshooting.
Dstat allows you to view all of your system resources in real-time, you can eg. compare disk utilization in combination with interrupts from your IDE controller, or compare the network bandwidth numbers directly with the disk throughput (in the same interval).
Dstat gives you detailed selective information in columns and clearly indicates in what magnitude and unit the output is displayed. Less confusion, less mistakes. And most importantly, it makes it very easy to write plugins to collect your own counters and extend in ways you never expected.
Dstat’s output by default is designed for being interpreted by humans in real-time, however you can export details to CSV output to a file to be imported later into Gnumeric or Excel to generate graphs.

dstat

# yum -y install dstat

To start dstat simply type the following

# dstat

Saidar

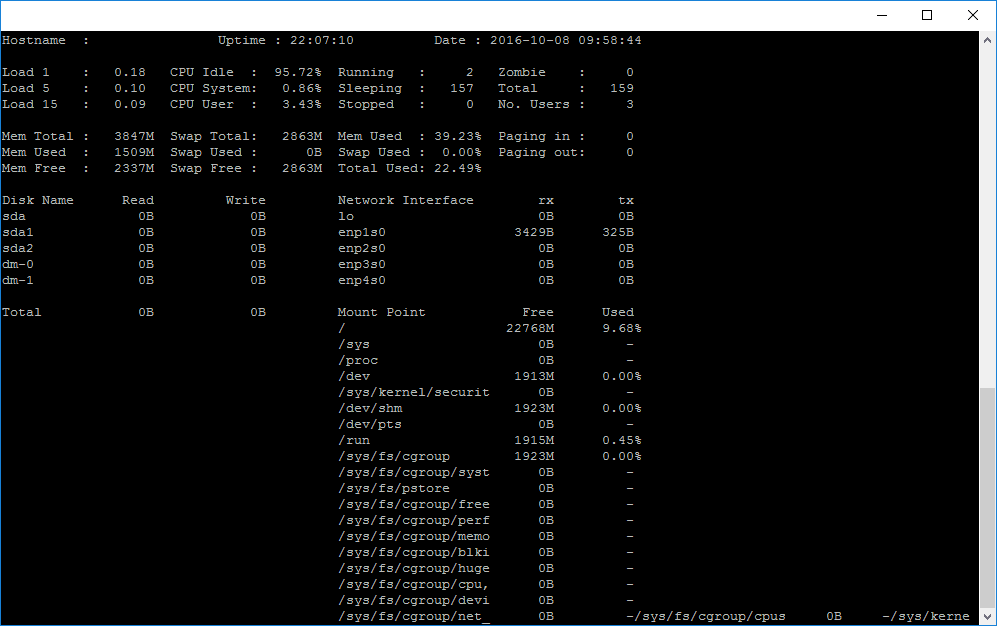
Saidar is a curses-based application to display system statistics. It use the libstatgrab library, which provides cross platform access to statistics about the system on which it’s run. Reported statistics include CPUloadprocessesmemoryswapnetwork input and output and disks activities along with their free space.

saidar

# yum -y install saidar

To start saidar simply type the following

# saidar

Glances

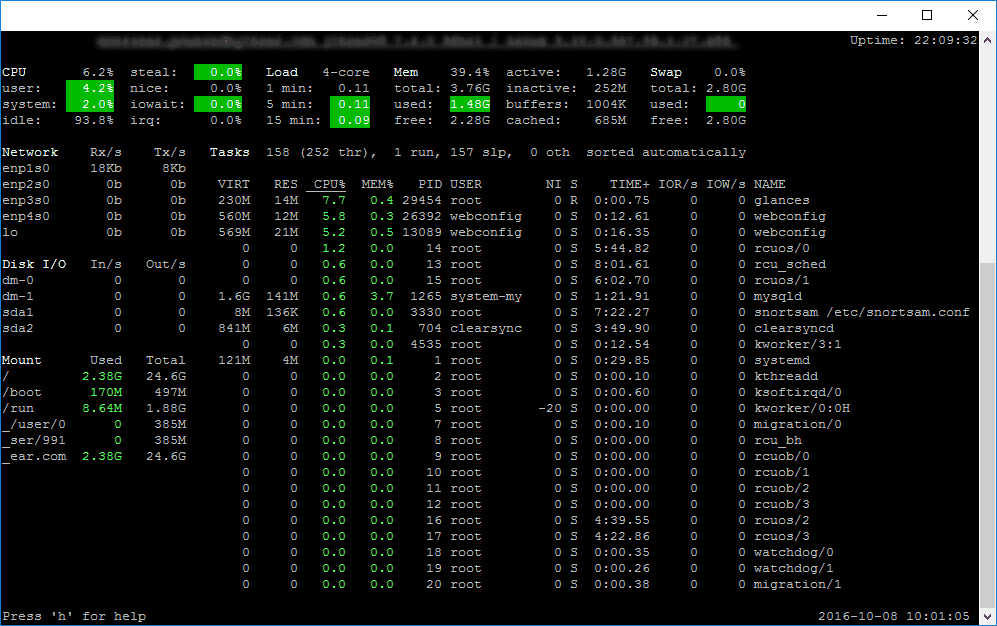
Glances is a cross-platform curses-based command line monitoring tool writen in Python which use the psutil library to grab informations from the system. Glance monitoring CPULoad AverageMemoryNetwork InterfacesDisk I/OProcessesand File System spaces utilization.

Glances can adapt dynamically the displayed information depending on the terminal siwrize. It can also work in a client/server mode for remote monitoring.

glances

# yum -y install glances

To start glances simply type the following

# glances

Atop

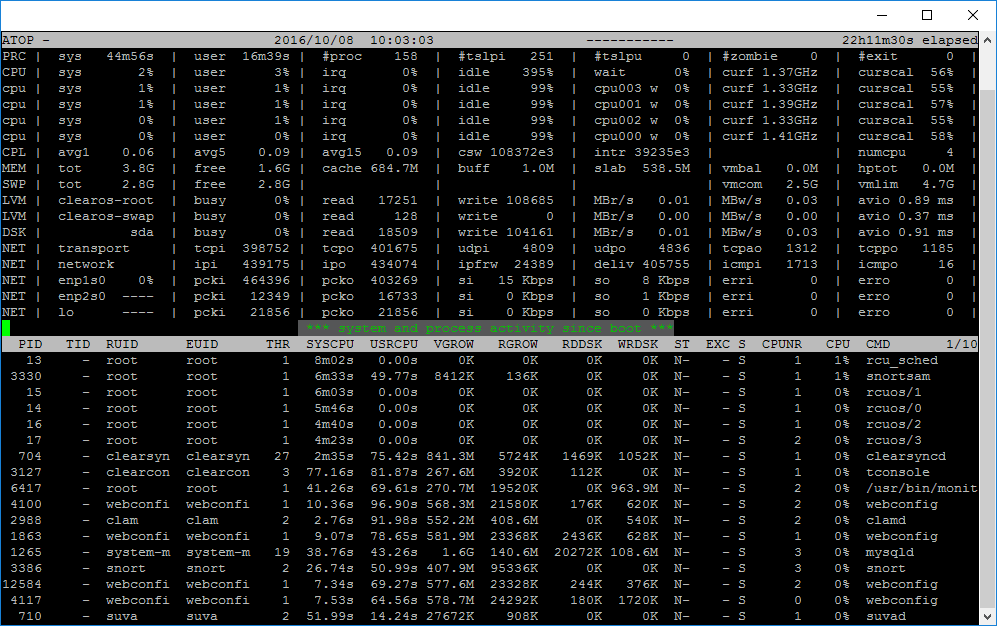
Atop is an interactive monitor to view the load on a Linux system. It shows the occupation of the most critical hardware resources on system level, i.e. cpu, memory, disk and network. It also shows which processes are responsible for the indicated load with respect to cpu- and memory load on process level.

Disk load is shown if per process “storage accounting” is active in the kernel or if the kernel patch ‘cnt’ has been installed. Network load is only shown per process if the kernel patch ‘cnt’ has been installed.

atop

# yum -y install atop

To start Atop simply type the following

# atop

IPTraf

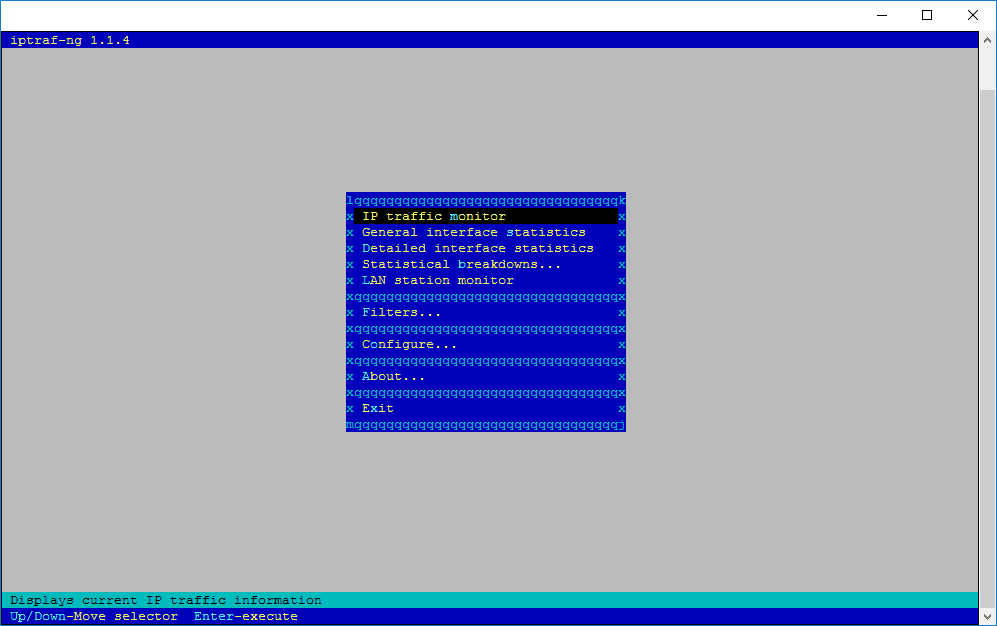
The iptraf command is interactive colorful IP LAN monitor. It is an ncurses-based IP LAN monitor that generates various network statistics including TCP info, UDP counts, ICMP and OSPF information, Ethernet load info, node stats, IP checksum errors, and others. It can provide the following info in easy to read format:

  • Network traffic statistics by TCP connection
  • IP traffic statistics by network interface
  • Network traffic statistics by protocol
  • Network traffic statistics by TCP/UDP port and by packet size
  • Network traffic statistics by Layer2 address

iptraf

# yum -y install iptraf

To start IPTraf simply type the following

# iptraf

or

# iptraf-ng

Enjoy!

Backup Server using Mondo Rescue

Good day! Here is a good tool to backup your entire CentOS server called Mondo Rescue.

First step! Download MondoRescue Repository for your Linux OS distribution version using following command:

cd /etc/yum.repos.d/
wget ftp://ftp.mondorescue.org/rhel/6/x86_64/mondorescue.repo

After downloading MondoRescue Repository, run the following command to install MondoRescue.

# yum install mondo

After installing Mondo, Run “mondoarchive” command from “root” user. Then follow steps according to screenshot that shows how to create Backup/Clone in ISO based backup media of your full system.

# mondoarchive

First you need to choose the backup media and press Enter.

mondo-rescue-step-1

Please enter the full path name to the directory for your ISO Images and press Enter.

mondo-rescue-step-2

Now select the type of compression type like: bzip2, gzip, lzo & lzma and press Enter.

mondo-rescue-step-3

Now select the compression level and press Enter.

mondo-rescue-step-4

Please enter how large you want each ISO image in MB (Megabytes) and press Enter.

mondo-rescue-step-5

Please give the name of ISO image filename and press Enter.

mondo-rescue-step-6

Please add the filesystems to backup (separated by “|“). The default filesystem is “/” means full backup.

mondo-rescue-step-7

Please exclude the filesystem that you don’t want to backup like /tmp.

mondo-rescue-step-8

Please enter your temporary directory path or select default one.

mondo-rescue-step-9

Now enter your scratch directory path or select default one.

mondo-rescue-step-10

If you would like to backup extended attributes. Just press “enter“.

mondo-rescue-step-11

It will found full path name of your Kernel.

mondo-rescue-step-12

If you want to Verify your backup, then Click “Yes“

mondo-rescue-step-13

If you want to proceed the backup then click on “Yes”

mondo-rescue-step-14

Creating a catalog of “/” filesystem.

mondo-rescue-step-15

Dividing filelist into sets.

mondo-rescue-step-16

Follow up the other setup and build your backup. You may also take a look at the log file located here:

# /var/log/mondoarchive.log

NOTE : Your backup will be located in /var/cache/mondo/

I ran into a problem with one of my HP Server

Error: Package: perl-IO-Interface-1.05-2.el6.x86_64 (mondorescue)
Requires: perl(:MODULE_COMPAT_5.10.1)

5_10_missing

5.10… 😉 missing!

Have fun!

Midnight Commander in ClearOS

Install Midnight Commander on ClearOS 7+

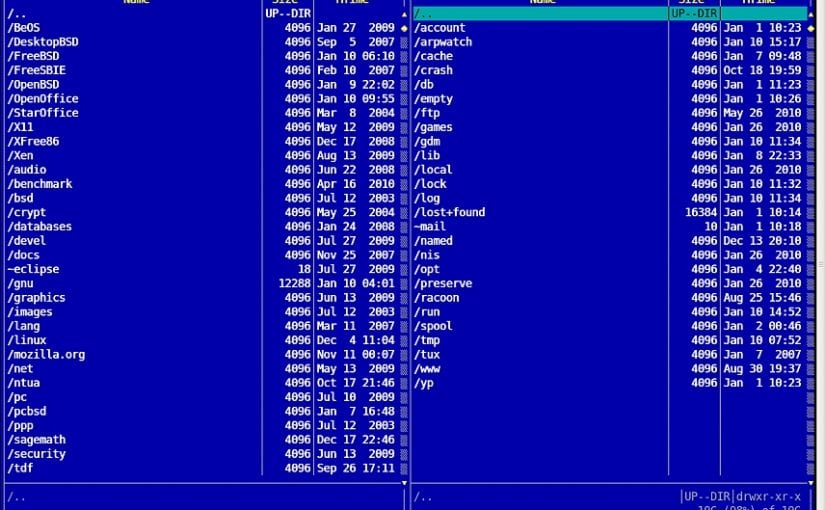
GNU Midnight Commander (also known as mc) is a free and visual file manager, licensed under GNU General Public License. It is a clone of Norton Commander. It was started by Miguel de Icaza in 1994. It’s a feature rich full-screen text mode application that allows you to copy, move and delete files and whole directory trees, search for files and run commands in the subshell. Internal viewer and editor are included.

Features

Midnight Commander is quite powerful and boasts an extensive set of features:

  • Performs all the common file and directory manipulations such as copying, moving, renaming, linking, and deleting.
  • Allows manipulation of file and directory permissions.
  • Can treat remote systems (via FTP or SSH) as though they were local directories.
  • Can treat archive files (like .tar and .zip) as though they were local directories.
  • Allows creation of a user-defined “hotlist” of frequently used directories.
  • Can search for files based on file name or file contents, and treat the search results like a directory.

Install Midnight Commander (mc) On Centos / RHEL / Fedora Linux / ClearOS

# yum -y install mc

How do I use mc?

Simply type the following command:

# mc

Sample outputs:

NOTE : Midnight Commander also support your mouse device 😉

Enjoy!

Prevent new user to browse your CentOS server using sFTP

Good day! I run into a problem yesterday that allowed a new created account to navigate my entire CentOS server when connecting using sFTP protocol. Here is the step by step guide to fix this major problem in CentOS/Webmin/VirtualMIN.

    1. Create a new account in VirtualMIN / Ex. mynewwebsite.com
      After you created the new account you will have to set things up so that when this new account user connect to your sFTP (I use proFTPD) they will not be able to navigate your entire server.

NOTE: You will have to create a new UserGroup : sftpusers

In webmin, navigate to this section /Others/File Manager/ Once you are there select the new created account

/home/mynewwebsite

You will have to do 3 more steps

  1. CHOWN the new created directory to ROOT
    NOTE : Do not use recursive!
  2. You have to set now the directory permissions to 0755
  3. Run this command in Shell # usermod -G sftpusers USERNAME

proftpd-root-01

NOTE : This will add your new created account to the sFTPusers group!

After this your new created account will only have permission to navigate into the directory /home/mynewwebsite/ when connecting with sFTP.

Enjoy!

Are you having a hard time installing this device?

Wow! I am stuck now!!! Trying to install my new Intel 3160 WIFI

minipcie card into … with red hat! Updated Kernel too!

Will crack my head on this ~ one… & will keep you posted

You should stick with this card … for C/OS & PFS…

Qualcomm Atheros!

Cheers!

Setup…
IMG_4169

Test failed! kernel 4.2! + updated bios + firmware .14 no luck, Thanks for all the help out there.;.. result = Qualcomm Atheros! 100%

Just ordered this beauty!

thinkpenguin

https://www.thinkpenguin.com/gnu-linux/wireless-n-pci-express-dual-band-mini-half-height-card-tpe-nhmpcied2

Supported distributions:

*ClearOS 6.x , 7.x
Trisquel 4.5, 5, 5.5, 6, 6.01, 7

Ubuntu 10.04, 10.10, 11.04, 11.10, 12.04, 12.10, 13.04, 13.10, 14.04, 14.10, 15.04, 15.10, 16.04
Lubuntu 10.04, 10.10, 11.04, 11.10, 12.04, 12.10, 13.04, 13.10, 14.04, 14.10, 15.04, 15.10, 16.04
Kubuntu 10.04, 10.10, 11.04, 11.10, 12.04, 12.10, 13.04, 13.10, 14.04, 14.10, 15.04, 15.10, 16.04
Peppermint Linux OS 1, 2, 3, 4, 5, 6, 7
LinuxMint 9, 10, 11, 12, 13, 14, 14.1, 15, 16, 17, 17.1, 17.2, 17.3, 18
Fedora 13, 14, 15, 16, 17, 18, 19, 20, 21, 22, 23, 24
OpenSuSE 11.0, 11.1, 11.2, 11.3, 11.4, 12.1, 12.2, 12.3, 13.1, 13.2, Leap 42.1
Mageia 1, 2, 3, 4, 5, 6
Slackware 13.1, 13.37, 14, 14.1, 14.2
Debian 6, 7, 8
Tails 1.0, 1.0.1, 1.1, 1.1.1, 1.1.2, 1.2, 1.2.1, 1.2.2, 1.2.3, 1.3, 1.3.1, 1.3.2, 1.4, 1.4.1, 1.5, 1.5.1, 1.6, 1.7, 2.0, 2.0.1, 2.3, 2.4
PCLinuxOS 2011.6, 2011.9, 2012.2, 2013.2, 2013.4, 2013.6, 2013.7, 2013.715, 2013.10, 2013.12, 2014.04, 2014.05, 2014.07, 2014.08, 2014.12, 2016.03
Red Hat Enterprise Linux (RHEL) 7 Series 7.0, 7.1, 7.2
Red Hat Enterprise Linux (RHEL) 6 Series 6.5, 6.6, 6.7, 6.8
CentOS 7 Series 7.0, 7.1, 7.2
CentOS 6 Series 6.5, 6.6, 6.7, 6.8
Scientific Linux 7 Series 7.0, 7.1, 7.2
Scientific Linux 6 Series 6.5, 6.6, 6.7, 6.8

* will test this out soon!

All test are done, this card work like a charm for ClearOS 7.x and the latest stable PFSENSE. The WI-FI signal is very strong depending of your antenna setup! I used for my test…,,, (2) 12DBI 3′ long antenna 😉

antenna-2

Cheers!

SFTP Connection Error Received unexpected end-of-file from SFTP server

proftpd

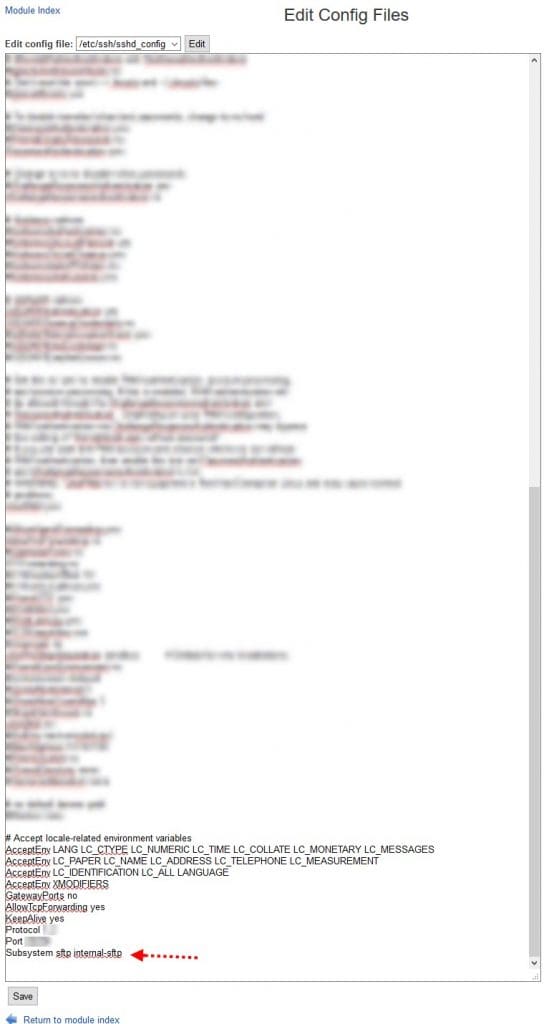
Here are the steps to fix the issue of sFTP – Received unexpected end-of-file – error when trying to connect to the sFTP Server.

First step is to edit your sshd_config file.

# nano /etc/ssh/sshd_config

Then scroll down until you see this line:

# Subsystem sftp /usr/lib/openssh/sftp-server

*  Do not worry if you don’t find this line, just add this code at the end of your sshd_config file.

SFTP Connection Error Received unexpected end-of-file

Subsystem sftp internal-sftp

Now restart SSHD! and try to connect to your sFTP Server.

et voilà!

Configure SSH for high security RSA-4096 Bits

There are some steps to do after SSH is installed on a system and there is a old saying that says “A chain is only as strong as its weakest link” and if you are using a weak password for your root account (or any other account) then you are extremely vulnerable. It does not matter if the communication is secure when you are easily brute forced. All steps is used on a Ubuntu 11.10 but should be the same on OpenBSD, Debian, Linux Mint or any other Linux distribution with none or very few modifications.

We are going to do the following steps

  • Create certificate
  • Set correct credentials to .ssh folder and files
  • Shut down the possibility to log in with password
  • Prevent root to log in via SSH
  • Remove less secure encryption methods
  • Enable visual identification of the server fingerprint
  • Optional: Change SSH port (does really not not increase security)

Create certificate
We are going to use a RSA-key with a key length of 4096 bits. Open a terminal and enter the following “‘ssh-keygen -t rsa -b 4096”.  1024 bits key should be enough but better to be safe than sorry.

Generating public/private rsa key pair
ssh-keygen -t rsa -b 4096

Then you will be asked where to store the key. If you already got keys in id_dsa then you should enter another file name or your existing keys will be overwritten. If you are satisfied with the suggestion simply press enter.

Enter file in which to save the key (/home/accountname/.ssh/id_rsa)

It’s now time to enter a password. Use a strong password with big and small letters, numbers and symbols. The password should also be unique and stored on a secure place like in a encrypted container.

Enter passphrase (empty for no passphrase): 2sWf3+@/’?B>.%DpBU”r
Enter same passphrase again: 2sWf3+@/’?B>.%DpBU”r

Your identification has been saved in /home/accountname/.ssh/id_rsa.
Your public key has been saved in /home/accountname/.ssh/id_rsa.pub.

The key fingerprint is:
31:b0:be:0b:5b:7c:f1:79:65:e4:72:42:18:08:c4:8d
The key’s randomart image is:

+–[ RSA 4096]—-+
|     o++ ..o.          |
|      Eoo ..            |
|      . o   . .           |
|     .   o o +         |
|      . S   +           |
|     . o o o          |
|    . + o .            |
|     + o .             |
|    . .                  |
+—————–+

Enable the public key for authentication
The public key should be stored in ~/.ssh/authorized_keys and there can be more then one key for a single user. Just make a new row for each public key. If you key should be installed on the same system from where you just created the private key simply copy id_rsa.pub to authorized_keys

# ~$ cd ~/.ssh
# ~/.ssh$ cp id_rsa.pub authorized_keys

Set correct credentials to .ssh folder and files

Make sure that your working folder is your home folder, replace “john” with your username.

# ~/.ssh$ cd ~
# ~/.ssh$ sudo chown -R john:john .ssh
# ~/.ssh$ sudo chmod -R 600 .ssh
# ~/.ssh$ sudo chmod +x .ssh

Do a test log in to test the public key

# ~/.ssh$ ssh john@localhost
Enter passphrase for key ‘/home/john/.ssh/id_rsa’:

After you entered the private key password you should have access to your machine, if not you will have to look for errors in the logs but I will not cover this in this guide.

Configure sshd
The next step is to modify sshd. All settings we will change is in the file /etc/ssh/sshd_config. Start to make a backup of sshd_config just in case.

# john@john-laptop:/$ sudo cp /etc/ssh/sshd_config /etc/ssh/sshd_config_backup

Use desired editor to edit sshd_config. I prefer vi but I will use nano in this example

# john@john-laptop:/$ sudo nano /etc/ssh/sshd_config

The following lines is going to be added or altered:

PermitRootLogin yes
#PasswordAuthentication yes
Ciphers

PermitRootLogin no

root should never be used since it much more secure to use a regular user instead and then you need to perform a administrative task use the command sudo instead which gives you temporary administrative rights
We are also going to prevent the possibility to log in with password (you will be forced to use the private key). Find the rows which looks like  this:

PermitRootLogin yes

Modify it to look like this

PermitRootLogin no

Find the row which look like this

#PasswordAuthentication yes

Modify it to look like this

PasswordAuthentication no

At the end Cipers is going to be added and it may not apply never installations but the default ciphers has not always been the best choices and sshd should be forced to only use the strongest ones.

Ciphers aes128-ctr,aes256-ctr,arcfour256,arcfour,aes128-cbc,aes256-cbc

Verify these entries:

  • Protocol 2
  • UsePrivilegeSeparation yes
  • StrictModes yes
  • RSAAuthentication yes
  • PubkeyAuthentication yes

Save and exit

Restart to active the settings.

# ~/.ssh$ sudo service ssh restart
or
# systemctl restart sshd

Verified that SSHD is running

# systemctl status sshd

Enable visual identification of the servers fingerprint (Visual Host Key)
It’s not easy to verify and remember the fingerprint of a host since it’s a long hexadecimal string that may look like this one: ” 31:b0:be:0b:5b:7c:f1:79:65:e4:72:42:18:08:c4:8d” , some one may have altered the DNS record so that you in fact are trying to authenticate to a rouge server and to remember that string is near impossible. . It’s more easy to remember a visual fingerprint but it’s still not bulletproof. It’s absolute best to verify the exact string every time and that is done by most SSH clients and for example openssh stored them in ~/.ssh/known_hosts and gives you a warning if it has changed.

Do the following to enable visual host key

Edit eider /etc/ssh/ssh_config witch effects all users on the system or ~/.ssh/config to enable it for a single user.

Add the following lines (“Host * is already at top of ssh_config)

Host *
VisualHostKey yes

Test and verify
It’s now time to test and verify. You should not be able to log in without your private key and password authentication should been disabled. You should also see your visual finger print when you tries to log in.

Your SSH should be more safe now but remember that SSH probably was the most secure software from the beginning with default settings and MySQL, Apache or any other system also has to be secured.

Enjoy!

Virtualmin multiple account RSA-2048 Bits Key Setup

rsa-security

In the article I will eleborate how to install a 2048 Bits RSA Encryption Key for multiple Virtual Server on your Webmin/Virtualmin system.

Generate the RSA Key in your /home/accountname/.ssh

To do that, you can log in as the SSH user in question, navigate to the /home/accountname/.ssh folder, and run this command:

ssh-keygen -t rsa

That will generate (2) key files.
id_rsa and id_rsa.pub

id_rsa = Client
id_rsa.pub = Server

Next step will be to add or create a file called authorized_keys inside the  /home/accountname/.ssh

Open a text editor leave it blank and copy the content of the id_rsa.pub key. Save the file & upload it to your server into /home/accountname/.ssh

Now download your id_rsa key on your system in a safe place.

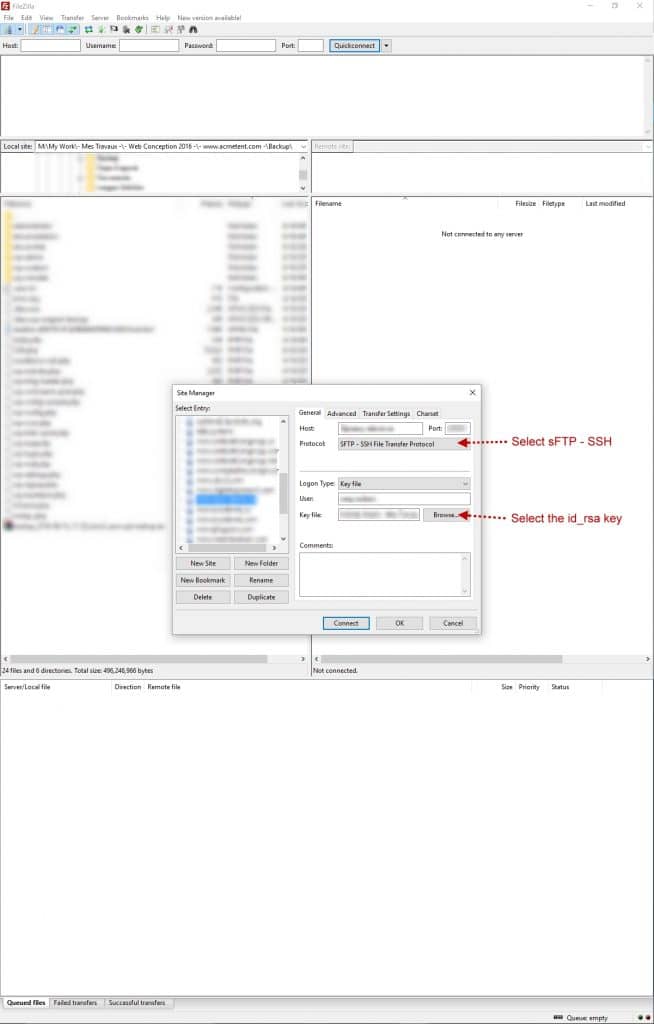
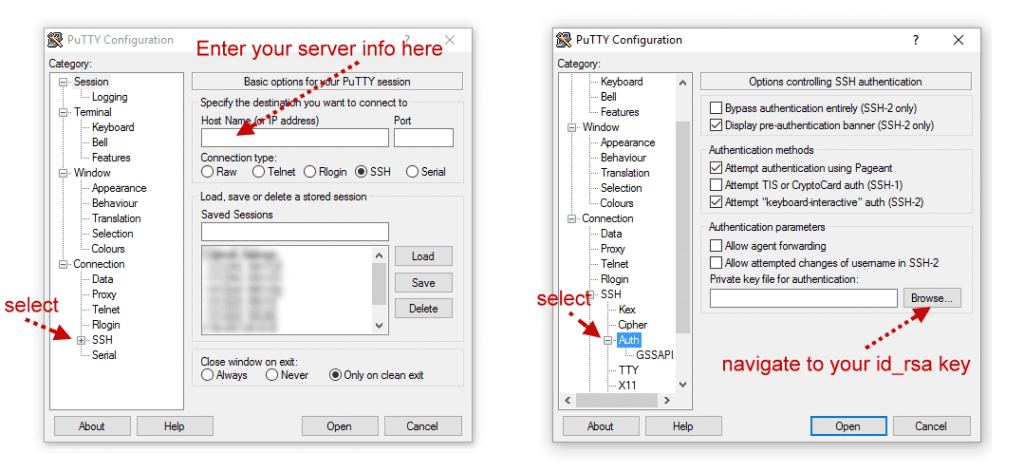
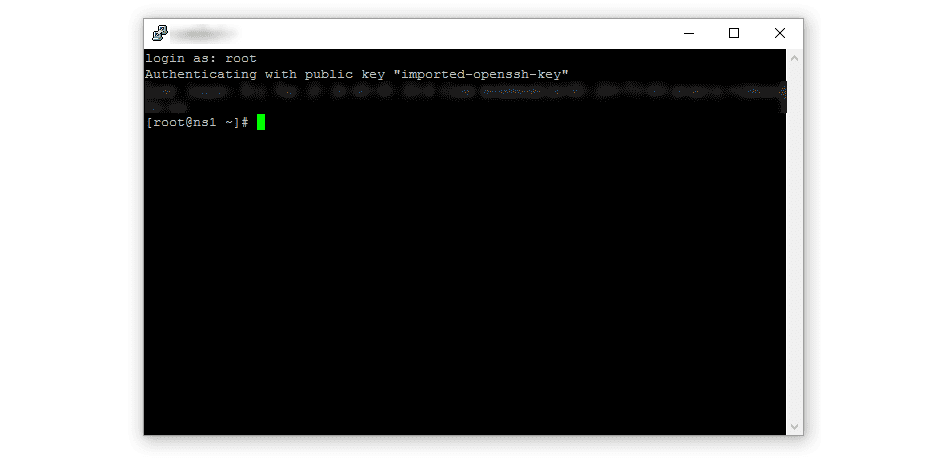
After those steps you will be able to connect using RSA 2048 Bits Key. The key is good for FileZilla, Putty or any other program that support KeyFile Login.

FILEZILLA
* Make sure to have the latest version. In older version you don’t have the option of using a KEY File !

filezilla-rsa-key

PUTTY

ras-putty

NOTE: Make sure those options are there in  /etc/ssh/sshd_config

# The default is to check both .ssh/authorized_keys and .ssh/authorized_keys2
# but this is overridden so installations will only check .ssh/authorized_keys
AuthorizedKeysFile    .ssh/authorized_keys

# To disable tunneled clear text passwords, change to no here!
#PasswordAuthentication yes
#PermitEmptyPasswords no
PasswordAuthentication no

# Change to no to disable s/key passwords
#ChallengeResponseAuthentication yes
ChallengeResponseAuthentication no

rsa-putty

Et voilà!

Install rkhunter (Rootkit Hunter)

rkhunter (Rootkit Hunter) is a Unix-based tool that scans for rootkits, backdoors and possible local exploits. It does this by comparing SHA-1 hashes of important files with known good ones in online databases, searching for default directories (of rootkits), wrong permissions, hidden files, suspicious strings in kernel modules, and special tests for Linux and FreeBSD.

Install RKHunter which is the Rootkit Detection tool

Install from EPEL

# yum – -enablerepo=epel -y install rkhunter

# nano /etc/sysconfig/rkhunter
Recipient address for report

MAILTO=root@localhost

If specified “yes”, scan more detaily

DIAG_SCAN=no

Update database

# rkhunter – -update

Update system file properties

# rkhunter – -propupd

Execute checking
–sk means sikpping to push Enter key.
If specified –rwo , display only warnings

# rkhunter – -check – -sk

How to force sshd server to display login banner

Pre login banner is use for sending a warning message before authentication may be relevant for getting legal protection or just give out information to users. The contents of the specified file are sent to the remote user before authentication is allowed. This option is only available for protocol version 2. By default, no banner is displayed (if you are using latest version of Linux/UNIX then you do not have to worry about version issue).

Procedure to change OpenSSH pre login banner

1) By default sshd server turns off this feature.

2) Login as the root user; create your login banner file:

# vi /etc/ssh/sshd-banner

Append text:
Welcome to nixCraft Remote Login!

3) Open sshd configuration file /etc/sshd/sshd_config using a text editor:

# vi /etc/sshd/sshd_config

4) Add/edit the following line:

Banner /etc/ssh/sshd-banner

5) Save file and restart the sshd server:

# /etc/init.d/sshd restart

Arpwatch Tool to Monitor Ethernet Activity in Linux

WARNING : BE CAREFUL USING ARPWATCH,
IT MAY CAUSE IP CONFLIC!

Arpwatch is an open source computer software program that helps you to monitor Ethernet traffic activity (like Changing IP and MAC Addresses) on your network and maintains a database of ethernet/ip address pairings. It produces a log of noticed pairing of IP and MAC addresses information along with a timestamps, so you can carefully watch when the pairing activity appeared on the network. It also has the option to send reports via email to an network administrator when a pairing added or changed.

This tool is specially useful for Network administrators to keep a watch on ARP activity to detect ARP spoofing or unexpected IP/MAC addresses modifications.

By default, Arpwatch tool is not installed on any Linux distributions. We must install it manually using ‘yum‘ command on RHEL, CentOS, Fedora and ‘apt-get‘ on Ubuntu, Linux Mint and Debian.

# yum install arpwatch

Let’s focus on the some most important arpwatch files, the location of the files are slightly differ based on your operating system.

  1. /etc/rc.d/init.d/arpwatch : The arpwatch service for start or stop daemon.
  2. /etc/sysconfig/arpwatch : This is main configuration file…
  3. /usr/sbin/arpwatch : Binary command to starting and stopping tool via the terminal.
  4. /var/arpwatch/arp.dat : This is the main database file where IP/MAC addresses are recorded.
  5. /var/log/messages : The log file, where arpwatch writes any changes or unusual activity to IP/MAC.

Type the following command to start the arpwatch service.

# chkconfig --level 35 arpwatch on
# /etc/init.d/arpwatch start

Arpwatch Commands and Usage

To watch a specific interface, type the following command with ‘-i‘ and device name.

# arpwatch -i eth0

So, whenever a new MAC is plugged or a particular IP is changing his MAC address on the network, you will notice syslog entries at ‘/var/log/syslog‘ or ‘/var/log/message‘ file.

# tail -f /var/log/messages

You can also check current ARP table, by using following command.

# arp -a

If you want to send alerts to your custom email id, then open the main configuration file ‘/etc/sysconfig/arpwatch‘ and add the email as shown below.

# -u <username> : defines with what user id arpwatch should run
# -e <email>    : the <email> where to send the reports
# -s <from>     : the <from>-address
OPTIONS="-u arpwatch -e email@domain.xxx -s 'root (Arpwatch)'"

Lynis is a powerful auditing tool for Linux

Lynis is an open source and much powerful auditing tool for Unix/Linux like operating systems. It scans system for security information, general system information, installed and available software information, configuration mistakes, security issues, user accounts without password, wrong file permissions, firewall auditing, etc.

Lynis is one of the most trusted automated auditing tool for software patch management, malware scanning and vulnerability detecting in Unix/Linux based systems. This tool is useful for auditors, network and system administrators, security specialists and penetration testers.

Installation of Lynis
Lynis doesn’t required any installation, it can be used directly from any directory. So, its good idea to create a custom directory for Lynis under /usr/local/lynis.

# mkdir /usr/local/lynis

Download stable version of Lynis source files from the trusted website using wget command and unpack it using tar command as shown below.

# cd /usr/local/lynis
# wget https://cisofy.com/files/lynis-2.2.0.tar.gz

Unpack the tarball

# tar -xvf lynis-2.2.0.tar.gz

Running and using Lynis Basics
You must be root user to run Lynis, because it creates and writes output to /var/log/lynis.log file. To run Lynis execute the following command.

# cd lynis
# ./lynis

By running ./lynis without any option, it will provide you a complete list of available parameters and goes back to the shell prompt.

To start Lynis process, you must define a --check-all parameter to begin scanning of your entire Linux system. Use the following command to start scan with parameters as shown below.

# ./lynis --check-all

Once, you execute above command it will start scanning your system and ask you to Press [Enter] to continue, or [CTRL]+C to stop) every process it scans and completes.

To prevent such acknowledgment (i.e. “press enter to continue”) from user while scanning, you need use -c and -Q parameters as shown below.

# ./lynis -c -Q

It will do complete scan without waiting for any user acknowledgment. See the following screencast.

Creating Lynis CronJobs
If you would like to create a daily scan report of your system, then you need to set a cron job for it. Run the following command at the shell.

# crontab -e

Add the following cron job with option --cronjob all the special characters will be ignored from the output and the scan will run completely automated.

30	22	*	*	*	root    /path/to/lynis -c -Q --auditor "automated" --cronjob

The above example cron job will run daily at 10:30pm in the night and creates a daily report under /var/log/lynis.log file.

Lynis Scanning Results
While scanning you will see output as [OK] or [WARNING]. Where [OK] considered as good result and [WARNING] as bad. But it doesn’t mean that [OK] result is correctly configured and [WARNING] doesn’t have to be bad. You should take corrective steps to fix those issues after reading logs at /var/log/lynis.log.

In most cases, the scan provides suggestion to fix problems at the end of the scan. See the attached figure that provides a list of suggestion to fix problems.

Updating Lynis
If you want to update or upgrade current lynis version, simple type the following command it will download and install latest version of lynis.

# ./lynis update info         [Show update details]
# ./lynis update release      [Update Lynis release]

Lynis Parameters
Some of the Lynis parameters for your reference.

  1. --checkall or -c : Start the scan.
  2. --check-update : Checks for Lynis update.
  3. --cronjob : Runs Lynis as cronjob (includes -c -Q).
  4. --help or -h : Shows valid parameters
  5. --quick or -Q : Don’t wait for user input, except on errors
  6. --version or -V : Shows Lynis version.

That’s it, we hope this article will be much helpful you all to figure out security issues in running systems. For more information visit the official Lynis page at

https://cisofy.com/download/lynis/.

Direct Download Lynis 2.2.0 Tar File

Enjoy!

SSH via key files for Putty & Filezilla

PLEASE NOTE THAT I AM NOT USING MULTIPLE ACCOUNT ON THIS SERVER. IF YOU USE MULTIPLE ACCOUNTS YOU NEED TO MAKE THOSE STEP IN THE /HOME/(USER ACCOUNT NAME)

  1. Go to /root/.ssh directory (If directory does not exist create it)
  2. cat known_hosts (If it does not exist create it)
  3. ssh-keygen -t rsa (Create the private and public keys)
  4. Enter passphase (Hit enter twice for none)
  5. ls -a (You will see now the Private Local Machine Key and the Public Server Key)
  6. cat id_rsa.pub
  7. Copy the id_rsa.pub
  8. In the .ssh directory run the following command
    # touch authorized_keys
  9. Copy the id_rsa.pub key in the authorized_keys file
  10. If you did not already did this step you are good to go!
    navigate to /etc/ssh/sshd_config
  11. Navigate to …
    # To disable tunneled clear text passwords, change to no here!
    #PasswordAuthentication yes
    #PermitEmptyPasswords no
    PasswordAuthentication yes
  12. You have to set the PasswordAuthentication no
  13. For the rest of the installation just follow the video!

Here is what I do after, download the private key id_rsa to your computer. Open filezilla and add a new connection by using “LOGON TYPE: Key File”

RSA_KEY

Add the key file that you downloaded “id_rsa” then Filezilla will prompt you to created the final key file by converting it to .ppk “I named my keyfile filezilla.ppk”

When the new key is saved you will be able to login to the ftp server.

P.S Use the same filezilla.ppk key for PUTTY 😉

Also you will notice that if you use CSF you will have a stronger security!

csf-score

Et voilà!

.htaccess Migration problem with XCloner

htaccess-migration-problem-xcloner

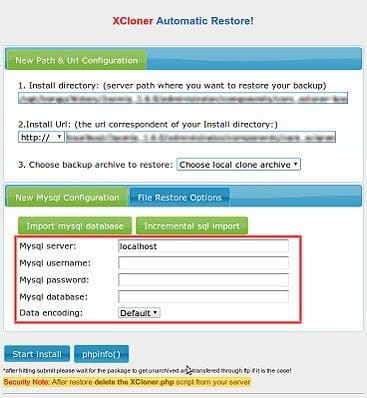
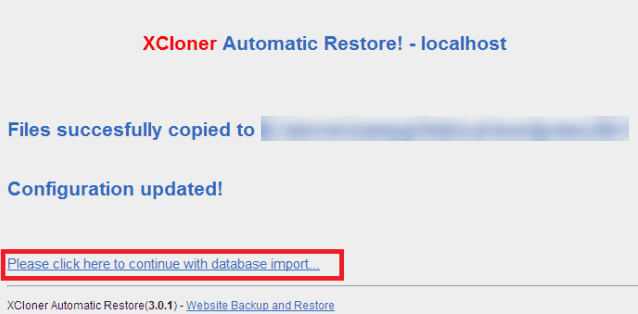
I had run into problems migrating my blog on my temporary server before the big migration. The plugin I use is called XCloner Backup and Restore, a pretty nice way to backup & restore your wordpress onto a new server. The problem was that the .htaccess was making a Internal 500 error.

Simple solution was to rename the .htaccess to .htaccess-migration OR JUST DELETE IT IN THE ROOT!

After doing so XCloner was able to reborn my blog!

Cheers to Dejan for this one!