Libre office
Only office
Gimp
Krita
Darktable
Virtualbox
Davinci Resolve
Inkscape
Obs studio
Blender
Audacity
Handbrake
Enjoy!
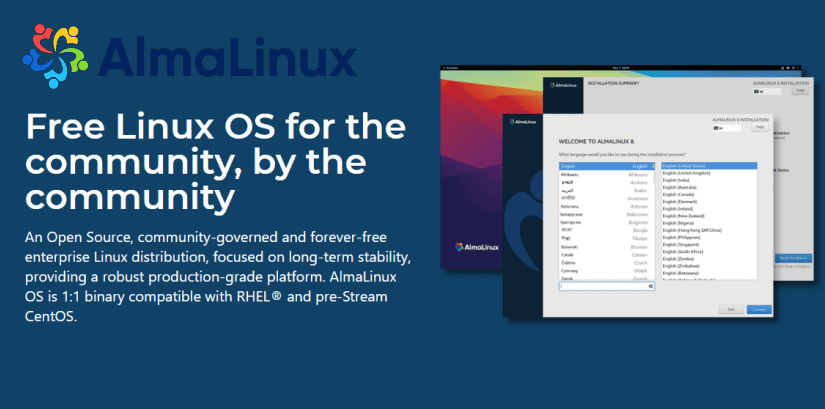
AlmaLinux OS is an open-source, community-driven Linux operating system that fills the gap left by the discontinuation of the CentOS Linux stable release. AlmaLinux OS is a 1:1 binary compatible fork of RHEL® guided and built by the community.
As a standalone, completely free OS, AlmaLinux OS enjoys $1M in annual sponsorship from CloudLinux Inc and support from other sponsors. Ongoing development efforts are governed by the members of the community.
The AlmaLinux OS Foundation is proud to announce the release of the only 100% community owned and governed CentOS alternative, AlmaLinux OS 8.4 Stable for the Arm/AArch64 architecture. Available now on a mirror near you! Download a fresh copy and then join us to talk about it. Container images are also available on Docker Hub and Quay.io.
This release was the true product of collaboration. We would like to publicly thank all those that were involved in this effort–community members, sponsors and partners–to ensure that the most popular chipsets and hardware was supported and well tested. This release would not have been possible without the tremendous efforts of the community, so first and foremost, thank you the most. We would also like to thank our sponsors and partners, Arm for their sponsorship and technical expertise and to Ampere for ensuring their processors and hardware are well supported out of the gate. Thank you to Amazon Web Services for their sponsorship and for facilitating testing of the release on Graviton processors/instances–we know this is important to many in the community. We have a Marketplace AMI available and community AMIs available in every AWS region and those will soon be updated to include AArch64 as well. The legendary Oregon State University Open Source Lab also assisted with sponsorship of build nodes and OpenStack testing infrastructure. We’d also like to give a special shout out and thank you to Equinix Metal. Equinix Metal sponsored bare metal instances for building and testing, but there is more to it. They have this awesome Open Source project called Tinkerbell, which is a bare metal provisioning and management engine and we were able to submit patches upstream that the whole community can benefit from.
Thanks to the community for the thousands of downloads of AlmaLinux OS, all your valuable feedback, bug reports and most of all your contributions. This is a production ready, stable release to power all your computing needs and workloads.
You can read more about it by checking out the Release Notes. This release utilizes our new geolocation powered mirror infrastructure giving you super fast network installs and updates. OpenSCAP support is included as well as the -devel repo.
Imagine running your favorite Windows applications and drivers in an open-source environment you can trust.
That’s the mission of ReactOS!
Our own main features are:
Source: https://reactos.org/
Working since a couple of days to run Windows 11 on a simple Acer Aspire One Laptop, the Insider lastest Build of Windows 11 needed a memory upgrade from 1GB to 4GB of ram to be able to function! The Leaked DEV edition was working good with 1GB of ram! This is a old laptop that is not supporting UEFI! It’s running TPM 1.2 and loading in Legacy mode!
Figure this one out!
Have fun with this one!
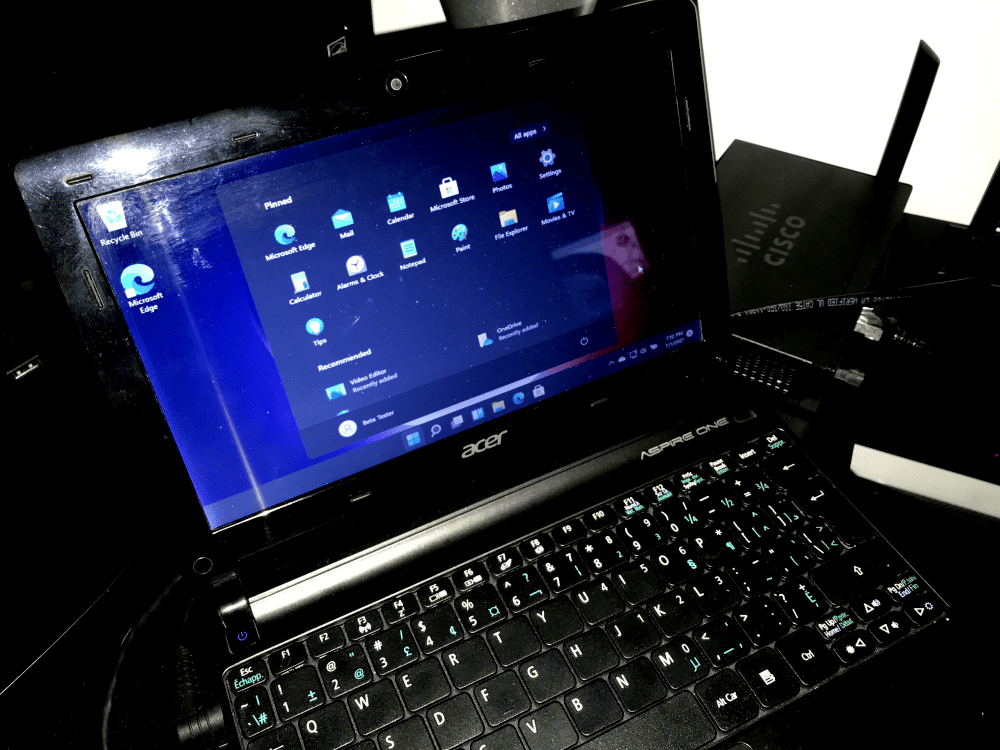
Running Windows 11 – Build 22000.51 – Acer Aspire One # System Model : AOD270 – ATOM N2600 @ 1.60GHz, 1600 Mhz, 2 CORE(S), 4 Logical, Bios V1.06 3/5.2012
Microsoft is releasing its first Windows 11 preview build today. Windows Insiders can download the Windows 11 preview (build 22000.51) right now, which includes access to the new Start menu, multitasking features, and overhauled Microsoft Store. Unlike the previous Windows 11 leak, this official preview also features an updated File Explorer that replaces the ribbon with a command bar to simplify file management a little more.
Most of the Windows 11 visual changes that Microsoft revealed last week will be available in this initial preview. The new Start menu with its centered launcher-like interface is part of this build, alongside rounded corners throughout the OS and improvements to the notification center, volume flyouts, and more. If your PC has an accelerometer, the Windows 11 lock screen will also include a parallax motion effect.

Windows 11’s new themes and dark / light mode improvements are also part of this preview, alongside the new Widgets feature. All of the new themes — Glow, Captured Motion, Sunrise, and Flow — are designed with the centered taskbar in mind, and Microsoft has coupled them with new sounds in Windows 11 as you use the OS.

Two big Windows 11 features are missing, though: Microsoft Teams integration and Android apps on Windows. Both are still being developed and tested by Microsoft but will appear in later preview builds.
:no_upscale()/cdn.vox-cdn.com/uploads/chorus_asset/file/22686514/Quick_Settings.png)
This Windows 11 preview also includes Microsoft’s new Snap Groups and Snap Layouts features, to improve multitasking across a variety of screen sizes. These new Snap features build on a lot of the multitasking features that have been in Windows for years but make them easier to discover and more useful — particularly in multiple-monitor scenarios.
Microsoft is also overhauling the Settings section of Windows 11. This preview build include changes that make it easier to navigate around and find the setting you need. Settings now has a left-hand navigation panel that persists throughout, making it quicker to switch between sections. Microsoft has built new “hero” controls at the top that offer quick access to information or settings that are relevant for each section.
:no_upscale()/cdn.vox-cdn.com/uploads/chorus_asset/file/22686515/Settings_Personalization.png)
Alongside the Windows 11 preview today, Microsoft is also releasing a preview of its Office refresh for Windows 11. The updated UI includes rounded corners in Office apps to match Windows 11 and some changes to how the dark and light modes work.
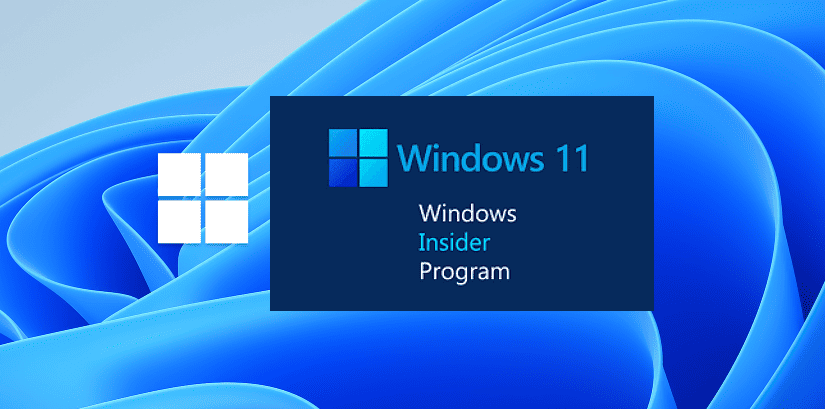
If you’re interested in testing the Windows 11 preview build, you’ll need to enroll in the Windows Insiders program and then navigate to Settings > Update & Security > Windows Insider Program on a Windows 10 device to enable the Dev Channel and obtain Windows 11 builds.
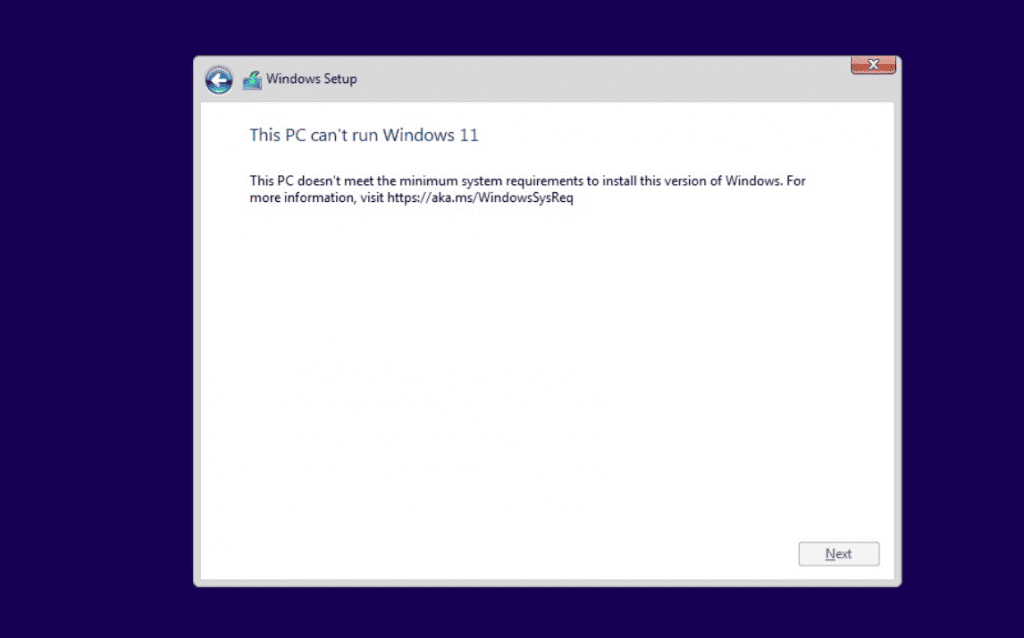
You’ll need a compatible machine, although Microsoft says it’s waiving its new hardware requirements during this preview period for those who have been testing Windows builds prior to June 24th. Otherwise, you’ll need to use Microsoft’s PC Health Check app to see if your system is compatible.

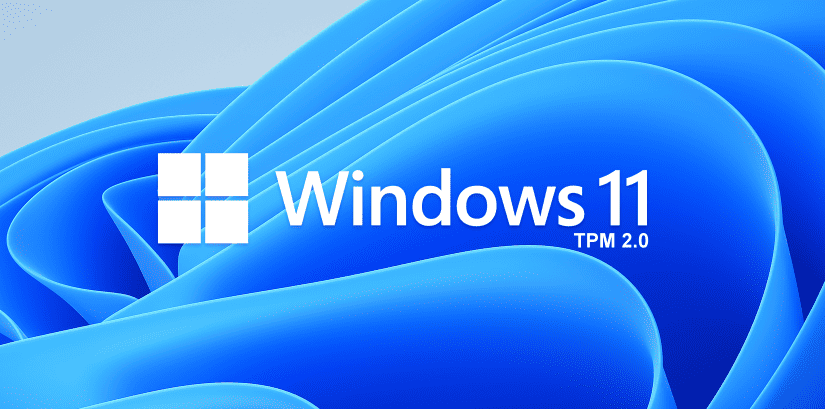
Microsoft has updated its documentation around the minimum Trusted Platform Module (TPM) security requirements for installing Windows 11, saying now that PCs will be required to have a TPM 2.0 chip in order to run the operating system.
In the updated documentation, Microsoft has removed the reference to a “hard floor” for Windows 11 that would’ve allowed PCs with TPM 1.2 to still install the new OS.
Microsoft’s original documentation had characterized TPM 2.0 as a recommendation rather than a requirement. According to the original documentation, as long as a PC had at least TPM 1.2 – which was released in 2011 – it would meet the minimum security requirements for Windows 11. Microsoft had said that devices with TPM 1.2 would “receive a notification that upgrade is not advised,” but wouldn’t be prohibited from installing Windows 11.
For Intel Core chips, support for Windows 11 starts at the eighth-generation line, meaning that PCs with seventh-gen Intel Core chips and older would not be compatible with Windows 11, based on Microsoft’s disclosure.
The first builds of Windows 11 will begin rolling out to Windows Insider testers early next week, and Windows 11 will be generally available this holiday as a free update for compatible Windows 10 PCs, Microsoft said. Windows 11 will only see one major feature update per year, in contrast to the twice-a-year feature updates for Windows 10, the company disclosed.
Check for compatibility
Use the PC Health Check app to see if your current PC meets the requirements to run Windows 11. If so, you can get a free upgrade when it rolls out.
Direct Download link on the official Microsoft website

You may also verified that your computer have the minimum TPM 2.0 installed by opening TPM.msc
You may need to activated it in your Bios option if it’s available.
Enjoy!
I will post a workaround method to be able to install windows 11 on older unsupported computer soon! Stay tuned 😉
To be able to install Windows 11 on unsupported computer you will need :
Install Windows directly into your existing OS, insert your USB key and just run setup
Workaround method 1
🙂
Workaround method 2
This is not for production and it’s only for you to see the new windows 11 on your unsupported computer.
Note that many device driver will not work yet!
Workaround method 3
Modify Registry
The first method involves simply editing Windows Registry during the installation process of the new operating system. On unsupported devices, if you try to install the new OS, a message will appear on your screen stating that the computer isn’t compatible.
At that screen, you need to press Shift+F10 to open Command Prompt window and modify the registry. In Command Prompt, you need to run regedit.exe and create a new key “LabConfig” under HKEY_LOCAL_MACHINE\SYSTEM\Setup. In the “LabConfig” key, create two new entries:
Save the changes and compatibility errors will disappear.
Otherwise, you can also create a .reg file with the following line of code:
Windows Registry Editor Version 5.00 [HKEY_LOCAL_MACHINE\SYSTEM\Setup\LabConfig] “BypassTPMCheck”=dword:00000001 “BypassSecureBootCheck”=dword:00000001
Save this (.reg) file in a USB drive and perform a clean installation of Windows 11 when it is officially released. During the installation process, press Shift + F10 and type notepad and hit enter.
In Notepad, open the file menu and locate and apply the reg file. This will bypass the TPM+SecureBoot requirements.
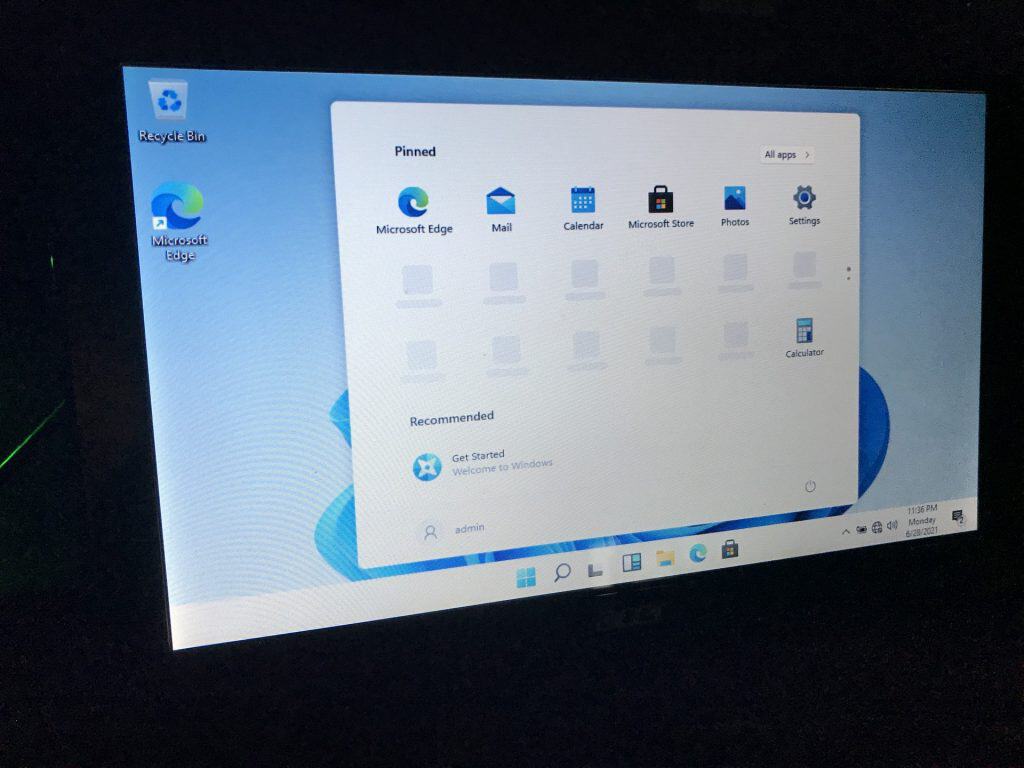
Here is a view of Windows 11 installed on Acer Aspire One with TPM 1.2

Install PHP 8.0 alongside other PHP versions
# sudo yum -y install https://dl.fedoraproject.org/pub/epel/epel-release-latest-7.noarch.rpm
# sudo yum -y install https://rpms.remirepo.net/enterprise/remi-release-7.rpm
# sudo yum -y install yum-utils
# sudo yum-config-manager –disable ‘remi-php*’
# sudo yum-config-manager –enable remi-safe
# sudo yum -y install php80
The current situation is causing Québec businesses’ needs to evolve quickly and challenges to multiply. At Videotron Business and Fibrenoire, we are committed to supporting all our customers as they get ready to relaunch their activities. Discover the various measures, offers, and solutions we have implemented to help businesses of all kinds across Québec—big and small—rise to the challenges that come with our new reality.
![]()
The Uninstaller module is Revo Uninstaller ‘s primary feature for situations when a program won’t uninstall normally or when you have some doubts that a program has not been uninstalled completely.
Also when a program is uninstalled, often times there are multiple files, folders, and/or Registry entries left on your system, which can cause various issues if not removed. This happens more frequently than you might think.
Revo Uninstaller acts as both a replacement and a supplement to the built-in functionality in Windows by first running the built-in uninstaller for the program, and then scanning for leftover data afterwards, making it your best choice when it comes to completely remove stubborn programs, temporary files, and other unnecessary program data that is left behind after the standard uninstall process.
Why ClearOS?
Applications and an operating system come with your computer, tablet, and phone. So, why not on your server? HPE is redefining the small business server by offering ClearOS with HPE ProLiant servers. ClearOS is a simple, open, and affordable operating system with an intuitive graphical web-based user interface and an application marketplace with over 100 apps to choose from, with more being added every day. Leveraging open source software, you decide what applications you need and only pay for the applications and support you want.
HPE and ClearCenter are making it easy for small, home, remote, and branch offices to have a server ready to use, out of the box, at no additional cost. HPE ProLiant integrated with ClearOS offers a simple, affordable, and secure experience. Building the IT solution that is just right for you has never been easier.
https://montreal.poweredbyclear.com/
Powered by ClouDNS – ClearOS – Videotron Ltee, Montreal, Quebec
😉
I really hope that! Ya! virtualmin will work on Centos 8!
Keep it on!
Installing rkhunter 1.4.6 on CentOS 7
I think that rkhunter is a valuable tool no matter the distribution that is used.
In CentOS 7 rkhunter 1.4.6 is found in the EPEL repository, we must make sure that this is available to use first:
$ sudo yum install -y epel-release
The install then is straight forward using yum.
$ sudo yum install rkhunter
$ sudo rkhunter --update
$ sudo rkhunter --propupd
We may also want to manually copy the /etc/passwd and /etc/group file to /var/lib/rkhunter. I gerenerally do not as they are copied in the first scan. The ubuntu install makes copies of these files for you.
If we don’t the first scan will warn that the group file and passwd file could have changed.
$ sudo rkhunter --check --sk
...
Performing group and account checks
    Checking for passwd file                          [ Found ]
    Checking for root equivalent (UID 0) accounts     [ None found ]
    Checking for passwordless accounts                [ None found ]
    Checking for passwd file changes                  [ Warning ]
    Checking for group file changes                   [ Warning ]
    Checking root account shell history files         [ OK ]
Further details can be found in the log file /var/log/rkhunter/rkhunter.log. Note that with rkhunter 1.4.6 on CentOS 7 we have the extra rkhunter log directory. As this is the first scan though, we know that the reference files did not exist.
They will exist now and on a second running the warning will not show. Of course, adding a new user will trigger the warning again but will also update the reference files, /var/lib/rkhunter/passwd and /var/lib/rkhunter/group. Each check will update the references.
By default the CentOS install does not check root access in SSH. We should enable this by editong /etc/rkhunter.conf. Look for the line:
ALLOW_SSH_ROOT_USER=unset
Change the line to read:
ALLOW_SSH_ROOT_USER=no
The file /etc/ssh/sshd_config can be configured with:
PermitRootLogin=no
Once set, restart the sshd service with:
$ sudo systemctl restart sshd
Running the rkhunter check now will report SSH root login as secured. The execution of rkhunter is enabled with cron by default.
Enjoy!
Lynis is a security auditing tool for UNIX derivatives like Linux, macOS, BSD, Solaris, AIX, and others.
It performs an in-depth security scan. Software packages are available via https://packages.cisofy.com.
Michael Boelen
Michael Boelen is company founder and responsible for defining strategy and development efforts. He is a specialist in the field of Linux and UNIX security. Work experience includes small to Fortune 500 companies (Philips, T-Systems, and ASML).
Contributions to the field include open source security tools like Rootkit Hunter (rkhunter) and Lynis. He is also a regular contributor to our blog Linux Audit, covering Linux security.
Enjoy!
Assuming that you have a running centos 7 server using webmin + virtualmin with a qualified domain name.
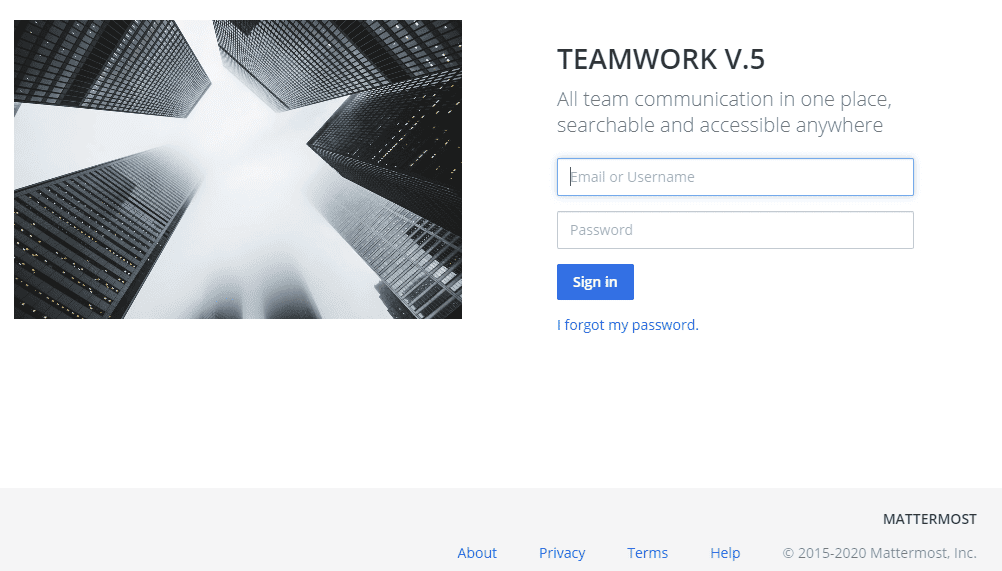
Mattermost is an open-source online chat service. Mattermost is developed by Mattermost Inc, and it is written in Golang and Javascript. Mattermost is designed as an internal chat server for organizations and being marketed as an alternate to Slack.
Mattermost has a simple web interface that can be used for administration as well as instant messaging. Besides that, there are various chat clients are available as Desktop and Mobile Apps for Mattermost chat server.
In this article, we are installing Mattermost 5 on CentOS 7 server. We are also installing PostgreSQL 11, as a prerequisite of Mattermost server software.
Install PostgreSQL yum repository as follows:
[root@easy-admin ~]# rpm -ivh https://download.postgresql.org/pub/repos/yum/reporpms/EL-7-x86_64/pgdg-redhat-repo-latest.noarch.rpm
The same PostgreSQL package provides the yum repositories for various versions of PostgreSQL database.
Therefore, we are disabling the PostgreSQL yum repositories other than version 11 as follows.
[root@easy-admin ~]# yum-config-manager –disable pgdg10 pgdg94 pgdg95 pgdg96
Build yum cache for PostgreSQL repository.
[root@easy-admin ~]# yum makecache fast
Install PostgreSQL client and server packages using yum command.
[root@easy-admin ~]# yum install -y postgresql11 postgresql11-server
Initialize PostgreSQL database instance as follows.
[root@easy-admin ~]# /usr/pgsql-11/bin/postgresql-11-setup initdb
Edit pg_hba.conf file to allow md5 based user authentication.
[root@easy-admin ~]# nano /var/lib/pgsql/11/data/pg_hba.conf
Find following directive:
host all all 127.0.0.1/32 ident
and update it as:
host all all 127.0.0.1/32 md5
Enable and start PostgreSQL service.
[root@easy-admin ~]# systemctl enable postgresql-11.service
Start PostgreSQL
[root@easy-admin ~]# systemctl start postgresql-11.service
Connect as postgres user and set password for admin user.
[root@easy-admin ~]# su – postgres
-bash-4.2$ psql
psql (11.4)
Type “help” for help.
postgres=# ALTER USER postgres WITH PASSWORD ‘123’;
ALTER ROLE
Create the Mattermost database.
postgres=# CREATE DATABASE mattermost;
Create the Mattermost user.
postgres=# CREATE USER mmuser WITH PASSWORD ‘123’;
CREATE ROLE
Grant all privileges on mattermost database to mmuser.
postgres=# GRANT ALL PRIVILEGES ON DATABASE mattermost to mmuser;
GRANT
Exit from psql and logout from postgres user.
postgres=# \q
-bash-4.2$ exit
logout
PostgreSQL 11 has been installed on CentOS 7 server.
Installing Mattermost 5 on CentOS 7 server:
Download Mattermost software using wget command.
[root@easy-admin ~]# cd /tmp
[root@easy-admin ~]# wget https://releases.mattermost.com/5.26.1/mattermost-5.26.1-linux-amd64.tar.gz
Extract downloaded TAR file using following command.
[root@easy-admin ~]# tar -C /opt -xvf mattermost-5.26.1-linux-amd64.tar.gz
Create the storage directory for Mattermost files. This storage directory is used to store files and images posted by Mattermost users.
[root@easy-admin ~]# cd
[root@easy-admin ~]# mkdir /opt/mattermost/data
Create OS user and group for Mattermost software.
[root@easy-admin ~]# useradd –system –user-group mattermost
Adjust file permissions and ownership of /opt/mattermost directory.
[root@easy-admin ~]# chown -R mattermost:mattermost /opt/mattermost [root@easy-admin ~]# chmod -R g+w /opt/mattermost
Edit /opt/mattermost/config/config.json file to set PostgreSQL database configurations.
[root@easy-admin ~]# nano /opt/mattermost/config/config.json
Search for “SqlSettings” section and update following directives therein.
“DriverName”: “postgres”, “DataSource”: “postgres://mmuser:123@127.0.0.1:5432/mattermost?sslmode=disable&connect_timeout=10”,
Testing Mattermost configurations by executing mattermost command.
[root@easy-admin ~]# cd /opt/mattermost/
[root@easy-admin ~]# sudo -u mattermost ./bin/mattermost
* Go get yourself a cup![]() of coffee and let it run a bit,
of coffee and let it run a bit,
The server should run now!
Exit!
Create a systemd service unit for Mattermost.
[root@easy-admin ~]# cd
[root@easy-admin ~]# nano /usr/lib/systemd/system/mattermost
…and define the service unit directives as follows.
[Unit]
Description=Mattermost
After=syslog.target network.target postgresql-11.service
[Service]
Type=notify
WorkingDirectory=/opt/mattermost
User=mattermost
ExecStart=/opt/mattermost/bin/mattermost PIDFile=/var/spool/mattermost/pid/master.pid
TimeoutStartSec=3600 LimitNOFILE=49152
[Install]
WantedBy=multi-user.target
Save and close Nano.
Enable and start mattermost.service.
[root@easy-admin ~]# systemctl enable mattermost.service
[root@easy-admin ~]# systemctl start mattermost.service
Allow Mattermost service port in Linux firewall (I use CSF).
[root@easy-admin ~]# firewall-cmd –permanent –add-port=8065/tcp
[root@easy-admin ~]# firewall-cmd –reload
Open your browser and go to http://yourdomain:8065
Fill out the information requested!
Et Voilà
😉
This will work on the latest Mattermost 5.26.1 release.
Hope you enjoy!

Boot up your PC using your windows 10 install disk or usb
Choose Repair your computer
Go in Advanced Option
Select the Command Prompt option
Type diskpart
> diskpart
DISKPART > list volume
Choose your biggest partition or where your system32 directory is located
Exit DISKPART
> exit
Type the following in the command prompt
> move d:\windows\system32\utilman.exe d:\windows\system32\utilman.exe.bak
> copy d:\windows\system32\cmd.exe d:\windows\system32\utilman.exe
restart
> wpeutil reboot
Click on Easy of Access
You are now in the dos prompt
net user fullaccess /add
net localgroup administrators fullaccess password /add
reboot
Select fullaccess user
Go in Control Panel
Click on user account
Select the account you wish to reset the password
Reboot
Go back to /system32/
copy to your desktop utilman.exe.bak
rename it on your desktop to utilman.exe
copy the file back to /system32/
Reboot
Maybe it will work, maybe not! The last resort would be to fetch the user data on a backup usb drive and re-install the hole thing!
Enjoy!
DIRECTOR: Stefan Malešević
CAST: Marta Bjelica, Dražen Pavlović, Nabi Tang, Vuk Janošević, Radoje Čupić
Jovana works at a bakery in the small town where she lives with her father. Her somewhat shy peer Marko is supposed to follow in his own father’s footsteps and become a truck driver. But the events of one night change both their lives…
Good day, we had some issues over the weekend at LiquidWeb! The problem was a large volume of crawling on some specific websites. Here is a good practice to prevent this from happening.
—————————————————————-
robot.txt (Block only those bots)
—————————————————————-
user-agent: AhrefsBot
user-agent: MJ12bot
user-agent: Semrushbot
disallow: /
—————————————————————-
robot.txt (Block all except google)
—————————————————————-
User-Agent: Googlebot
Allow: /
User-Agent: *
Disallow: /
This input will block access to your website to all bots apart of Google.
In Theory. Many bots don’t respect it so it is good idea to block them through .htaccess file.
—————————————————————-
.htaccess
—————————————————————-
RewriteEngine On
RewriteBase /
RewriteCond %{HTTP_USER_AGENT} .*Twice.* [OR]
RewriteCond %{HTTP_USER_AGENT} .*Yand.* [OR]
RewriteCond %{HTTP_USER_AGENT} .*Yahoo.* [OR]
RewriteCond %{HTTP_USER_AGENT} .*Voil.* [OR]
RewriteCond %{HTTP_USER_AGENT} .*libw.* [OR]
RewriteCond %{HTTP_USER_AGENT} .*Java.* [OR]
RewriteCond %{HTTP_USER_AGENT} .*Sogou.* [OR]
RewriteCond %{HTTP_USER_AGENT} .*psbot.* [OR]
RewriteCond %{HTTP_USER_AGENT} .*Exabot.* [OR]
RewriteCond %{HTTP_USER_AGENT} .*boitho.* [OR]
RewriteCond %{HTTP_USER_AGENT} .*ajSitemap.* [OR]
RewriteCond %{HTTP_USER_AGENT} .*Rankivabot.* [OR]
RewriteCond %{HTTP_USER_AGENT} .*DBLBot.* [OR]
RewriteCond %{HTTP_USER_AGENT} .*MJ1.* [OR]
RewriteCond %{HTTP_USER_AGENT} .*Rankivabot.* [OR]
RewriteCond %{HTTP_USER_AGENT} .*ask.* [OR]
RewriteCond %{HTTP_USER_AGENT} .*AhrefsBot.* [OR]
RewriteCond %{HTTP_USER_AGENT} .*Semrush.*
RewriteRule ^(.*)$ http://example.com/ [L,R=301]
Order Allow,Deny
Allow from all
Deny from 104.16.0.0/12
Deny from 110.0.0.0/8
Deny from 111.0.0.0/8
Deny from 112.0.0.0/5
Deny from 120.0.0.0/6
Deny from 124.0.0.0/8
Deny from 125.0.0.0/8
Deny from 147.0.0.0/8
Deny from 169.208.0.0
Deny from 175.0.0.0/8
Deny from 180.0.0.0/8
Deny from 182.0.0.0/8
Deny from 183.0.0.0/8
Deny from 202.0.0.0/8
Deny from 203.0.0.0/8
Deny from 210.0.0.0/8
Deny from 211.0.0.0/8
Deny from 218.0.0.0/8
Deny from 219.0.0.0/8
Deny from 220.0.0.0/8
Deny from 221.0.0.0/8
Deny from 222.0.0.0/8
# make your own list 😉 PlaySafe!
Note: RewriteCond ^(.*)$ ,…. will forward all crawler’s to http://example.com [L,R=301]
Enjoy!
Good day!
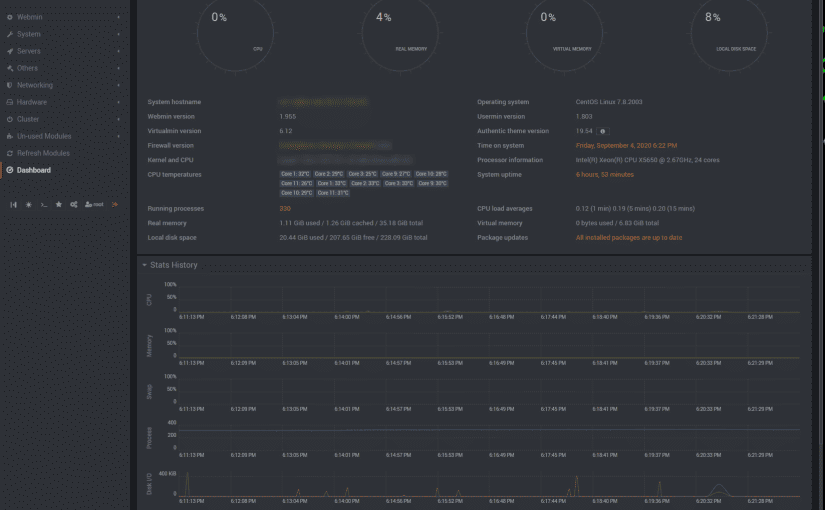
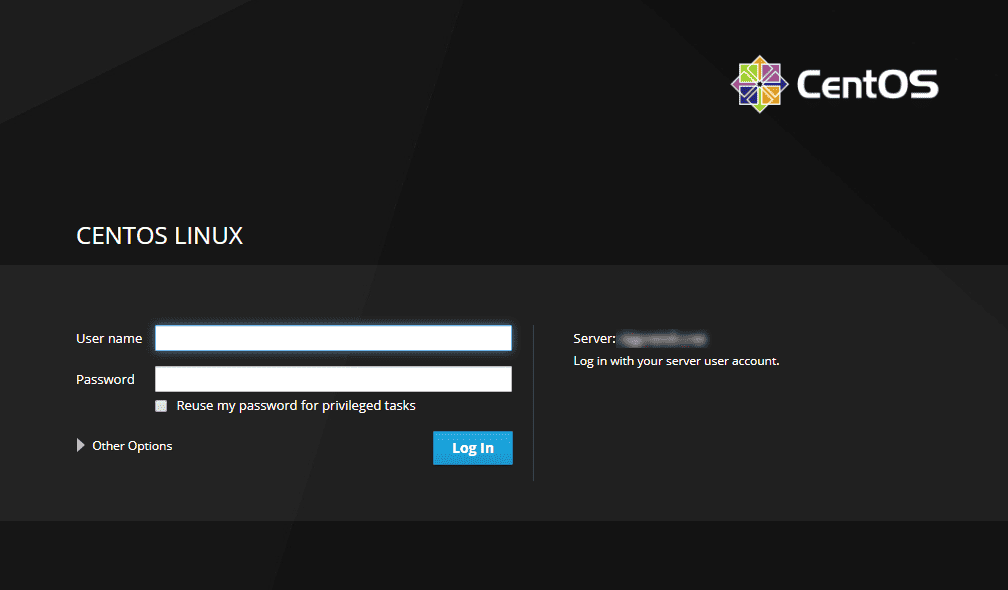
I ran into problem when I decided to test drive the new CentOS 8 on my test lab. The install was good until I tried to install VirtualMIN! No luck it’s not compatible yet and will take a while to be compatible “Webmin” is compatible and working smooth!
I would suggest you stick with CentOS 7.
So far CentOS 8 is quite interesting. 😉
CentOS 8 Updated Features
Desktop Environment
Unlike previous CentOS versions where the default installation did not include a GUI, the CentOS 8 default desktop environment is GNOME 3.28. What’s more, the GNOME Display Manager now uses Wayland as the default display server (as opposed to the X.org server).
The newest GNOME (nicknamed Chongqing) includes a number of useful features including:
Extended Device Support
GNOME is now integrated with Thunderbolt 3 connection support. Whenever Thunderbolt 3 establishes a connection and becomes active, you will get notified. This feature allows you to monitor all connections closely and detect any security breaches or attempts at data breach or theft.
New Boxes Feature. There are a couple of new features included in GNOME’s application for managing remote and virtual machines. The updated version simplifies the process of creating virtual environments with its automatic downloading of operating systems. Also, its drag-and-drop feature lets you easily transfer files between machines.
New On-Screen Keyboard. The GNOME team rewrote the on-screen keyboard for the newest release in an attempt to resolve the pressing UI issues. Now, the feature has a variety of layouts supported for different locales, automatic keyboard activation, and view-shift, so the user has a clear view of the text when writing.
Upgraded UI. The new desktop environment also has several additional features added to improve UI, as well as UX. This includes multi-monitor handling, direct window handling, improved scaling, to list a few.
Networking
As far as networking features, there are two major updates:
CentOS now comes with the TCP Networking Stack version 4.16.
The default packet filtering framework used is nftables.
Most of all, these changes ensure better stability, scaling, and performance.
nftables replaces iptables, iptablesip6table, arptables, and ebtables, serving as a single framework for IPv4 and IPv6 protocols. In addition, the firewalld deamon will also use the same subsystem for filtering network transactions as its default backend.
Cockpit Web Console
The open web-based interface, Cockpit, now comes as part of the new CentOS release. Use this platform to easily manage your servers through a web console interface. Perform system tasks, create and manage virtual machines, configure networks, start containers, and inspect logs all via web browser.
Cockpit is highly integrated. Not only does it have an embedded terminal allowing you to switch from terminal to browser at any time, but it also works on mobile devices.
Therefore, when you install CentOS 8 it will automatically set up the Cockpit web console, along with opening the required firewall ports. However, you do not worry about it burdening the system. The software is quite efficient as it uses memory and CPU only when active.
Software Management
CentOS 8 comes with the YUM package manager version v4.0.4, which now uses DNF (Dandified YUM) technology as its backend. DNF is the next generation of YUM and the new OS version lets you use both for managing packages.
Integrated with DNF technology, the latest release has a much-improved software management system. It’s increased performance, has well-defined APIs, and support for modular content, software AppStreams for cloud, container workloads, and CI/CD.
Virtualization
CentOS version 8 comes with KVM (qemu-kvm 2.12) that supports:
A 5-level paging feature, extending the size of virtual addresses and increasing the addressable virtual memory.
User-Mode Instruction Prevention (UMIP), a security feature restricting access to user-space applications to system-wide settings.
Ceph storage, providing block storage capabilities on all RHEL CPU architectures.
Q35 machine type to which all the virtual machines are pre-set (the machine type includes a native PCIe hotplug, IOMMU, Secure Boot and many other newly integrated features).
Compatibility between NVIDIA vGPU and the VNC console.
A sandboxing feature, introduced by the QEMU emulator, to ensure secure code testing.
Upgraded Security
The CentOS team has improved security features to ensure data protection and prevent breaches. The latest release will now have OpenSSL 1.1.1 which by default includes TLS 1.3. This ensures that all your data, as well as your clients’ data, will be cryptographically protected.
Also, the OS comes with a system-wide cryptographic policy which means you will not have to modify security configurations for individual applications.
Good day! Here are the steps to install PHP v. 7.3 in CentOS 7
Step 1: Add PHP 7.3 Remi repository
PHP 7.3 is available for CentOS 7 and Fedora distributions from the Remi repository. Add it to your system by running
# sudo yum -y install http://rpms.remirepo.net/enterprise/remi-release-7.rpm
# sudo yum -y install epel-release yum-utils
Step 2: Disable repo for PHP 5.4
By default, the enabled repository is for PHP 5.4. Disable this repo and enable on for PHP 7.3
# sudo yum-config-manager –disable remi-php54
# sudo yum-config-manager –enable remi-php73
Step 3: Install PHP 7.3 on CentOS 7
Once the repo has been enabled, install php 7.3 on CentOS 7 or Fedora using the command
# sudo yum -y install php php-cli php-fpm php-mysqlnd php-zip php-devel php-gd php-mcrypt php-mbstring php-curl php-xml php-pear php-bcmath php-json
Check version installed
# php -v
Enjoy!
Lynis is a security auditing tool for UNIX derivatives like Linux, macOS, BSD, Solaris, AIX, and others. It performs an in-depth security scan.
Enjoy!
This indicates detection of an attempted scan from Masscan port scanner.
Port scanners are used to probe computer networks to see which ports or services are available. An attacker may utilize a scanner to identify what services the target system is running and perform further attacks based on its findings. This signature detects for HTTP traffics associated with Masscan.
Affected Products
All web servers.
Impact
Information Disclosure: Remote attackers can gain sensitive information from vulnerable systems.
Recommended Actions
Monitor the traffic from the network for any suspicious activity.
Other References
https://github.com/robertdavidgraham/masscan
Log Example:
138.68.247.104 – – [10/Nov/2019:21:56:30 -0500] “GET / HTTP/1.0” 301 229 “-” “masscan/1.0
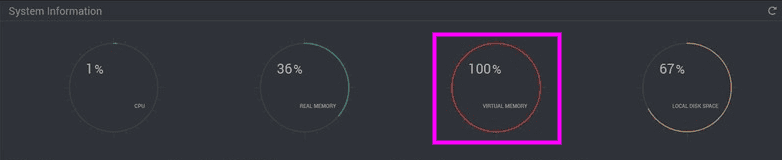
Flushing the Swap file (Virtual Memory):
# swapoff -a && swapon -a
Disabling the Swap File:
# sudo swapoff -a
Permanently Disabling the Swap File:
# nano /etc/fstab
And # hash out the line indicated as swap then reboot:
/etc/fstab
/dev/mapper/centos-root / xfs defaults 0 0
UUID=5cd945c2-5ca7-48c5-b67b-0f3610534e8f /boot xfs defaults 0 0
/dev/mapper/centos-home /home xfs defaults 0 0
# /dev/mapper/centos-swap swap swap defaults 0 0