Install REDIS on Centos 7

Redis is an open-source, in-memory data structure store which excels at caching. A non-relational database, Redis is known for its flexibility, performance, scalability, and wide language support.

Redis was designed for use by trusted clients in a trusted environment, and has no robust security features of its own. Redis does, however, have a few security features that include a basic unencrypted password and command renaming and disabling. This tutorial provides instructions on how to configure these security features, and also covers a few other settings that can boost the security of a standalone Redis installation on CentOS 7.

Prerequisites

To follow along with this tutorial, you will need:

  • One CentOS 7 Droplet configured using our Initial Server Setup for CentOS 7.
  • Firewalld installed and configured using this guide, up to and including the “Turning on the Firewall” step.

With those prerequisites in place, we are ready to install Redis and perform some initial configuration tasks.

Step 1 — Installing Redis

Before we can install Redis, we must first add Extra Packages for Enterprise Linux (EPEL) repository to the server’s package lists. EPEL is a package repository containing a number of open-source add-on software packages, most of which are maintained by the Fedora Project.

We can install EPEL using yum:

sudo yum install epel-release

Once the EPEL installation has finished you can install Redis, again using yum:

sudo yum install redis -y

This may take a few minutes to complete. After the installation finishes, start the Redis service:

sudo systemctl start redis.service

If you’d like Redis to start on boot, you can enable it with the enable command:

sudo systemctl enable redis

You can check Redis’s status by running the following:

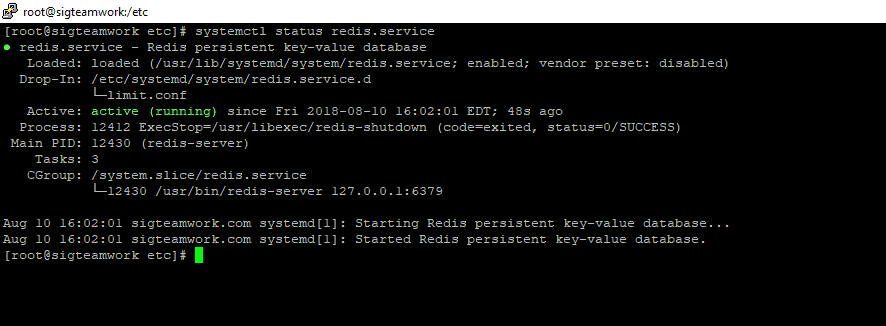
sudo systemctl status redis.service
Output
● redis.service - Redis persistent key-value database
   Loaded: loaded (/usr/lib/systemd/system/redis.service; disabled; vendor preset: disabled)
  Drop-In: /etc/systemd/system/redis.service.d
           └─limit.conf
   Active: active (running) since Thu 2018-03-01 15:50:38 UTC; 7s ago
 Main PID: 3962 (redis-server)
   CGroup: /system.slice/redis.service
           └─3962 /usr/bin/redis-server 127.0.0.1:6379

Once you’ve confirmed that Redis is indeed running, test the setup with this command:

redis-cli ping

This should print PONG as the response. If this is the case, it means you now have Redis running on your server and we can begin configuring it to enhance its security.

Step 2 — Binding Redis and Securing it with a Firewall

An effective way to safeguard Redis is to secure the server it’s running on. You can do this by ensuring that Redis is bound only to either localhost or to a private IP address and that the server has a firewall up and running.

However, if you chose to set up a Redis cluster using this tutorial, then you will have updated the configuration file to allow connections from anywhere, which is not as secure as binding to localhost or a private IP.

To remedy this, open the Redis configuration file for editing:

sudo vi /etc/redis.conf

Locate the line beginning with bind and make sure it’s uncommented:

/etc/redis.conf
bind 127.0.0.1

If you need to bind Redis to another IP address (as in cases where you will be accessing Redis from a separate host) we strongly encourage you to bind it to a private IP address. Binding to a public IP address increases the exposure of your Redis interface to outside parties.

/etc/redis.conf
bind your_private_ip

If you’ve followed the prerequisites and installed firewalld on your server and you do not plan to connect to Redis from another host, then you do not need to add any extra firewall rules for Redis. After all, any incoming traffic will be dropped by default unless explicitly allowed by the firewall rules. Since a default standalone installation of Redis server is listening only on the loopback interface (127.0.0.1 or localhost), there should be no concern for incoming traffic on its default port.

If, however, you do plan to access Redis from another host, you will need to make some changes to your firewalld configuration using the firewall-cmd command. Again, you should only allow access to your Redis server from your hosts by using their private IP addresses in order to limit the number of hosts your service is exposed to.

To begin, add a dedicated Redis zone to your firewalld policy:

sudo firewall-cmd --permanent --new-zone=redis

Then, specify which port you’d like to have open. Redis uses port 6397 by default:

sudo firewall-cmd --permanent --zone=redis --add-port=6379/tcp

Next, specify any private IP addresses which should be allowed to pass through the firewall and access Redis:

sudo firewall-cmd --permanent --zone=redis --add-source=client_server_private_IP

After running those commands, reload the firewall to implement the new rules:

sudo firewall-cmd --reload

Under this configuration, when the firewall sees a packet from your client’s IP address, it will apply the rules in the dedicated Redis zone to that connection. All other connections will be processed by the default public zone. The services in the default zone apply to every connection, not just those that don’t match explicitly, so you don’t need to add other services (e.g. SSH) to the Redis zone because those rules will be applied to that connection automatically.

If you chose to set up a firewall using Iptables, you will need to grant your secondary hosts access to the port Redis is using with the following commands:

  • sudo iptables -A INPUT -i lo -j ACCEPT
  • sudo iptables -A INPUT -m conntrack –ctstate ESTABLISHED,RELATED -j ACCEPT
  • sudo iptables -A INPUT -p tcp -s client_servers_private_IP/32 –dport 6397 -m conntrack –ctstate NEW,ESTABLISHED -j ACCEPT
  • sudo iptables -P INPUT DROP

Make sure to save your Iptables firewall rules using the mechanism provided by your distribution.

Keep in mind that using either firewall tool will work. What’s important is that the firewall is up and running so that unknown individuals cannot access your server. In the next step, we will configure Redis to only be accessible with a strong password.

Step 3 — Configuring a Redis Password

If you installed Redis using the How To Configure a Redis Cluster on CentOS 7 tutorial, you should have configured a password for it. At your discretion, you can make a more secure password now by following this section. If you haven’t set up a password yet, instructions in this section show how to set the database server password.

Configuring a Redis password enables one of its built-in security features — the auth command — which requires clients to authenticate before being allowed access to the database. Like the bind setting, the password is configured directly in Redis’s configuration file, /etc/redis.conf. Reopen that file:

sudo vi /etc/redis.conf

Scroll to the SECURITY section and look for a commented directive that reads:

/etc/redis.conf
# requirepass foobared

Uncomment it by removing the #, and change foobared to a very strong password of your choosing. Rather than make up a password yourself, you may use a tool like apg or pwgen to generate one. If you don’t want to install an application just to generate a password, though, you may use the command below.

Note that entering this command as written will generate the same password every time. To create a password different from the one that this would generate, change the word in quotes to any other word or phrase.

echo "easy-admin" | sha256sum

Though the generated password will not be pronounceable, it is a very strong and very long one, which is exactly the type of password required for Redis. After copying and pasting the output of that command as the new value for requirepass, it should read:

/etc/redis.conf
requirepass password_copied_from_output

If you prefer a shorter password, use the output of the command below instead. Again, change the word in quotes so it will not generate the same password as this one:

echo "easy-admin" | sha1sum

After setting the password, save and close the file then restart Redis:

sudo systemctl restart redis.service

To test that the password works, access the Redis command line:

redis-cli

The following is a sequence of commands used to test whether the Redis password works. The first command tries to set a key to a value before authentication.

127.0.0.1:6379> set key1 10

That won’t work as we have not yet been authenticated, so Redis returns an error.

Output
(error) NOAUTH Authentication required.

The following command authenticates with the password specified in the Redis configuration file.

127.0.0.1:6379> auth your.redis.password

Redis will acknowledge that we have been authenticated:

Output
OK

After that, running the previous command again should be successful:

127.0.0.1:6379> set key1 10

Output
OK

The get key1 command queries Redis for the value of the new key.

127.0.0.1:6379>  quit

It should now be very difficult for unauthorized users to access your Redis installation. Please note, though, that without SSL or a VPN the unencrypted password will still be visible to outside parties if you’re connecting to Redis remotely.

Next, we’ll look at renaming Redis commands to further protect Redis from malicious actors.

Step 4 — Renaming Dangerous Commands

The other security feature built into Redis allows you to rename or completely disable certain commands that are considered dangerous. When run by unauthorized users, such commands can be used to reconfigure, destroy, or otherwise wipe your data. Some of the commands that are known to be dangerous include:

  • FLUSHDB
  • FLUSHALL
  • KEYS
  • PEXPIRE
  • DEL
  • CONFIG
  • SHUTDOWN
  • BGREWRITEAOF
  • BGSAVE
  • SAVE
  • SPOP
  • SREM RENAME DEBUG

This is not a comprehensive list, but renaming or disabling all of the commands in that list is a good starting point.

Whether you disable or rename a command is site-specific. If you know you will never use a command that can be abused, then you may disable it. Otherwise, you should rename it instead.

Like the authentication password, renaming or disabling commands is configured in the SECURITY section of the /etc/redis.conf file. To enable or disable Redis commands, open the configuration file for editing one more time:

sudo vi  /etc/redis.conf

NOTE: These are examples. You should choose to disable or rename the commands that make sense for you. You can check the commands for yourself and determine how they might be misused at redis.io/commands.

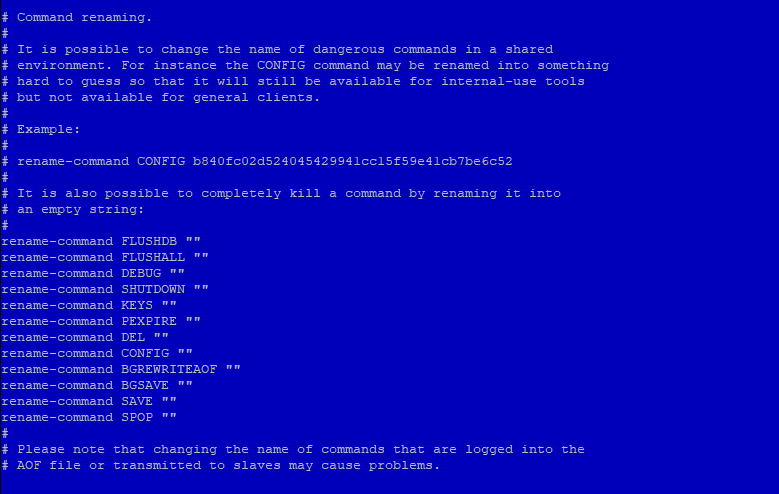
To disable or kill a command, simply rename it to an empty string, as shown below:

/etc/redis.conf
# It is also possible to completely kill a command by renaming it into
# an empty string:
#
rename-command FLUSHDB ""
rename-command FLUSHALL ""
rename-command DEBUG ""

To rename a command, give it another name like in the examples below. Renamed commands should be difficult for others to guess, but easy for you to remember:

/etc/redis.conf
rename-command CONFIG ""
rename-command SHUTDOWN SHUTDOWN_MENOT
rename-command CONFIG ASC12_CONFIG


Save your changes and close the file, and then apply the change by restarting Redis:

sudo systemctl restart redis.service

To test the new command, enter the Redis command line:

redis-cli

Authenticate yourself using the password you defined earlier:

127.0.0.1:6379> auth your_redis_password

Output
OK

Assuming that you renamed the CONFIG command to ASC12_CONFIG, attempting to use the config command should fail.

127.0.0.1:6379> config get requirepass

Output
(error) ERR unknown command 'config'

Calling the renamed command should be successful (it’s case-insensitive):

127.0.0.1:6379> asc12_config get requirepass

Output
1) "requirepass"
2) "your_redis_password"

Finally, you can exit from redis-cli:

127.0.0.1:6379> exit

Note that if you’re already using the Redis command line and then restart Redis, you’ll need to re-authenticate. Otherwise, you’ll get this error if you type a command:

Output
NOAUTH Authentication required.

Regarding renaming commands, there’s a cautionary statement at the end of the SECURITY section in the /etc/redis.conf file, which reads:

Please note that changing the name of commands that are logged into the AOF file or transmitted to slaves may cause problems.

That means if the renamed command is not in the AOF file, or if it is but the AOF file has not been transmitted to slaves, then there should be no problem. Keep that in mind as you’re renaming commands. The best time to rename a command is when you’re not using AOF persistence or right after installation (that is, before your Redis-using application has been deployed).

When you’re using AOF and dealing with a master-slave installation, consider this answer from the project’s GitHub issue page. The following is a reply to the author’s question:

The commands are logged to the AOF and replicated to the slave the same way they are sent, so if you try to replay the AOF on an instance that doesn’t have the same renaming, you may face inconsistencies as the command cannot be executed (same for slaves).

The best way to handle renaming in cases like that is to make sure that renamed commands are applied to all instances of master-slave installations.

Step 5 — Setting Data Directory Ownership and File Permissions

In this step, we’ll consider a couple of ownership and permissions changes you can make to improve the security profile of your Redis installation. This involves making sure that only the user that needs to access Redis has permission to read its data. That user is, by default, the redis user.

You can verify this by grep-ing for the Redis data directory in a long listing of its parent directory. The command and its output are given below.

ls -l /var/lib | grep redis
Output
drwxr-xr-x 2 redis   redis   4096 Aug  6 09:32 redis

You can see that the Redis data directory is owned by the redis user, with secondary access granted to the redis group. This ownership setting is secure, but the folder’s permissions (which are set to 755) are not. To ensure that only the Redis user has access to the folder and its contents, change the permissions setting to 770:

sudo chmod 770 /var/lib/redis

The other permission you should change is that of the Redis configuration file. By default, it has a file permission of 644 and is owned by root, with secondary ownership by the root group:

ls -l /etc/redis.conf
Output
-rw-r--r-- 1 root root 30176 Aug 10  2018 /etc/redis.conf

That permission (644) is world-readable. This presents a security issue as the configuration file contains the unencrypted password you configured in Step 4, meaning we need to change the configuration file’s ownership and permissions. Ideally, it should be owned by the redis user, with secondary ownership by the redis group. To do that, run the following command:

sudo chown redis:redis /etc/redis.conf

Then change the permissions so that only the owner of the file can read and/or write to it:

sudo chmod 660 /etc/redis.conf

You may verify the new ownership and permissions using:

ls -l /etc/redis.conf
Output
total 40
-rw------- 1 redis redis 29716 Sep 22 18:32 /etc/redis.conf

Finally, restart Redis:

sudo systemctl restart redis.service

Check the status of redis.service

systemctl status redis.service

Congratulations, your Redis installation should now be more secure!

SIGPROTEK & SIGTEAMWORK

SIGPROTEK and SIGTEAMWORK are small form factor network appliance built for use as a firewall router or other application and is compatible with a variety of open source projects.

The unit is small and it’s fanless, so there’s no noise. The 4 Intel NIC ports are proven to be the most reliable for use with high throughput packet switching applications and the units can route at gigabit wire speeds.

SIGPROTEK SECURITY FIREWALL SYSTEM

SPECIFICATIONS
– Quad Core J1900 CPU 2.0GHZ
– 4 LAN Gigabit Network
– 8 GB DDR3 Memory
– 2 USB 3.0 Ports
– 2 USB 2.0 Ports
– 1 VGA Connector
– mSATA 64GB SSD *3ME MLC
– Non-Industrial mSATA up to 1TB
* Industrial embedded for Aerospace industries
– Firewall: PFSENSE / CLEAROS / UnTANGLE
– Optional WIFI Hi-Speed Router

SIGTEAMWORK COMMUNICATION SYSTEM

SPECIFICATIONS
– Quad Core J1900 CPU 2.0GHZ
– 4 LAN Gigabit Network
– 8 GB DDR3 Memory
– 2 USB 3.0 Ports
– 2 USB 2.0 Ports
– 1 VGA Connector
– mSATA 64GB SSD *3ME MLC
– Non-Industrial mSATA up to 1TB
* Industrial embedded for Aerospace industries
– Up to 5TB 2.5″ SATA3 Storage
– CENTOS 7.x
– APACHE / Webmin / CSF
– FREE Integrated Dynamic IP Server

Developed by SIG INC. (Montreal) CANADA
https://www.sigsolution.net

IT DEV Dejan Janosevic (Belgrade) SERBIA
http://dejanjanosevic.com/

How to Install the Dynamic Update Client on Linux

This guide will walk you through the installation and setup of the Dynamic Update Client (DUC) on a computer running Linux. If you are using Ubuntu or Debian Linux please check our support site for guides on their specific setup.

Installing the Client

The below commands should be executed from a terminal window (command prompt) after logging in as the “root” user.  You can become the root user from the command line by entering “sudo su -” followed by the root password on your machine.

Note: If you do not have privileges on the machine you are on, you may add the “sudo” command in front of steps (5 and 6).

  1. cd /usr/local/src
  2. wget http://www.no-ip.com/client/linux/noip-duc-linux.tar.gz
  3. tar xzf noip-duc-linux.tar.gz
  4. cd no-ip-2.1.9
  5. make
  6. make install

If you get “make not found” or “missing gcc” then you do not have the gcc compiler tools on your machine. You will need to install these in order to proceed.

To Configure the Client

As root again (or with sudo) issue the below command:

  • /usr/local/bin/noip2 -C   (dash capital C, this will create the default config file)

You will then be prompted for your username and password for No-IP, as well as which hostnames you wish to update.  Be careful, one of the questions is “Do you wish to update ALL hosts”.  If answered incorrectly this could affect hostnames in your account that are pointing at other locations.

Now that the client is installed and configured, you just need to launch it.  Simply issue this final command to launch the client in the background:

  • /usr/local/bin/noip2

Setup dynamic DNS using ddclient and configure for noip.com on CENTOS 7

yum install ddclient

There are some dependencies, however all of them should be installable from mainstream repos:

bash perl perl-Digest-SHA1 perl-Getopt-Long perl perl-IO-Socket-SSL shadow-utils systemd

Now that ddclient and it’s dependencies are installed it is time to edit it’s config file /etc/ddclient.conf:

[root@easy ~]# cat /etc/ddclient.conf
 ######################################################################
 ### (CC BY 3.0 IE) int21hex at https://laptopdoctor.wordpress.com/
 ### Based on https://www.andreagrandi.it/ blog post
 ### /etc/ddclient.conf
 ### Setup Environment

daemon=900                                     # go easy on the server
 syslog=yes
 #mail-failure=root # no place like /dev/null, leaving in for later
 pid=/var/run/ddclient/ddclient.pid
 ssl=yes

#######################################################################
 ### Workaround for ddclient to work with no-ip.com
 ### Grab external IP dyndns.com, use that for connection to noip.com
 ### Your $dynamicFQDN should be already setup

protocol=dyndns2
 use=web, web=checkip.dyndns.com/, web-skip='IP Address'
 server=dynupdate.no-ip.com
 login=$YourUsername
 password=$YourPasswd
 $dynamicFQDN
 mx=mail.$dynamicFQDN
 backupmx=no
 #wildcard=yes|no                                 # left for later

It’s not bad idea to update /etc/hosts with new domain name:

[root@easy ~]# cat /etc/hosts
 127.0.0.1 localhost.locadomain localhost
 127.0.0.1 customname.localdom customname
 192.168.xxx.xxx $dynamicFQDN

With that out of the way, it is time to set up and enable system service:

[root@easy ~]# systemctl enable ddclient.service
[root@easy ~]# systemctl start ddclient
[root@easy ~]# systemctl status ddclient
 ● ddclient.service - A Perl Client Used To Update Dynamic DNS Loaded:
 loaded (/usr/lib/systemd/system/ddclient.service; enabled; vendor
 preset: disabled)
 Active: active (running) since Sat 2017-07-01 21:47:42 IST; 2h 47min ago
 Main PID: 1629 (ddclient - slee)
 CGroup: /system.slice/ddclient.service
 └─1629 ddclient - sleeping for 300 seconds

Jul 01 21:47:40 vger systemd[1]: Starting A Perl Client Used To Update
Dynamic DNS...
Jul 01 21:47:42 vger systemd[1]: Started A Perl Client Used To Update
Dynamic DNS.

You can test if it’s working in couple ways. Noip.com dashboard will tell you if hostname is active

After ports are forwarded you can try accessing any of the services running on the server, like Webmin!

https://yourname.no-ip

Third option is to check DNS records for your $dynamicFQDN:

[root@easy ~]# nslookup $dynamicFQDN
 Server: 89.101.160.4
 Address: 89.101.160.4#53

Non-authoritative answer:
 Name: $dynamicFQDN
 Address: xxx.xxx.xxx.xxx

Enjoy!

Install xrdp on CentOS 7 / RHEL 7

Prerequisites

1. First, install Gnome GUI on CentOS 7 / RHEL 7

2. xrdp is available in EPEL repository, Install and configure EPEL repository

rpm -Uvh https://dl.fedoraproject.org/pub/epel/epel-release-latest-7.noarch.rpm

Install xrdp on CentOS 7

Use YUM command to install xrdp package on CentOS 7 / RHEL 7

yum -y install xrdp tigervnc-server

Once xrdp is installed, start the xrdp service using the following command

systemctl start xrdp

xrdp should now be listening on 3389. Confirm this by using netstat command

netstat -antup | grep xrdp

Output:

tcp        0      0 0.0.0.0:3389            0.0.0.0:*               LISTEN      1508/xrdp
tcp        0      0 127.0.0.1:3350          0.0.0.0:*               LISTEN      1507/xrdp-sesman

By default, xrdp service won’t start automatically after a system reboot. Run the following command in the terminal to enable the service at system startup

systemctl enable xrdp

Firewall

Configure the firewall to allow RDP connection from external machines. The following command will add the exception for RDP port (3389)

firewall-cmd --permanent --add-port=3389/tcp
firewall-cmd --reload

SELinux

Configure SELinux

chcon --type=bin_t /usr/sbin/xrdp
chcon --type=bin_t /usr/sbin/xrdp-sesman

Test xrdp Remote Connectivity

Now take RDP from any windows machine using Remote Desktop Connection. Enter the ip address of Linux server in the computer field and then click on connect

You may need to ignore the warning of RDP certificate name mismatch

You would be asked to enter the username and password. You can either use root or any user that you have it on the system. Make sure you use module “Xvnc

If you click ok, you will see the processing. In less than a half minute, you will get a desktop

Enjoy!

Thanks Dejan! TEAMWORK!

1. Resizing of images (cropping if needed) and upload via FTP into /image/catalog/Galleries/mb-events

2. Design > Banners > Add New (manually insert all images in EN and FR)

3. Extensions > Extensions > Modules > Blueimp Gallery Pro > Add New (button) and make settings according to previous gallery made (or the image 1 attached after this text)

4. Catalog > Information > Add New, fill the titles and meta tag titles FR and EN, insert SEO keywords (those are friendly URLs)

5. Design > Layouts > Add New (I named each gallery starting with “Gallery 25 – etc…”); then add the route: information/image-galleries/mb-events; and add modules in the Content Top part (image 2 attached after this text)

6. Go back to Catalog > Information and in the newly created page from step 4; add in the last tab Design the Layout Override that you created in step 5 (in this example it is Gallery 25 – MB Events)

7. Design > Banners > Main gallery page > Add new gallery to the bottom of the page with the highest Sort Order number, gallery thumbnail and link to the page (in this example it is: https://www.celebrationsgroup.com/mb-events)


OpenCart 3.0.2 Blank contact success page fix!

in catalog/controller/information/contact.php file

find:

$this->response->redirect($this->url->link('information/contact/success'));

add above:

$this->session->data['success'] = true;

Then, find:

$data['continue'] = $this->url->link('common/home');

add below:

if (!empty($this->session->data['success'])) {
			$data['text_success'] = $this->language->get('text_success');
			
			unset ($this->session->data['success']);
		}

In catalog/view/theme/<your_theme>/template/common/success.twig file

find:

</ul>

add below:

{% if text_success %}
  <div class="alert alert-success alert-dismissible"><i class="fa fa-check-circle"></i> {{ text_success }}</div>
  {% endif %}

This should resolved the problem.

ModSecurity Tools – OWASP ModSecurity Core Rule Set, with OpenCart v3.x

When we implemented ModSecurity™ Tools with vendor OWASP ModSecurity Core Rule Set, OpenCart site displayed strange behavior.

We had to disable three of the 21+ core rules to make our OpenCart site act and preform normal again. Below are the three rules we had to disable.

Hope this helps others who may have a VPS/server that has implemented ModSecurity™ Tools for Cpanel/WHM..

Rules we had to disable
rules/REQUEST-33-APPLICATION-ATTACK-PHP.conf
rules/REQUEST-41-APPLICATION-ATTACK-XSS.conf
rules/REQUEST-42-APPLICATION-ATTACK-SQLI.conf

Stephen Hawking Dies at 76

Stephen W. Hawking, the Cambridge University physicist and best-selling author who roamed the cosmos from a wheelchair, pondering the nature of gravity and the origin of the universe and becoming an emblem of human determination and curiosity, died early Wednesday at his home in Cambridge, England. He was 76.

His death was confirmed by a spokesman for Cambridge University.

“Not since Albert Einstein has a scientist so captured the public imagination and endeared himself to tens of millions of people around the world,” Michio Kaku, a professor of theoretical physics at the City University of New York, said in an interview.

Dr. Hawking did that largely through his book “A Brief History of Time: From the Big Bang to Black Holes,” published in 1988. It has sold more than 10 million copies and inspired a documentary film by Errol Morris. The 2014 film about his life, “The Theory of Everything,” was nominated for several Academy Awards and Eddie Redmayne, who played Dr. Hawking, won the Oscar for best actor.

Scientifically, Dr. Hawking will be best remembered for a discovery so strange that it might be expressed in the form of a Zen koan: When is a black hole not black? When it explodes.

What is equally amazing is that he had a career at all. As a graduate student in 1963, he learned he had amyotrophic lateral sclerosis, a neuromuscular wasting disease also known as Lou Gehrig’s disease. He was given only a few years to live.
The disease reduced his bodily control to the flexing of a finger and voluntary eye movements but left his mental faculties untouched.

He went on to become his generation’s leader in exploring gravity and the properties of black holes, the bottomless gravitational pits so deep and dense that not even light can escape them.

That work led to a turning point in modern physics, playing itself out in the closing months of 1973 on the walls of his brain when Dr. Hawking set out to apply quantum theory, the weird laws that govern subatomic reality, to black holes. In a long and daunting calculation, Dr. Hawking discovered to his befuddlement that black holes — those mythological avatars of cosmic doom — were not really black at all. In fact, he found, they would eventually fizzle, leaking radiation and particles, and finally explode and disappear over the eons.

Nobody, including Dr. Hawking, believed it at first — that particles could be coming out of a black hole. “I wasn’t looking for them at all,” he recalled in an interview in 1978. “I merely tripped over them. I was rather annoyed.”

That calculation, in a thesis published in 1974 in the journal Nature under the title “Black Hole Explosions?,” is hailed by scientists as the first great landmark in the struggle to find a single theory of nature — to connect gravity and quantum mechanics, those warring descriptions of the large and the small, to explain a universe that seems stranger than anybody had thought.

The discovery of Hawking radiation, as it is known, turned black holes upside down. It transformed them from destroyers to creators — or at least to recyclers — and wrenched the dream of a final theory in a strange, new direction.

“You can ask what will happen to someone who jumps into a black hole,” Dr. Hawking said in an interview in 1978. “I certainly don’t think he will survive it.

“On the other hand,” he added, “if we send someone off to jump into a black hole, neither he nor his constituent atoms will come back, but his mass energy will come back. Maybe that applies to the whole universe.”

Dennis W. Sciama, a cosmologist and Dr. Hawking’s thesis adviser at Cambridge, called Hawking’s thesis in Nature “the most beautiful paper in the history of physics.”

Official website : http://www.hawking.org.uk/

WIKI : https://en.wikipedia.org/wiki/Stephen_Hawking

Hawking (2013) documentary by Stephen Finnigan.

https://en.wikipedia.org/wiki/Gravity

Configuring CA or Certificate Authority with pfSence

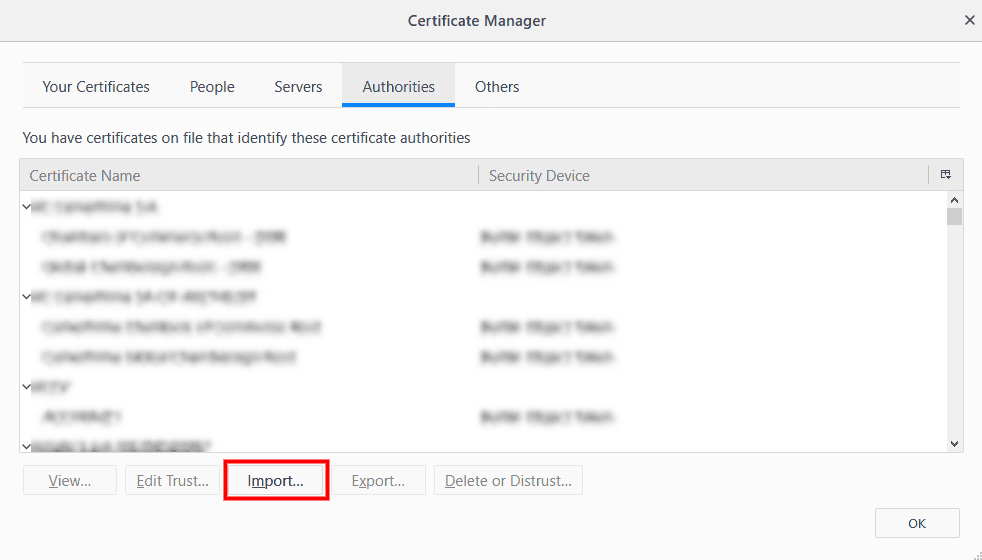
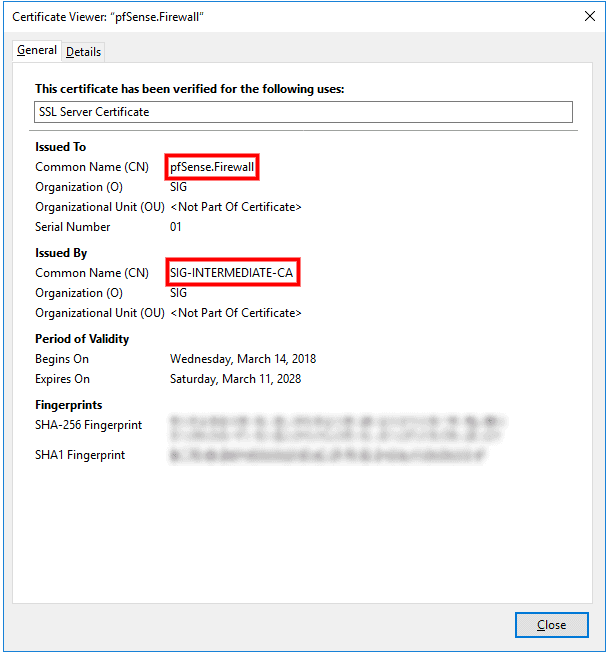
NOTES: If you are using Firefox, you must import the ROOT-CA Certificate that you have generated on your pfSense firewall. I noticed using Chrome that you don’t need to import the ROOT CA Certificate to make it work on the Local Side!

In the menu of your Firefox Browser navigate here >

> Tools > Options > Privacy & Security > “Scroll down” click on View Certificate.

Check both options and import!

Et voilà!!!

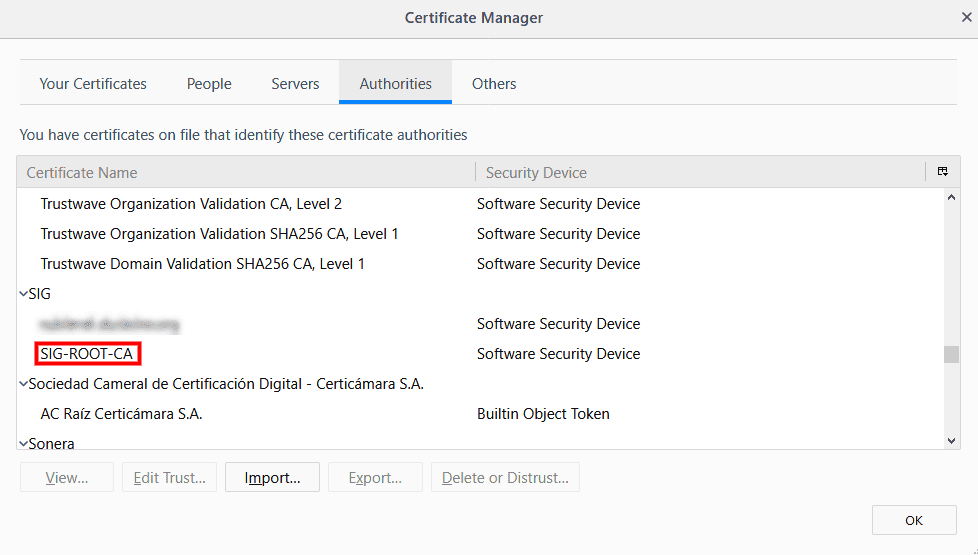
Now in Firefox your pfSense will be secured using your CA Certificate on the local side 😉

You may check for the certificate in Firefox

Enjoy!

DNSBL LIST

TypeDescriptionLink
DNSBLAD_AdAwayhttp://adaway.org/hosts.txt
DNSBLAD_Cameleonhttp://sysctl.org/cameleon/hosts
DNSBLAD_MalwareBytes_HpHosts_Adshttps://hosts-file.net/ad_servers.txt
DNSBLadshttp://hosts-file.net/ad_servers.txt
DNSBLadshttp://pgl.yoyo.org/adservers/serverlist.php?hostformat=hosts&mimetype=plaintext
DNSBLadshttps://adaway.org/hosts.txt
DNSBLAds/ncoinhttps://raw.githubusercontent.com/hoshsadiq/adblock-nocoin-list/master/hosts.txt
DNSBLBBCan178_DGAhttp://osint.bambenekconsulting.com/feeds/dga-feed.gz
DNSBLBBCan178_malwarehttps://gist.githubusercontent.com/BBcan177/4a8bf37c131be4803cb2/raw
DNSBLBBCan178_MS-2https://gist.githubusercontent.com/BBcan177/4a8bf37c131be4803cb2/raw/396eb85f00418569cd5e82f71b9d96275163d970/MS-2
DNSBLmalicious_dshield_SDhttps://www.dshield.org/feeds/suspiciousdomains_High.txt
DNSBLmalicious_hpHosts_ziphttp://hosts-file.net/download/hosts.zip
DNSBLmalicious_malc1dehttps://malc0de.com/bl/BOOT
DNSBLmalicious_MDLhttp://www.malwaredomainlist.com/hostslist/hosts.txt
DNSBLmalicious_MVPShttp://winhelp2003.mvps.org/hosts.txt
DNSBLmalicious_SWChttp://someonewhocares.org/hosts/hosts
DNSBLmalicious_Zeushttps://zeustracker.abuse.ch/blocklist.php?download=domainblocklist
DNSBLMalware domains listhttps://www.malwaredomainlist.com/hostslist/hosts.txt
DNSBLMalware Exploit DNS Grouphttps://lists.malwarepatrol.net/cgi/getfile?receipt=f1442112771&product=8&list=dansguardian
DNSBLMalware Exploit DNS Grouphttps://s4.amazonaws.com/lists.disconnect.me/simple_malvertising.txt
DNSBLMalware Exploit DNS Grouphttps://s4.amazonaws.com/lists.disconnect.me/simple_malware.txt
DNSBLMalwarehttp://mirror2.malwaredomains.com/files/justdomains
DNSBLMW_MalwareBytes_HpHosts_Exploitshttps://hosts-file.net/exp.txt
DNSBLMW_MalwareBytes_HpHosts_Fraudhttps://hosts-file.net/fsa.txt
DNSBLMW_MalwareBytes_HpHosts_Hijackshttps://hosts-file.net/hjk.txt
DNSBLMW_MalwareBytes_HpHosts_Malwarehttps://hosts-file.net/emd.txt
DNSBLMW_MalwareBytes_HpHosts_Misleadinghttps://hosts-file.net/mmt.txt
DNSBLMW_MalwareBytes_HpHosts_Phishinghttps://hosts-file.net/psh.txt
DNSBLMW_MalwareBytes_HpHosts_PUPhttps://hosts-file.net/pup.txt
DNSBLMW_MalwareBytes_HpHosts_Spam_2https://hosts-file.net/grm.txt
DNSBLMW_MalwareBytes_HpHosts_Spam_3https://hosts-file.net/hfs.txt
DNSBLMW_MalwareDomainshttps://mirror2.malwaredomains.com/files/justdomains
DNSBLMW_SuspiciousDomains_Highhttps://dshield.org/feeds/suspiciousdomains_High.txt
DNSBLMW_SuspiciousDomains_Mediumhttps://dshield.org/feeds/suspiciousdomains_Medium.txt
DNSBLphisinghttp://hosts-file.net/psh.txt
DNSBLPrivacy Fraud DNS Grouphttp://hosts-file.net/pha.txt
DNSBLRansomware Tracker Blacklistshttps://ransomwaretracker.abuse.ch/downloads/RW_DOMBL.txt
DNSBLRansomware Tracker Blacklistshttps://ransomwaretracker.abuse.ch/downloads/RW_URLBL.txt
DNSBLRansomwaretrackerhttps://ransomwaretracker.abuse.ch/downloads/RW_IPBL.txt
DNSBLStevenBlacksListhttps://raw.githubusercontent.com/StevenBlack/hosts/master/hosts
DNSBLWindows Telemetryhttps://raw.githubusercontent.com/crazy-max/WindowsSpyBlocker/master/data/hosts/win11/spy.txt
DNSBLWindows Telemetryhttps://raw.githubusercontent.com/WindowsLies/BlockWindows/master/hostslist
IPv4Abuse_DYREhttps://sslbl.abuse.ch/blacklist/dyre_sslipblacklist.csv
IPv4Abuse_DYREhttps://sslbl.abuse.ch/blacklist/dyre_sslipblacklist_aggressive.csv
IPv4Abuse_SSLBLhttps://sslbl.abuse.ch/blacklist/sslipblacklist.csv
IPv4Abuse_SSLBLhttps://sslbl.abuse.ch/blacklist/sslipblacklist_aggressive.csv
IPv4Abuse_Zeushttps://zeustracker.abuse.ch/blocklist.php?download=badips
IPv4Abuse_Zeushttps://zeustracker.abuse.ch/blocklist.php?download=ipblocklist
IPv4BinaryDefense_BanListhttps://www.binarydefense.com/banlist.txt
IPv4Emerging threats block IP’shttps://rules.emergingthreats.net/fwrules/emerging-Block-IPs.txt
IPv4Emerging Threatshttps://rules.emergingthreats.net/blockrules/compromised-ips.txt
IPv4Feodotrackerhttps://feodotracker.abuse.ch/blocklist/?download=badips
IPv4Feodotrackerhttps://feodotracker.abuse.ch/blocklist/?download=ipblocklist
IPv4Firehol_Level3https://raw.githubusercontent.com/firehol/blocklist-ipsets/master/firehol_level3.netset
IPv4malc0dehttp://malc0de.com/bl/IP_Blacklist.txt
IPv4TorNodes – helps with wannacry and alikehttps://www.dan.me.uk (get the list on his website)
IPv4WindowsSpyBlocker_spyhttps://raw.githubusercontent.com/crazy-max/WindowsSpyBlocker/master/data/firewall/win

Request denied by pfSense proxy SquidGuard: 403 Forbidden

Request denied by pfSense v 2.4.x proxy SquidGuard: 403 Forbidden

To fix this…

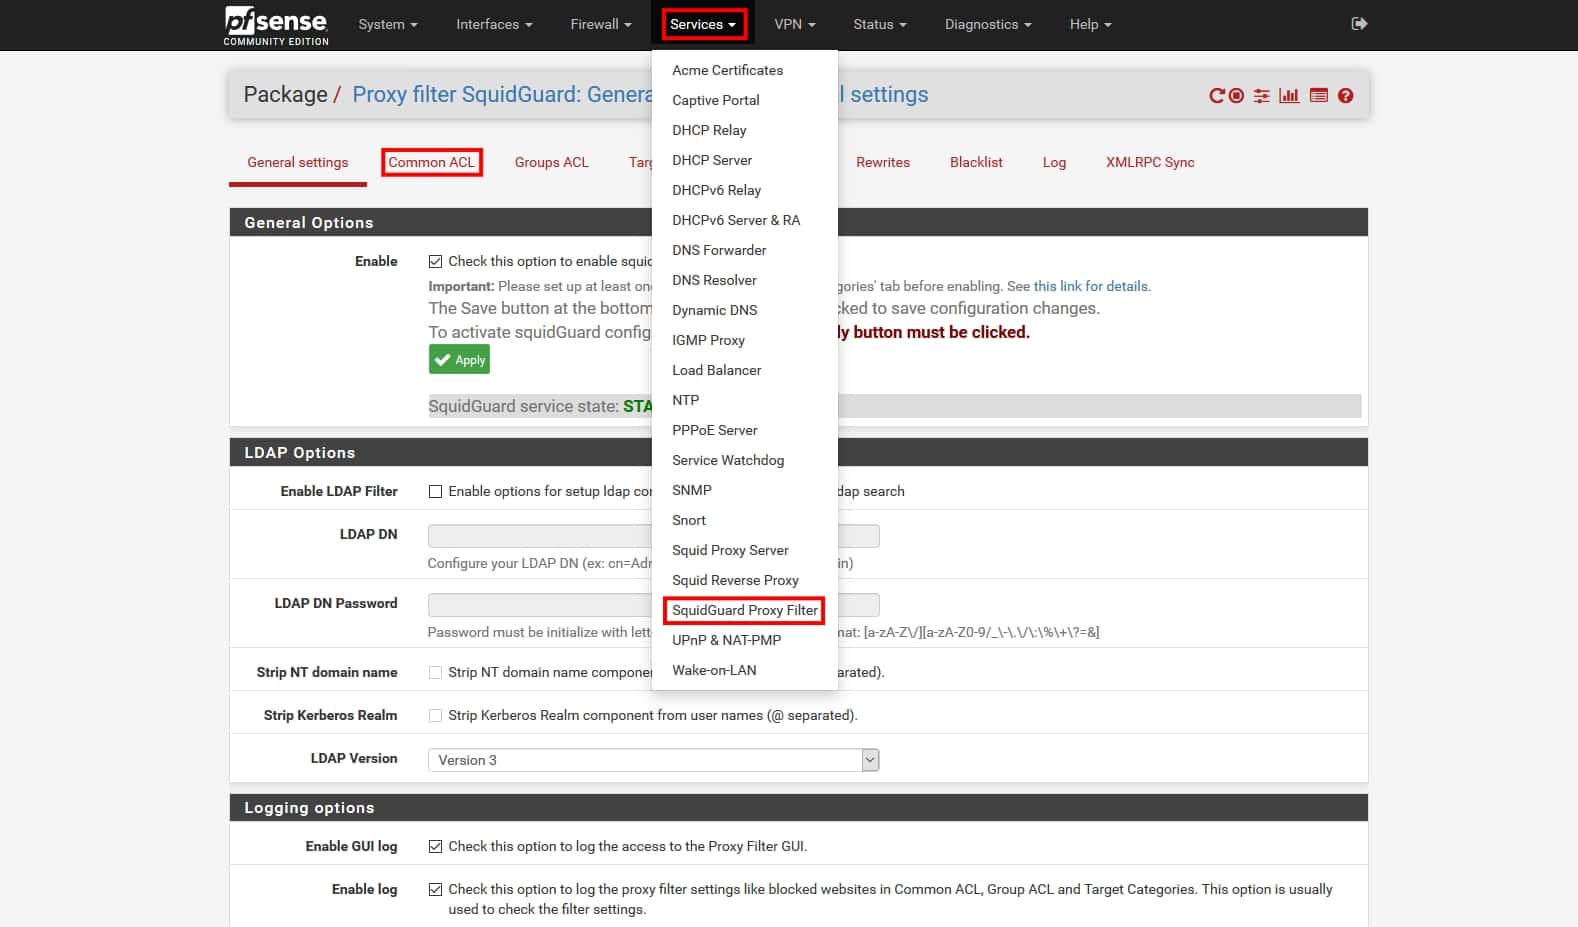
Navigate to 

> Services > SquidGuard Proxy Filter >

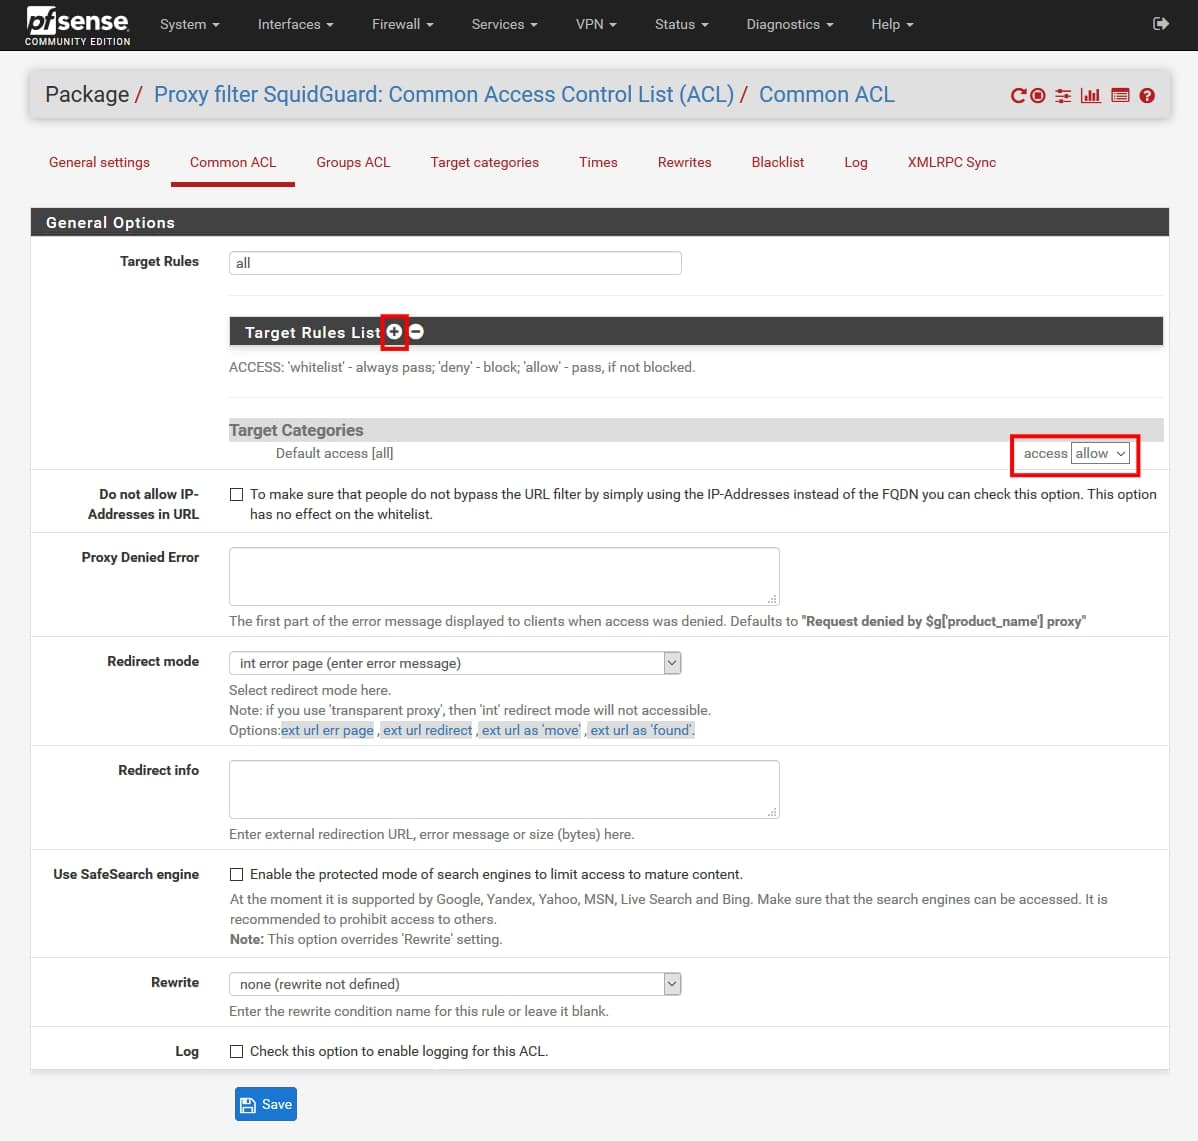
> SquidGuard Proxy Filter > Common ACL >

Target Rules! Just type : all

Click the + Sign icon

Under Target Categories select > access “Allow”

Click Save!

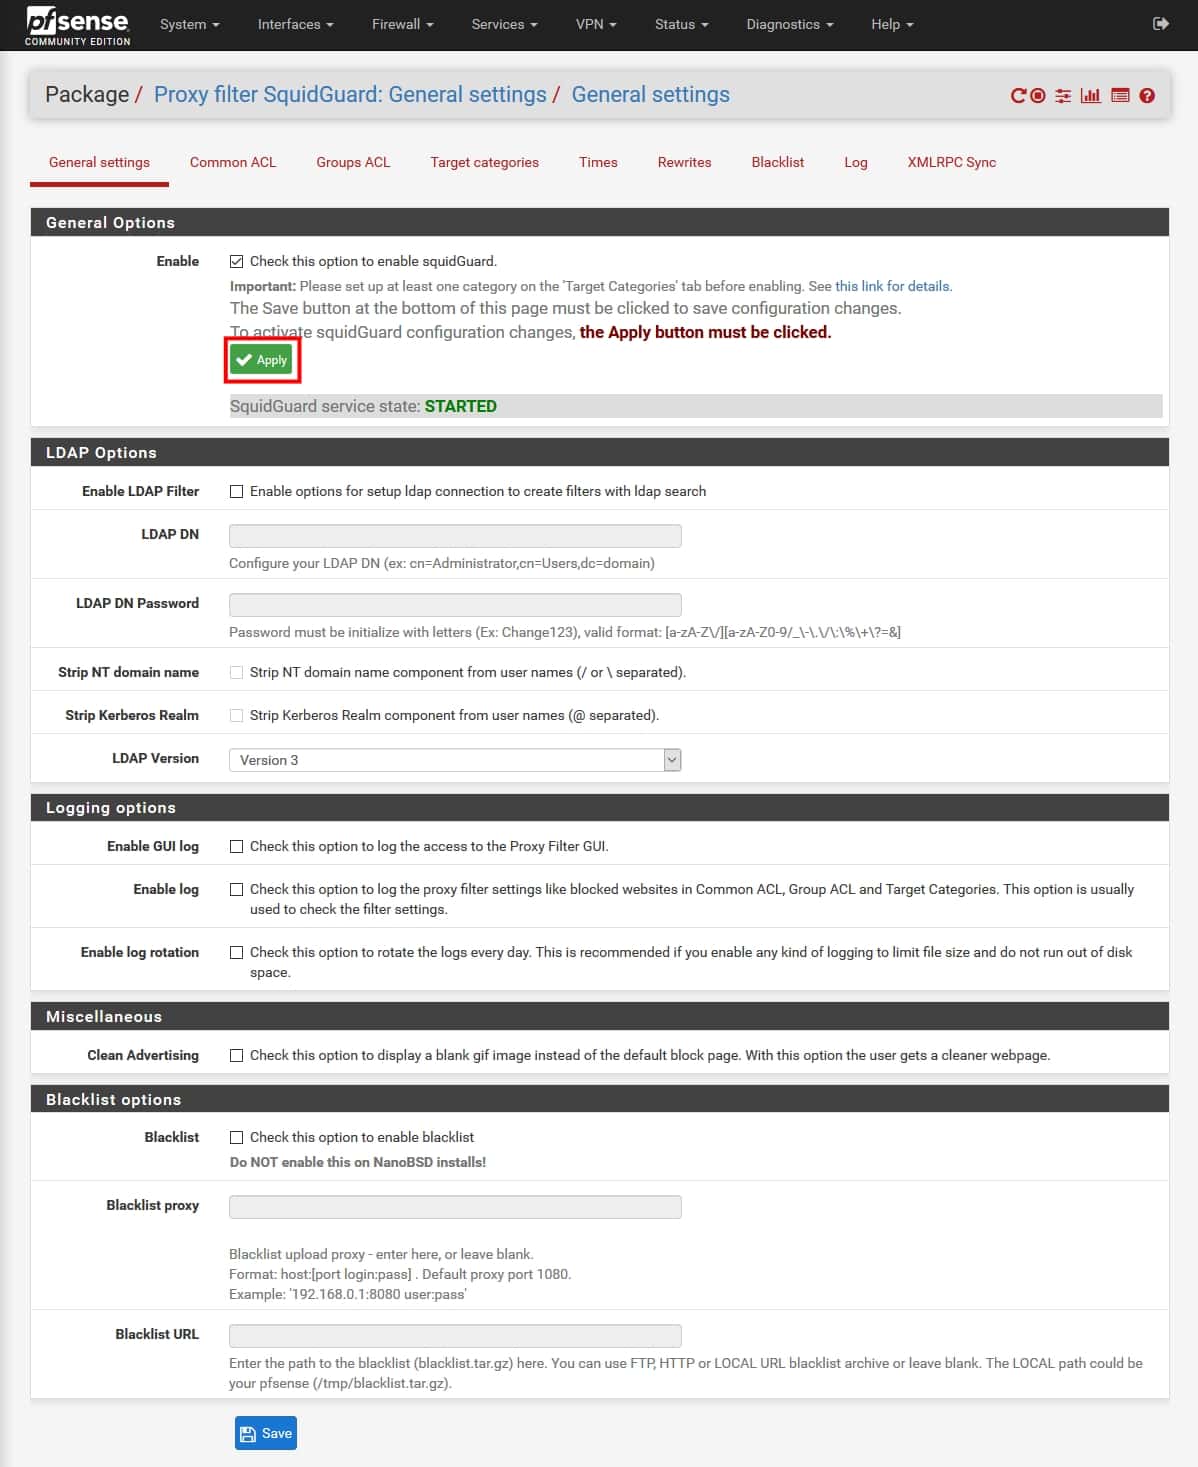
When you make any changes to SquidGuard, you need to remember to go back to the General settings page and click the Apply button or nothing you did will take effect.

Also don’t forget to empty your browser cache.

STUN Awareness

Setting the Scene

Zepko Analysts decided to try to track down ransomware threat actors using a different approach.

Zepko were recently approached by a company who were hit with ransomware which was identified by Zepko Analysts as a variant of CrySiS ransomware using file extensions .dharma, .wallet or .zzzzz.

Analysts have had previous experience dealing with CrySiS ransomware and discovered that the Threat Actors often use RDP brute force attacks to login, kill the antivirus and monitoring processes, then execute the ransomware payload. To find out more regarding ransomware over RDP attacks visit https://news.zepko.com/ransomware-over-rdp/

Leading on from this, as we know, most ransomware types leave a contact email address in the ransom note or in the file extension, which is used as a direct point of contact with the Threat Actor. This is the email address to directly talk about the payment methods, usually in return for a decryption tool for the encrypted files. In this correspondence Threat Actors also sometimes offer to decrypt one or two files to prove they are able to decrypt files as promised.

Using the email address in the ransom note, Analysts attempted to see if it was possible to somehow use this direct contact with the Threat Actor as a way of tracking them down.

To do this they decided to use a method utilising the STUN protocol, otherwise known as Simple Traversal of User Datagram Protocol (UDP) through Network Address Translators (NAT’s)). Quite a mouthful.

The protocol has a number of different uses but simply put, STUN is a tool which can be used to detect and traverse NATs that are located between two endpoints. When a blinding request is sent over UDP from a client operating from a private network, the STUN server responds with the IP and port number of the client. A full, (and much better) explanation of the STUN Protocol can be found on Wikipedia at https://en.wikipedia.org/wiki/STUN

To perform a stun request on a ransomware Threat Actor, Analysts used a hidden PHP script in an image to perform the STUN request once a link is clicked by the Threat Actor.

To do this, Analysts created a website with a webpage that displayed an image. This image contained the hidden PHP script that when the image is visited in a web browser it loads the PHP script and would initiate the STUN request which the response was logged containing the IP address of the person who clicked the link. This IP address would be that of the threat actor.

Because this was being sent in the form of a suspicious looking link it was highly unlikely that the threat actor would click it. To entice the Threat Actor to click the link, Analysts posed as a finance company who had been hit with the ransomware who were ready to pay the ransom.
Emailing the Threat Actor

Below is the email chain between Analysts and the Threat Actors. The email address contacted was injury@india.com. Spelling mistakes and typos were purposely made throughout the email correspondence to make it appear as if the message had been sent by someone who is not especially familiar with using computers.

Source : https://news.zepko.com/ransomware-threat-actors-stun/

STUN server ports : UDP 3478, TCP/TLS 5349

notes

libcurl error codes

NAME

libcurl-errors – error codes in libcurl

DESCRIPTION

This man page includes most, if not all, available error codes in libcurl. Why they occur and possibly what you can do to fix the problem are also included.

CURLcode

Almost all “easy” interface functions return a CURLcode error code. No matter what, using the curl_easy_setopt option CURLOPT_ERRORBUFFER is a good idea as it will give you a human readable error string that may offer more details about the cause of the error than just the error code. curl_easy_strerror can be called to get an error string from a given CURLcode number.

CURLcode is one of the following:

CURLE_OK (0)

All fine. Proceed as usual.

CURLE_UNSUPPORTED_PROTOCOL (1)

The URL you passed to libcurl used a protocol that this libcurl does not support. The support might be a compile-time option that you didn’t use, it can be a misspelled protocol string or just a protocol libcurl has no code for.

CURLE_FAILED_INIT (2)

Very early initialization code failed. This is likely to be an internal error or problem, or a resource problem where something fundamental couldn’t get done at init time.

CURLE_URL_MALFORMAT (3)

The URL was not properly formatted.

CURLE_NOT_BUILT_IN (4)

A requested feature, protocol or option was not found built-in in this libcurl due to a build-time decision. This means that a feature or option was not enabled or explicitly disabled when libcurl was built and in order to get it to function you have to get a rebuilt libcurl.

CURLE_COULDNT_RESOLVE_PROXY (5)

Couldn’t resolve proxy. The given proxy host could not be resolved.

CURLE_COULDNT_RESOLVE_HOST (6)

Couldn’t resolve host. The given remote host was not resolved.

CURLE_COULDNT_CONNECT (7)

Failed to connect() to host or proxy.

CURLE_FTP_WEIRD_SERVER_REPLY (8)

The server sent data libcurl couldn’t parse. This error code is used for more than just FTP and is aliased as CURLE_WEIRD_SERVER_REPLY since 7.51.0.

CURLE_REMOTE_ACCESS_DENIED (9)

We were denied access to the resource given in the URL. For FTP, this occurs while trying to change to the remote directory.

CURLE_FTP_ACCEPT_FAILED (10)

While waiting for the server to connect back when an active FTP session is used, an error code was sent over the control connection or similar.

CURLE_FTP_WEIRD_PASS_REPLY (11)

After having sent the FTP password to the server, libcurl expects a proper reply. This error code indicates that an unexpected code was returned.

CURLE_FTP_ACCEPT_TIMEOUT (12)

During an active FTP session while waiting for the server to connect, the CURLOPT_ACCEPTTIMEOUT_MS (or the internal default) timeout expired.

CURLE_FTP_WEIRD_PASV_REPLY (13)

libcurl failed to get a sensible result back from the server as a response to either a PASV or a EPSV command. The server is flawed.

CURLE_FTP_WEIRD_227_FORMAT (14)

FTP servers return a 227-line as a response to a PASV command. If libcurl fails to parse that line, this return code is passed back.

CURLE_FTP_CANT_GET_HOST (15)

An internal failure to lookup the host used for the new connection.

CURLE_HTTP2 (16)

A problem was detected in the HTTP2 framing layer. This is somewhat generic and can be one out of several problems, see the error buffer for details.

CURLE_FTP_COULDNT_SET_TYPE (17)

Received an error when trying to set the transfer mode to binary or ASCII.

CURLE_PARTIAL_FILE (18)

A file transfer was shorter or larger than expected. This happens when the server first reports an expected transfer size, and then delivers data that doesn’t match the previously given size.

CURLE_FTP_COULDNT_RETR_FILE (19)

This was either a weird reply to a ‘RETR’ command or a zero byte transfer complete.

CURLE_QUOTE_ERROR (21)

When sending custom “QUOTE” commands to the remote server, one of the commands returned an error code that was 400 or higher (for FTP) or otherwise indicated unsuccessful completion of the command.

CURLE_HTTP_RETURNED_ERROR (22)

This is returned if CURLOPT_FAILONERROR is set TRUE and the HTTP server returns an error code that is >= 400.

CURLE_WRITE_ERROR (23)

An error occurred when writing received data to a local file, or an error was returned to libcurl from a write callback.

CURLE_UPLOAD_FAILED (25)

Failed starting the upload. For FTP, the server typically denied the STOR command. The error buffer usually contains the server’s explanation for this.

CURLE_READ_ERROR (26)

There was a problem reading a local file or an error returned by the read callback.

CURLE_OUT_OF_MEMORY (27)

A memory allocation request failed. This is serious badness and things are severely screwed up if this ever occurs.

CURLE_OPERATION_TIMEDOUT (28)

Operation timeout. The specified time-out period was reached according to the conditions.

CURLE_FTP_PORT_FAILED (30)

The FTP PORT command returned error. This mostly happens when you haven’t specified a good enough address for libcurl to use. See CURLOPT_FTPPORT.

CURLE_FTP_COULDNT_USE_REST (31)

The FTP REST command returned error. This should never happen if the server is sane.

CURLE_RANGE_ERROR (33)

The server does not support or accept range requests.

CURLE_HTTP_POST_ERROR (34)

This is an odd error that mainly occurs due to internal confusion.

CURLE_SSL_CONNECT_ERROR (35)

A problem occurred somewhere in the SSL/TLS handshake. You really want the error buffer and read the message there as it pinpoints the problem slightly more. Could be certificates (file formats, paths, permissions), passwords, and others.

CURLE_BAD_DOWNLOAD_RESUME (36)

The download could not be resumed because the specified offset was out of the file boundary.

CURLE_FILE_COULDNT_READ_FILE (37)

A file given with FILE:// couldn’t be opened. Most likely because the file path doesn’t identify an existing file. Did you check file permissions?

CURLE_LDAP_CANNOT_BIND (38)

LDAP cannot bind. LDAP bind operation failed.

CURLE_LDAP_SEARCH_FAILED (39)

LDAP search failed.

CURLE_FUNCTION_NOT_FOUND (41)

Function not found. A required zlib function was not found.

CURLE_ABORTED_BY_CALLBACK (42)

Aborted by callback. A callback returned “abort” to libcurl.

CURLE_BAD_FUNCTION_ARGUMENT (43)

Internal error. A function was called with a bad parameter.

CURLE_INTERFACE_FAILED (45)

Interface error. A specified outgoing interface could not be used. Set which interface to use for outgoing connections’ source IP address with CURLOPT_INTERFACE.

CURLE_TOO_MANY_REDIRECTS (47)

Too many redirects. When following redirects, libcurl hit the maximum amount. Set your limit with CURLOPT_MAXREDIRS.

CURLE_UNKNOWN_OPTION (48)

An option passed to libcurl is not recognized/known. Refer to the appropriate documentation. This is most likely a problem in the program that uses libcurl. The error buffer might contain more specific information about which exact option it concerns.

CURLE_TELNET_OPTION_SYNTAX (49)

A telnet option string was Illegally formatted.

CURLE_PEER_FAILED_VERIFICATION (51)

The remote server’s SSL certificate or SSH md5 fingerprint was deemed not OK.

CURLE_GOT_NOTHING (52)

Nothing was returned from the server, and under the circumstances, getting nothing is considered an error.

CURLE_SSL_ENGINE_NOTFOUND (53)

The specified crypto engine wasn’t found.

CURLE_SSL_ENGINE_SETFAILED (54)

Failed setting the selected SSL crypto engine as default!

CURLE_SEND_ERROR (55)

Failed sending network data.

CURLE_RECV_ERROR (56)

Failure with receiving network data.

CURLE_SSL_CERTPROBLEM (58)

problem with the local client certificate.

CURLE_SSL_CIPHER (59)

Couldn’t use specified cipher.

CURLE_SSL_CACERT (60)

Peer certificate cannot be authenticated with known CA certificates.

CURLE_BAD_CONTENT_ENCODING (61)

Unrecognized transfer encoding.

CURLE_LDAP_INVALID_URL (62)

Invalid LDAP URL.

CURLE_FILESIZE_EXCEEDED (63)

Maximum file size exceeded.

CURLE_USE_SSL_FAILED (64)

Requested FTP SSL level failed.

CURLE_SEND_FAIL_REWIND (65)

When doing a send operation curl had to rewind the data to retransmit, but the rewinding operation failed.

CURLE_SSL_ENGINE_INITFAILED (66)

Initiating the SSL Engine failed.

CURLE_LOGIN_DENIED (67)

The remote server denied curl to login (Added in 7.13.1)

CURLE_TFTP_NOTFOUND (68)

File not found on TFTP server.

CURLE_TFTP_PERM (69)

Permission problem on TFTP server.

CURLE_REMOTE_DISK_FULL (70)

Out of disk space on the server.

CURLE_TFTP_ILLEGAL (71)

Illegal TFTP operation.

CURLE_TFTP_UNKNOWNID (72)

Unknown TFTP transfer ID.

CURLE_REMOTE_FILE_EXISTS (73)

File already exists and will not be overwritten.

CURLE_TFTP_NOSUCHUSER (74)

This error should never be returned by a properly functioning TFTP server.

CURLE_CONV_FAILED (75)

Character conversion failed.

CURLE_CONV_REQD (76)

Caller must register conversion callbacks.

CURLE_SSL_CACERT_BADFILE (77)

Problem with reading the SSL CA cert (path? access rights?)

CURLE_REMOTE_FILE_NOT_FOUND (78)

The resource referenced in the URL does not exist.

CURLE_SSH (79)

An unspecified error occurred during the SSH session.

CURLE_SSL_SHUTDOWN_FAILED (80)

Failed to shut down the SSL connection.

CURLE_AGAIN (81)

Socket is not ready for send/recv wait till it’s ready and try again. This return code is only returned from curl_easy_recv and curl_easy_send (Added in 7.18.2)

CURLE_SSL_CRL_BADFILE (82)

Failed to load CRL file (Added in 7.19.0)

CURLE_SSL_ISSUER_ERROR (83)

Issuer check failed (Added in 7.19.0)

CURLE_FTP_PRET_FAILED (84)

The FTP server does not understand the PRET command at all or does not support the given argument. Be careful when using CURLOPT_CUSTOMREQUEST, a custom LIST command will be sent with PRET CMD before PASV as well. (Added in 7.20.0)

CURLE_RTSP_CSEQ_ERROR (85)

Mismatch of RTSP CSeq numbers.

CURLE_RTSP_SESSION_ERROR (86)

Mismatch of RTSP Session Identifiers.

CURLE_FTP_BAD_FILE_LIST (87)

Unable to parse FTP file list (during FTP wildcard downloading).

CURLE_CHUNK_FAILED (88)

Chunk callback reported error.

CURLE_NO_CONNECTION_AVAILABLE (89)

(For internal use only, will never be returned by libcurl) No connection available, the session will be queued. (added in 7.30.0)

CURLE_SSL_PINNEDPUBKEYNOTMATCH (90)

Failed to match the pinned key specified with CURLOPT_PINNEDPUBLICKEY.

CURLE_SSL_INVALIDCERTSTATUS (91)

Status returned failure when asked with CURLOPT_SSL_VERIFYSTATUS.

CURLE_HTTP2_STREAM (92)

Stream error in the HTTP/2 framing layer.

CURLE_RECURSIVE_API_CALL (93)

An API function was called from inside a callback.

CURLE_OBSOLETE*

These error codes will never be returned. They were used in an old libcurl version and are currently unused.

CURLMcode

This is the generic return code used by functions in the libcurl multi interface. Also consider curl_multi_strerror.

CURLM_CALL_MULTI_PERFORM (-1)

This is not really an error. It means you should call curl_multi_perform again without doing select() or similar in between. Before version 7.20.0 this could be returned by curl_multi_perform, but in later versions this return code is never used.

CURLM_OK (0)

Things are fine.

CURLM_BAD_HANDLE (1)

The passed-in handle is not a valid CURLM handle.

CURLM_BAD_EASY_HANDLE (2)

An easy handle was not good/valid. It could mean that it isn’t an easy handle at all, or possibly that the handle already is in used by this or another multi handle.

CURLM_OUT_OF_MEMORY (3)

You are doomed.

CURLM_INTERNAL_ERROR (4)

This can only be returned if libcurl bugs. Please report it to us!

CURLM_BAD_SOCKET (5)

The passed-in socket is not a valid one that libcurl already knows about. (Added in 7.15.4)

CURLM_UNKNOWN_OPTION (6)

curl_multi_setopt() with unsupported option (Added in 7.15.4)

CURLM_ADDED_ALREADY (7)

An easy handle already added to a multi handle was attempted to get added a second time. (Added in 7.32.1)

CURLM_RECURSIVE_API_CALL (8)

An API function was called from inside a callback.

CURLSHcode

The “share” interface will return a CURLSHcode to indicate when an error has occurred. Also consider curl_share_strerror.

CURLSHE_OK (0)

All fine. Proceed as usual.

CURLSHE_BAD_OPTION (1)

An invalid option was passed to the function.

CURLSHE_IN_USE (2)

The share object is currently in use.

CURLSHE_INVALID (3)

An invalid share object was passed to the function.

CURLSHE_NOMEM (4)

Not enough memory was available. (Added in 7.12.0)

CURLSHE_NOT_BUILT_IN (5)

The requested sharing could not be done because the library you use don’t have that particular feature enabled. (Added in 7.23.0)

Block IPV6 ~ ClearOS, for good!

Good day!

I have detected on my pfsense connected under ClearOS setup @
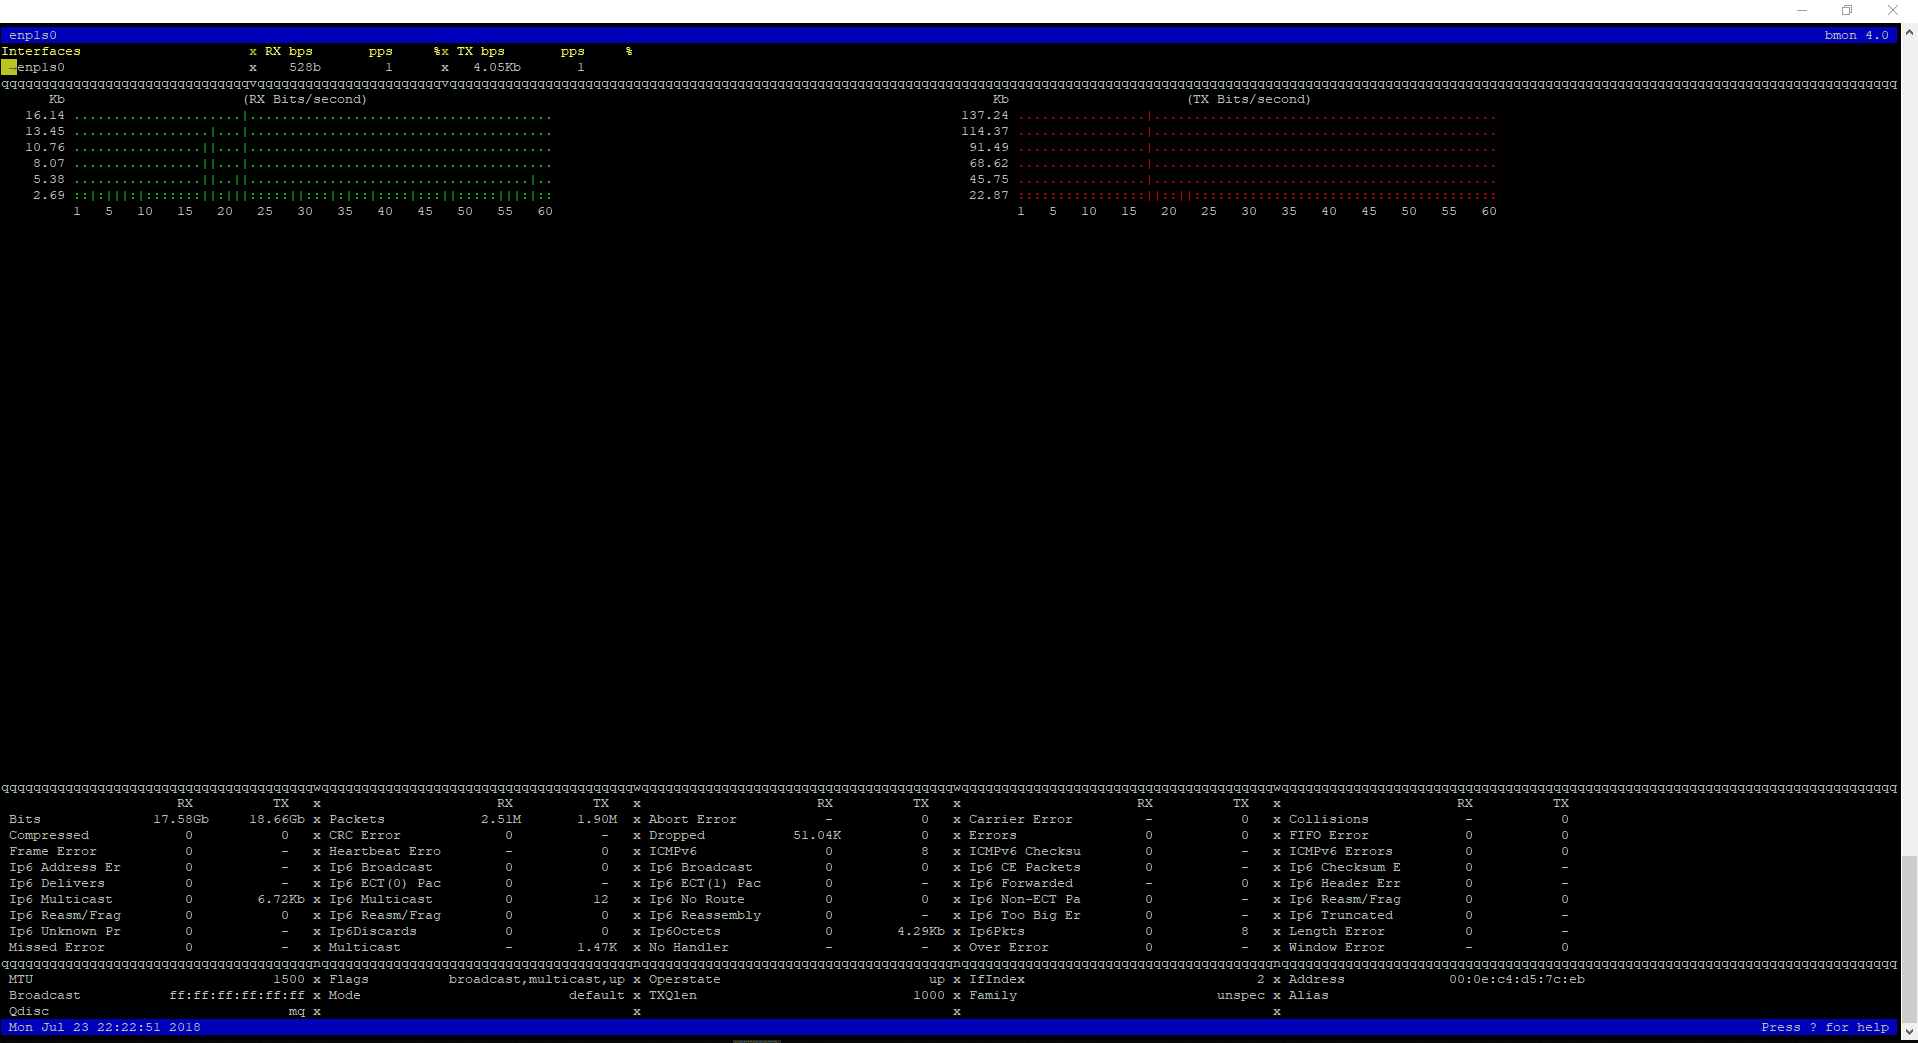
,,…. 😉 generating IPV6 traffic,…,

,,… here is the way to block all IPV6 in ClearOS!

Disabling the ipv6 module by adding or changing the following file on your ClearOS !

# nano /etc/sysctl.conf

net.ipv6.conf.all.disable_ipv6 =1

for sure you already block IPV6 in
# nano /etc/modprobe.d/disable-ipv6.conf

options ipv6 disable=1

😉

Enjoy!

Accessing your USB backup drive on ClearOS

First you will need to locate your USB name

# fdisk -l

After you located your USB drive you will need to check out the partition type

# fdisk -l /dev/sdb

To mount your USB drive run the following commands

# mkdir /mnt/somedir

# mount /dev/sdb1 /mnt/somedir

Now navigate using a ftp client to /mnt/somedir

You will now be able to download your ClearOS baremetal backup files to a secure place! When finished just umount your USB drive

# umount /dev/sdb1

After you run the umount command you will see your baremetal backup again!

Enjoy!

SimpleWall Protection Firewall

Wonderful Dashboard

Simplewall helps you keep track of all the key aspects of your network including alerts on a simple and easy to understand Dashboard with everything you need to know.

End to End Network Protection

With Simplewall, you get comprehensive intrusion protection, virus protection, spam prevention and a lot more bundled in, so you get the peace of mind you need.

Super Cool Content Filtering

Simplewall makes it dead easy for you to manage the content policies on your network and set it by users, group, time slots and a lot more.


Download it now!

http://www.simplewallsoftware.com/

Cannot install WordPress plugin update – FTP Error

I ran into a problem when trying to update plugin in a fresh installed wordpress on a ClearOS Box! 😉

So I got it working by doing this and then ran this:

chown -R apache:apache /var/www
find /var/www/ -type d -exec chmod 755 {} \;
find /var/www/ -type f -exec chmod 644 {} \;

All working good now.

Optional : Add define(‘FSMETHOD’, ‘direct’); in wp-config.php
Not recommended for obvious Security issues!

OLD NOTES : as long as you have one (1) site apache is Ok, but when you have more sites you should never give them the same user, regardless if using the direct FS_METHOD in your wp-config or not. Why? If one site is hacked all others will be too.

We are in a Virtual Server Era now… will investigate this!

Enjoy!