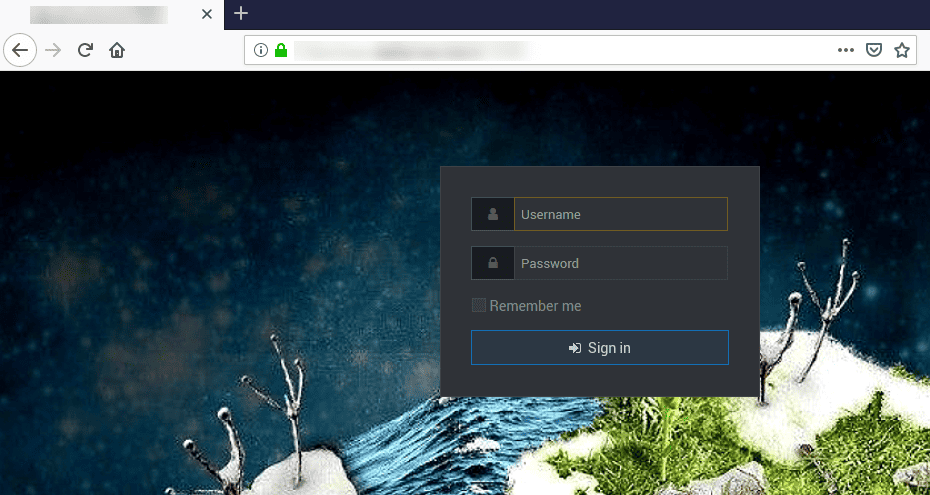
I was searching for a while on how to remove the Webmin logo in the login screen and other stuff related to the Webmin admin page!
Here is the solution that worked for me.
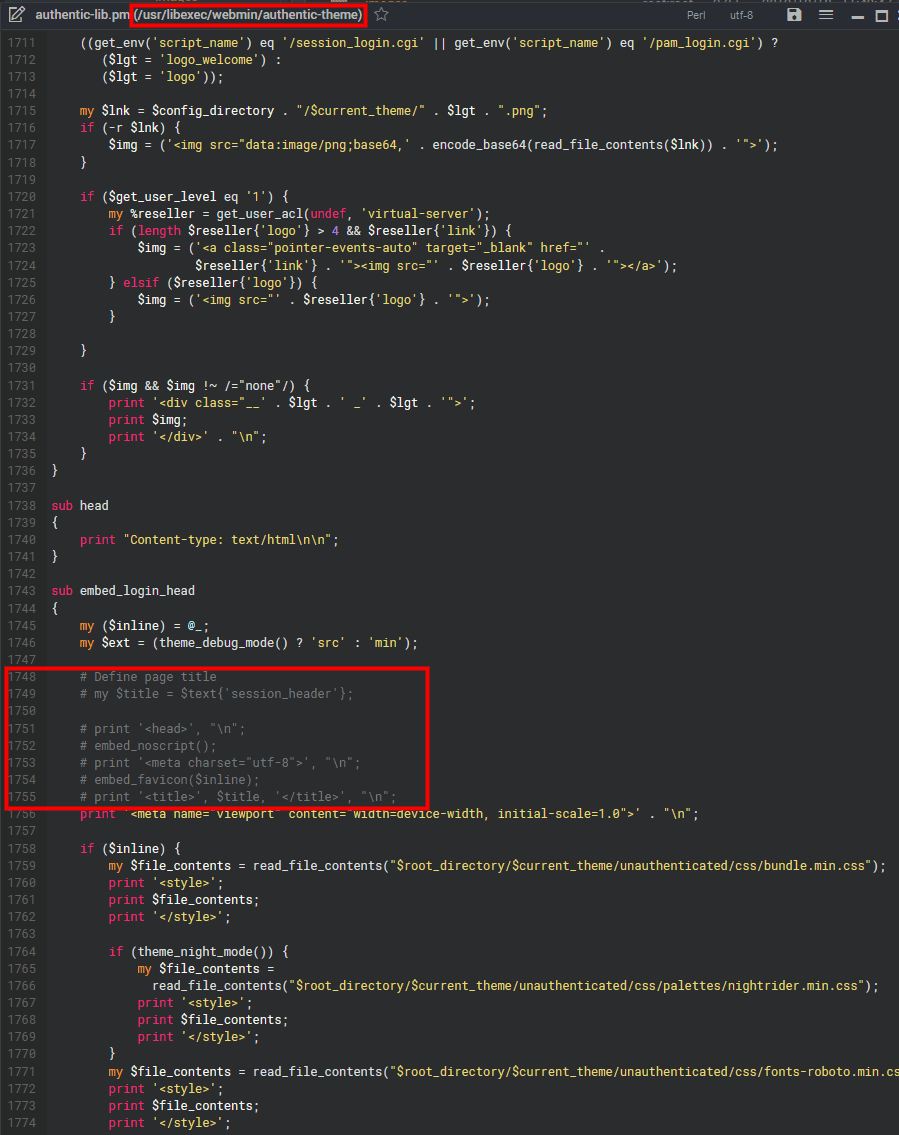
Locate “session_login.cgi” and edit it in here…, /usr/libexec/webmin/authentic-theme/session_login.cgi and remove the Webmin heading and logo by taking out the code lines below:
Look for the line code: #114 to #119 and remove the code.
With over 2.5 million copies sold on PC (digital download), 7 Days to Die has redefined the survival genre, crafting and world-building content. Set in a brutally unforgiving post-apocalyptic world overrun by the undead, 7 Days to Die is an open-world game that is a unique combination of first person shooter, survival horror, building, and role-playing games.
The best update so far!
Deploy date to public : 10-07-2019 (12:45pm Est Time)
Step 2: Creation of the Storage File for the new swap file
Type the following command to create 512MB swap file (1024 * 512MB = 524288 block size):
# dd if=/dev/zero of=/swap bs=1024 count=524288
If you don’t want to have to reboot use the following commands:
(This is useful for debugging automout issue)
524288+0 records in
524288+0 records out
536870912 bytes (537 MB) copied, 3.23347 s, 354 MB/s
1. if=/dev/zero : Read from /dev/zero file. /dev/zero is a special file in that provides as many null characters to build storage file called /swap.
2. of=/swap : Read from /dev/zero write storage file to /swapf.
3. bs=1024 : Read and write 1024 BYTES bytes at a time.
4. Count=524288 : Copy only 523288 BLOCKS input blocks.
Step 3 : Secure the new created swap file
Setup the correct file permission:
# chown root:root /swap
# chmod 0600 /swap
A world-readable swap file is a huge local vulnerability.
Step 4: Set up a Centos 7 swap area
Type the following command to set up a Linux swap area in a file:
# mkswap /swap
Sample outputs:
Setting up swapspace version 1, size = 524284 KiB
no label, UUID=0e5e7c60-bbba-4089-a76c-2bb29c0f0839
Step 5: Enabling the swap file
Finally, activate /swap swap space immediately, enter:
# swapon /swapfile1
Step 6: Update /etc/fstab file
To activate /swap after CentOS 7 system reboot, add entry to /etc/fstab file. Open this file using a text editor such as nano:
We had a strange bug in OC 3.x! When adding a PDF link outside of the OC files structure on the same domain name?!
mod_sec = nothing in my log’s,
.htaccess NO LUCK HERE!
The fix!
Just call your pdf file(s), https / http ,.. link inside your image directory structure ! ,,… ,, just create the OC directory “/image/catalog/terms (Or any name), use filezilla to upload your PDF file.
The bottom line is that you cannot call a non-OC directory, Ex,.: public_html/yournamehere/download/
Whether installing a new physical hard drive to a server or adding an additional disk to your cloud server or VPS, you’ll need to configure CentOS to be able to use it.
We’re going to assume the drive is connected, so first of all, we need to find it.
First of all, we need to know the naming convention your server is using for drives, and we can find this with the ‘df’ command.
[user@server ~] df
Filesystem     1K-blocks    Used Available Use% Mounted on
/dev/vda2       24733776 2521604  20942668  11% /
/dev/vda1        1007512  203260    751824  22% /boot
The two lines above show that this particular server is using the vd* notation, but sd* is also used. Here the primary drive, vda, has two partitions – vda1 and vda2.
We can now use the following command to find other disks:
[user@server ~] ls -1 /dev/[sv]d[a-z]
/dev/vda
/dev/vdb
We can see both our original disk, vda, and the new disk vdb. Now to create a filesystem the new disk with the ‘mkfs.ext4’ utility.
[user@server ~] sudo mkfs.ext4 /dev/vdb
This will just take a few seconds.
To use the new disk we now need to mount it. When you’ve decided where you want to mount the disk, first create that folder on your server. We’re going to use ‘home2’ for our disk.
[user@server ~] sudo mkdir /home2
We can now mount the disk to that location:
[user@server ~] sudo mount /dev/vdb /home2
Revisiting the df command we can now see that the new disk is mounted.
[user@server ~] df
Filesystem     1K-blocks    Used Available Use% Mounted on
/dev/vda2       24733776 2521604  20942668  11% /
/dev/vda1        1007512  203260    751824  22% /boot
/dev/vdb        25000000     100  24999900   1% /home2
To ensure the disk is automatically mounted when the server is rebooted, we also need to add it to fstab. Our preferred editor is ‘nano’ so we type
[user@server ~] sudo nano /etc/fstab
We add, to the end of the file, the line:
/dev/vdb /home2 ext4 defaults 0 0
Then CTRL + O to save and CTRL + X to exit.
The disk will now stay mounted after reboot and you can begin using it.
Good day, I had a issue with a new laptop Acer Swift that used Windows 10 S mode to prevent any installation of software not created by Microsoft! This is very annoying! Here is a quick fix to solve this problem.
Download a fresh copy of windows 10 pro
Burn it on a USB Key drive
You will have to include (2) files on the new created USB Key drive
First you will need to create those 2 files using notepad
First file
ei.cfg < filename to create
Inside this file you will add those lines
[EditionID]
Professional
[Channel]
Retail
Now save the file on your local hard drive.
Second file
pid.txt
Inside this file you will add those lines
[PID]
Value=XXXXX-XXXXX-XXXXX-XXXXX-XXXXX
You will need to type your Windows 10 Pro license
Now save the file on your local hard drive.
You will then need to copy those (2) files to the new created windows 10 Pro USB key.
Copy both files in the root of the key
Copy both files in /source
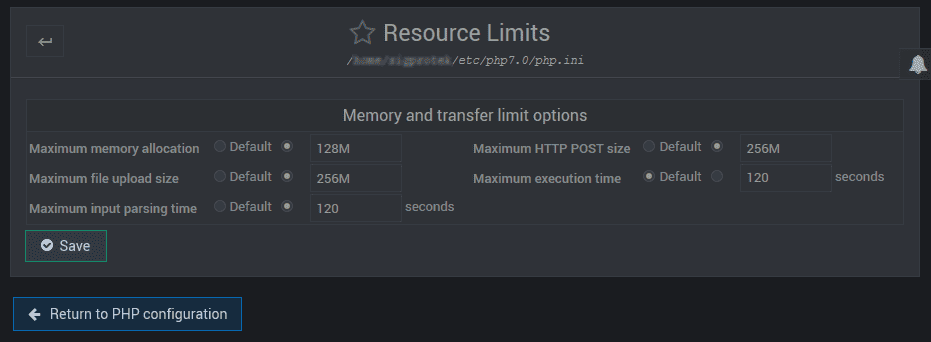
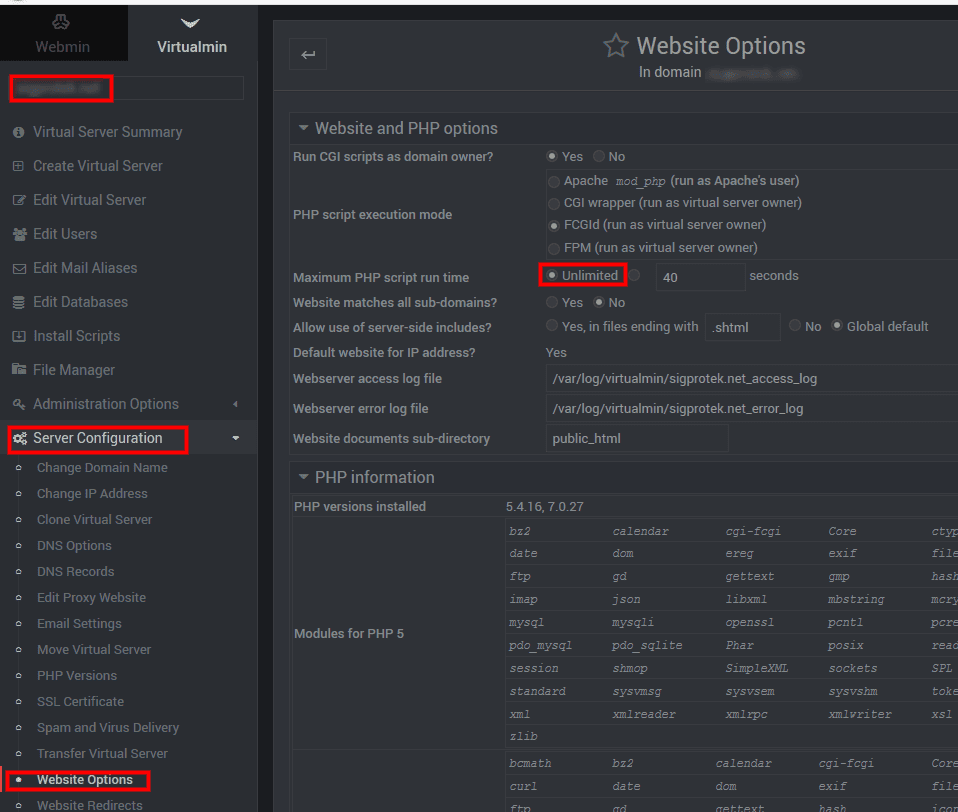
I ran into problem trying to import a large database on a fresh CENTOS 7 test lab! After setting up value in php.ini (I am running PHP version 7.0.27). I was still not able to import the database in phpmyadmin.
Notice the Maximum execution time is set to 120 seconds
Even after changing this value for 240-500, 700 seconds… I am still having issue importing the database!
Here is the fix,… you need to go in Virtualmin
1. Select the virtual server
2. Navigate to -> Server Configuration -> Website Options
3. In Website and Php options navigate to Maximum Php script run time
I checked “Unlimited” and hit “Save”
Voilà, I am able to import this large database without any errors!
For security reason I suggest that you put back the default value after your importation is finish!
After upgrading to Windows 10, I have had some issues with a couple of RDP connections that wouldn’t store the username and password (credentials). Despite ticking the box to save the credentials, it would always prompt me to enter the password.
Here’s how to fix the issue with RDP not saving the login information, which should work not just on Windows 10, but also other versions of Windows if you have the same problem:
Click Start and type “GPEDIT.MSC” to search for the shortcut to the Windows Group Policy Editor.
Right-click the gpedit.msc shortcut and click run as Administrator.
(Ignore any popups about errors if you get any when the Group Policy Editor console opens up).
Browse to Local Computer Policy > Computer Configuration > Administrative Temples > System > Credentials Delegation
Double click the setting called “Allow delegating default credentials with NTLM-only server authentication” to edit it.
Change the setting to “Enabled” and then click the “Show…” button in the “Options:” window where it says “Add servers to the list:”.
Double click the field below “Value” (with the black arrow to the left) and type in “TERMSRV/*” (without the double quotes).
Click Ok and then Ok again to close both popups, so that you only see the list of settings again.
Now just repeat the exact same for these three policies as well: Allow delegating default credentials Allow delegating saved credentials Allow delegating saved credentials with NTLM-only server authentication
Close the Local Group Policy Editor and RDP should now work as expected again!
First you will need to install LAMP (Linux, Apache, Mysql, PHP) on a fresh Dedicated standalone server! (Do not install on a VPS)
Here is a good online tutorial about deploying LAMP on CentOS
Disable SeLinux?
Edit the /etc/selinux/config file to set the SELINUX parameter to disabled, and then reboot the server.
I have noticed after turning back “on” SeLinux after the full installation bellow, that the server is holding!
Still a lot of testing to do but! Working 😉
Install Apache
# sudo yum install httpd
Once installed, you can start Apache
# sudo systemctl start httpd.service
The last thing you will want to do is enable Apache to start on boot. Use the following command to do so:
# sudo systemctl enable httpd.service
How To Find your Server Public IP
If you do not know what your server’s public IP address is, there are a number of ways you can find it. Usually, this is the address you use to connect to your server through SSH.
From the command line get your IP address by typing:
# curl https://ipinfo.io/ip
I suppose you already have proper DNS Server setup!
If you don’t have proper DNS just use your server local IP by running the following command:
# ip a
Install MySQL (MariaDB)
# sudo yum install mariadb-server mariadb
When the installation is complete, we need to start MariaDB with the following command:
# sudo systemctl start mariadb
Now that our MySQL database is running, we want to run a simple security script that will remove some dangerous defaults and lock down access to our database system a little bit. Start the interactive script by running:
# sudo mysql_secure_installation
The prompt will ask you for your current root password. Since you just installed MySQL, you most likely won’t have one, so leave it blank by pressing enter. Then the prompt will ask you if you want to set a root password. Go ahead and enter Y, and follow the instructions:
Enter current password for root (enter for none): OK, successfully used password, moving on…
Setting the root password ensures that nobody can log into the MariaDB root user without the proper authorization.
New password: password Re-enter new password: password Password updated successfully! Reloading privilege tables.. … Success!
For the rest of the questions, you should simply hit the “ENTER” key through each prompt to accept the default values. This will remove some sample users and databases, disable remote root logins, and load these new rules so that MySQL immediately respects the changes we have made.
The last thing you will want to do is enable MariaDB to start on boot. Use the following command to do so:
# sudo systemctl enable mariadb.service
Install PHP
We can once again leverage the yum system to install our components. We’re going to include the php-mysql package as well:
# sudo yum install php php-mysql
This should install PHP without any problems. We need to restart the Apache web server in order for it to work with PHP. You can do this by typing this:
# yum search php-
If you are running a firewall, run the following commands to allow HTTP and HTTPS traffic: At the same time let’s open port 3000 for Node.js!
Install Node.js and npm from the NodeSource repository We will install Node.js v6 LTS and npm from the NodeSource repository which depends on the EPEL repository being available.
To enable the EPEL repository on your CentOS 7, issue the following command:
# sudo yum install epel-release
Once the EPEL repository is enabled run the following command to add the Node.js v6 LTS repository:
After downloading Orangescrum you will need to unzip master.zip. To do this, run:
# yum install unzip
# unzip master.zip
# mv orangescrum-master /var/www/html/
We will need to change some folders permissions:
# chown apache:apache -R /var/www/html/
I am still missing something here for the 0777
Configuring MariaDB for Orangescrum
By default, MariaDB is not hardened. You can secure MariaDB using the mysql_secure_installation script. You should read each steps below carefully which will set root password, remove anonymous user, disallow remote root login, and remove the test database in your MariaDB (MySQL) Server:
# mysql_secure_installation
Configure it like this:
Set root password? [Y/n] y
Remove anonymous users? [Y/n] y
Disallow root login remotely? [Y/n] y
Remove test database and access to it? [Y/n] y
Reload privilege tables now? [Y/n] y
Next we will need to log in to the MariaDB console and create a database for the Orangescrum. Run the following command:
# mysql -u root -p
This will prompt you for a password, so enter your MariaDB root password and hit Enter. Once you are logged in to your database server you need to create a database for Orangescrum installation:
CREATE DATABASE orangescrum; CREATE USER ‘orangescrumuser’@’localhost’ IDENTIFIED BY ‘PASSWORD’; GRANT ALL PRIVILEGES ON orangescrum.* TO ‘orangescrumuser’@’localhost’ IDENTIFIED BY ‘password’ WITH GRANT OPTION; FLUSH PRIVILEGES;
Username : orangescrumuser Password : PASSWORD *CAP is important here!~ Database : orangescrum
Next you need to import the data from the database.sql file located in the /var/www/html/ directory:
# cd /var/www/html/
# mysql -u orangescrum -p password < database.sql
Next, By default STRICT mode is set to on in MySQL. You will need to disable it:
Next step, Now you need to change the post_max_size and upload_max_filesize to 200M in the php.ini file:
# nano /etc/php.ini
Find and change those values
post_max_size=200M
upload_max_filesize=200M
You may use those commands:
# cp /etc/php.ini /etc/php.ini.baksudo sed -i "s/post_max_size = 8M/post_max_size = 200M/" /etc/php.inisudo sed -i "s/upload_max_filesize =2M/upload_max_filesize = 200M/" /etc/php.ini
Configuring Apache web server for Orangescrum
We will create Apache virtual host for your Orangescrum website. First create ‘/etc/httpd/conf.d/vhosts.conf’ file with using a text editor of your choice:
Next, you need to provide your valid email address and password for SMTP, and update the FROM_EMAIL_NOTIFY and SUPPORT_EMAIL configurations in the constants.php file:
With over 3 million copies sold on PC (digital download), 7 Days to Die has redefined the survival genre, with unrivaled crafting and world-building content. Set in a brutally unforgiving post-apocalyptic world overrun by the undead, 7 Days to Die is an open-world game that is a unique combination of first person shooter, survival horror, tower defense, and role-playing games.
If you don’t want to deal with that sort of thing you may wish to consider waiting until the stable build is released. It has been mentioned that TFP would love to do a 3 week or less experimental. Hopefully things work out in their favor so that those of you waiting on the stable build don’t have to wait all that long.
Anniversaries: Lynis project (11 years) and CISOfy (5 years)
The Lynis project celebrated its 11th birthday last week! Also, Lynis 2.7.0 was released last week. Did you already upgrade?
If you think about it, it is rare. Just a handful of open source security projects reach the age of 10 years AND are still actively maintained. The secret? As its project founder, I believe it is dedication, involving the community, and helping others with sincere promotion.
Staying committed
It is hard for developers to stay involved with a project on a daily basis, especially if one has a full-time job and personal commitments.
To ensure the Lynis project would not suffer from the same issue, the company CISOfy was founded 5 years ago. The first priority for the company was getting the project back on its tracks and enhance its code.
Another special milestone is that we also reached a point where both the open source version and a commercial offering (demo) can co-exist. They increase value in both directions.
So let me take this moment to thank the community and also our customers who trust our solution. Both the standalone tool and solution would have been very different without your feedback and suggestions!
Teamspeak is a VOIP server that can be used for teams or multiple people to communicate. It is relatively lightweight, and secure, as updates are released regularly.
How to install Teamspeak on a CentOS instance.
Prerequisites
Before we begin, you’ll need:
CentOS 7 system (64 bit only).
512 MB of RAM or higher.
wget (utility used for downloading files).
nano or vim (any text editor is fine).
Installation
Prerequisites
Update the system packages. This may take some time.
yum update -y
Install tools needed for this tutorial.
yum install nano wget perl tar net-tools bzip2 -y
Installation
Add an unprivileged user to run Teamspeak. When prompted, enter your desired password.
useradd ts
passwd ts
Retrieve the Teamspeak server software.
Make sure you have the latest release here
cd ~
wget http://dl.4players.de/ts/releases/3.0.13.8/teamspeak3-server_linux_amd64-3.5.0.tar.bz2
Extract the Teamspeak tarball and copy all of the files to our unprivileged user’s home directory.
tar -xvf teamspeak3-server_linux_amd64-3.5.0.tar.bz2
cd teamspeak3-server_linux_amd64
cp * -R /home/ts
Remove temporary files.
cd ~
rm -rf teamspeak3-server_linux_amd64
rm -rf teamspeak3-server_linux_amd64-3.5.0.tar.bz2
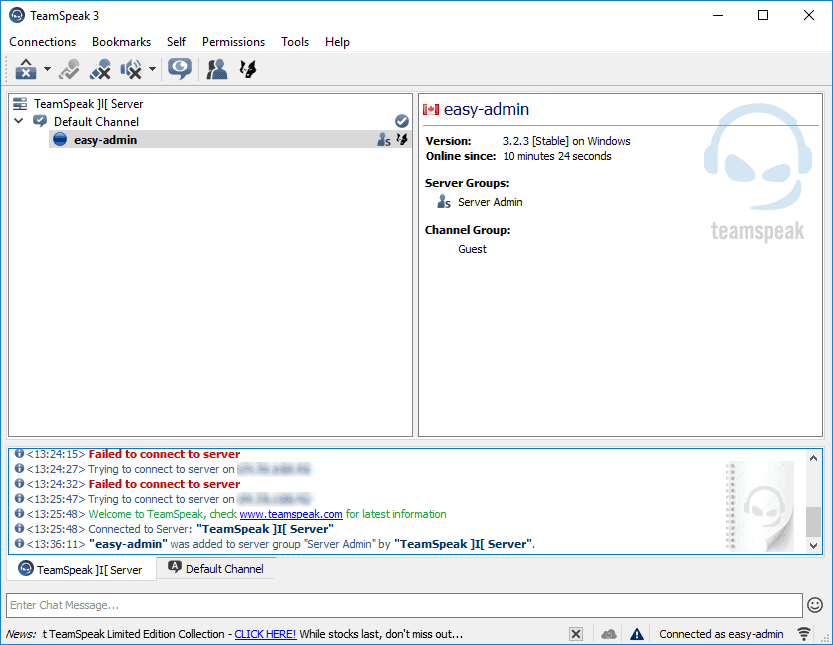
Congratulations! You’ve successfully created a Teamspeak server. You can connect to it with the Teamspeak Client. Sorry, for mobile they have a paid version for iPhone and Android! Hummm
This is what it should look when you are connected!
NOTES :
– Make sure you CHOWN all files to ts:ts
– Create this empty file where your server directory is located to accept the license terms .ts3server_license_accepted
– To retrieve the privilege key you need to check the Logs in the /Logs directory where you installed your Teamspeak server
In this tutorial, we’ll be installing Speedtest-cli to test the network speed of your server. Speedtest-cli is a command line interface for the popular speed-testing service, speedtest.net. It is quite simple to do and will only require basic Linux knowledge. This tutorial will work on CentOS 5, 6, and 7.
Dependencies
Before we do anything, we must install one dependency.
yum install -y python
Installation
Enter the root directory.
cd ~
Retrieve the Python script using wget. This script was written by Sivel; you can learn more about it on the GitHub page.
Was trying to install Centos 7 on a HP Proliant G7 DL380 Server and received some strange NMI errors! I was booting from a fresh version of Centos 7! The error was generated by NMI. First I taught it was memory related, I tested like 30 different DDR3 Memory sticks!
No luck it’s not memory related
Centos 7 is installed on the G7 Server,.. CentOS load but hang with all kinds of weird errors related to NMI!
The weird part: I was able to install Windows Server 2012 R2 without any problem?
By digging this error since 4 days and did a lot of test! I found out what was the cause of this nightmare bug!
Easy fix here!
Power on your server and go into the bios settings (F9)
Disable Hypertread technology!
reboot your server, CentOS 7 latest Minimal install should Boot now!!
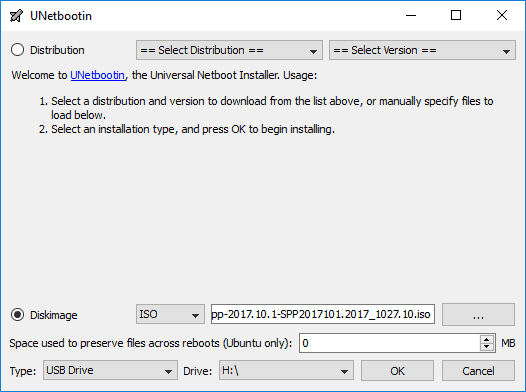
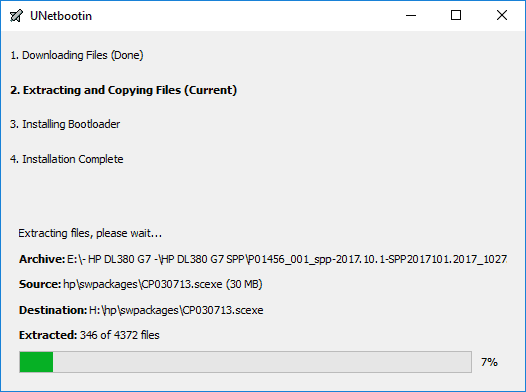
When trying to patch a HP DL380 G7 Server to the latest service pack (SPP) I ran into a problem creating a valid USB Boot Key! When trying to boot the server using the USB Key it seem that I was missing some files when I build the USB Key using Rufus latest flavor!
I found the perfect tool to make this work. Download and install UNetbootin Diskimage to copy the bootable .ISO over to the USB Flash Drive.
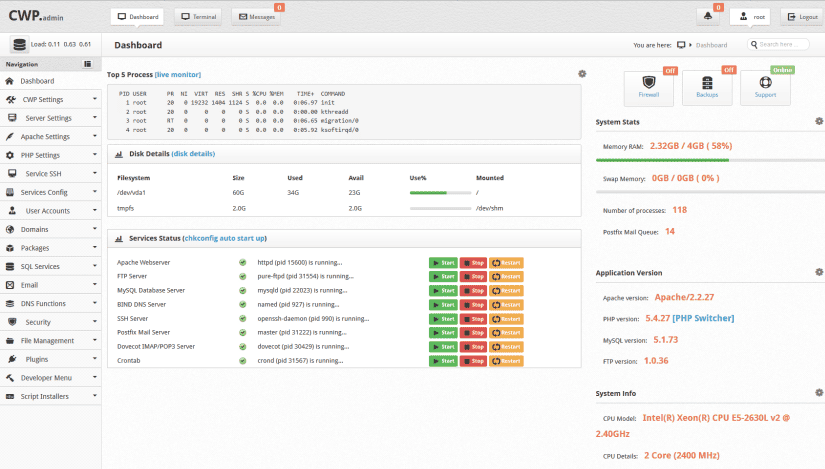
CentOS Web Panel – a Free Web Hosting control panel designed for quick and easy management of (Dedicated & VPS) servers minus the chore and effort to use ssh console for every time you want to do something, offers a huge number of options and features for server management in its control panel package.
CentOS 7: Installer for CentOS 7
cd /usr/local/src
wget http://centos-webpanel.com/cwp-el7-latest
sh cwp-el7-latest
If download link doesn’t work then you can use the following:
Reboot Server
Reboot your server so that all updates can take affect and CWP gets started.
reboot
CentOS Web Panel Configuration
Log in to your CWP server using the link provided by the installer on your server
CentOS WebPanel Admin GUI at http://SERVER-IP:2030/
Username: root
Password: your root password
– Setup nameservers
– Setup shared ip (must be your public IP address)
– Setup at least one hosting package (or edit default package)
– Setup root email
& now you are ready to host domains…
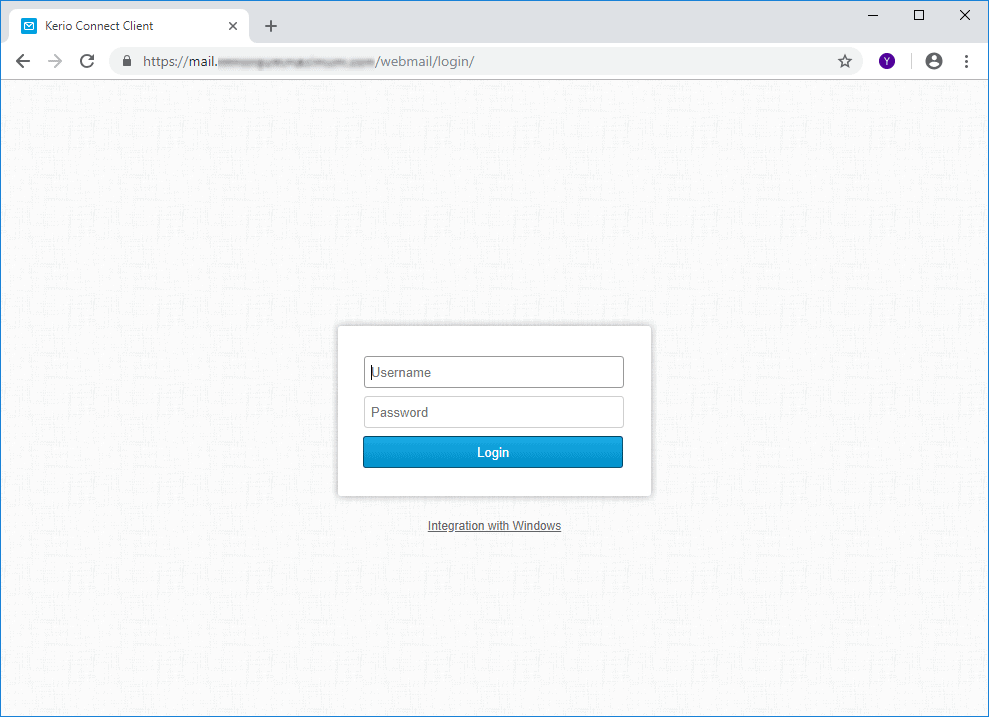
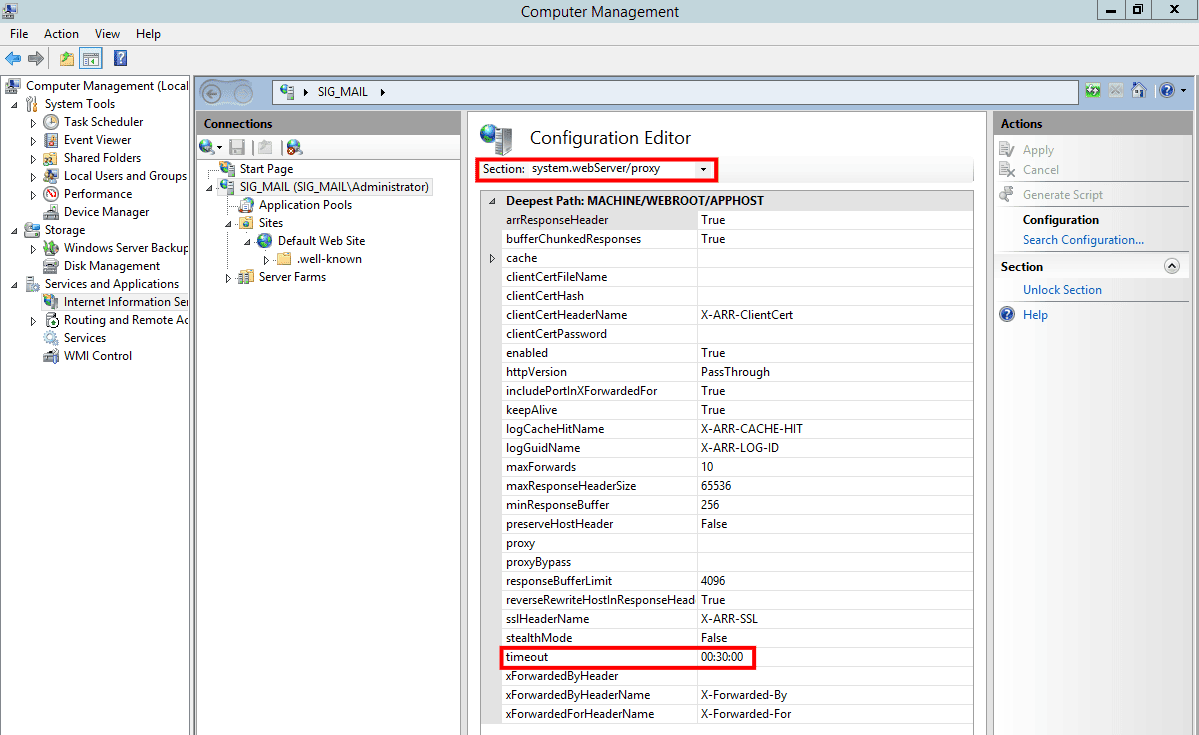
Good day, having a timeout issue in your Kerio Connect webmail server running on Microsoft IIS webserver? It’s not Kerio Connect mail server the problem! The problem is something to do with your Microsoft IIS Webserver,,….
Here is the complete error message:
IIS 502 – Web server received an invalid response while acting as a gateway or proxy server.
There is a problem with the page you are looking for, and it cannot be displayed.
When the Web server (while acting as a gateway or proxy) contacted the upstream content server, it received an invalid response from the content server.
Here is a solution to fix this problem when a user is using the webmail part of Kerio Connect, the user get a 502 Gateway Timeout error after 2 min of inactivity!
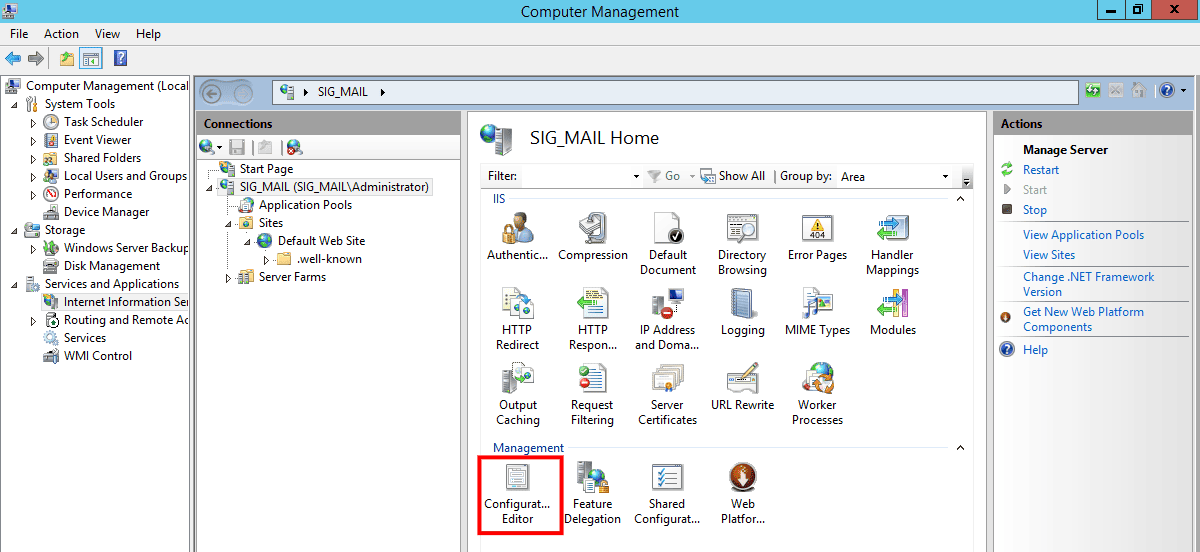
First you need to open your IIS server configuration in Windows 2012
Locate this …
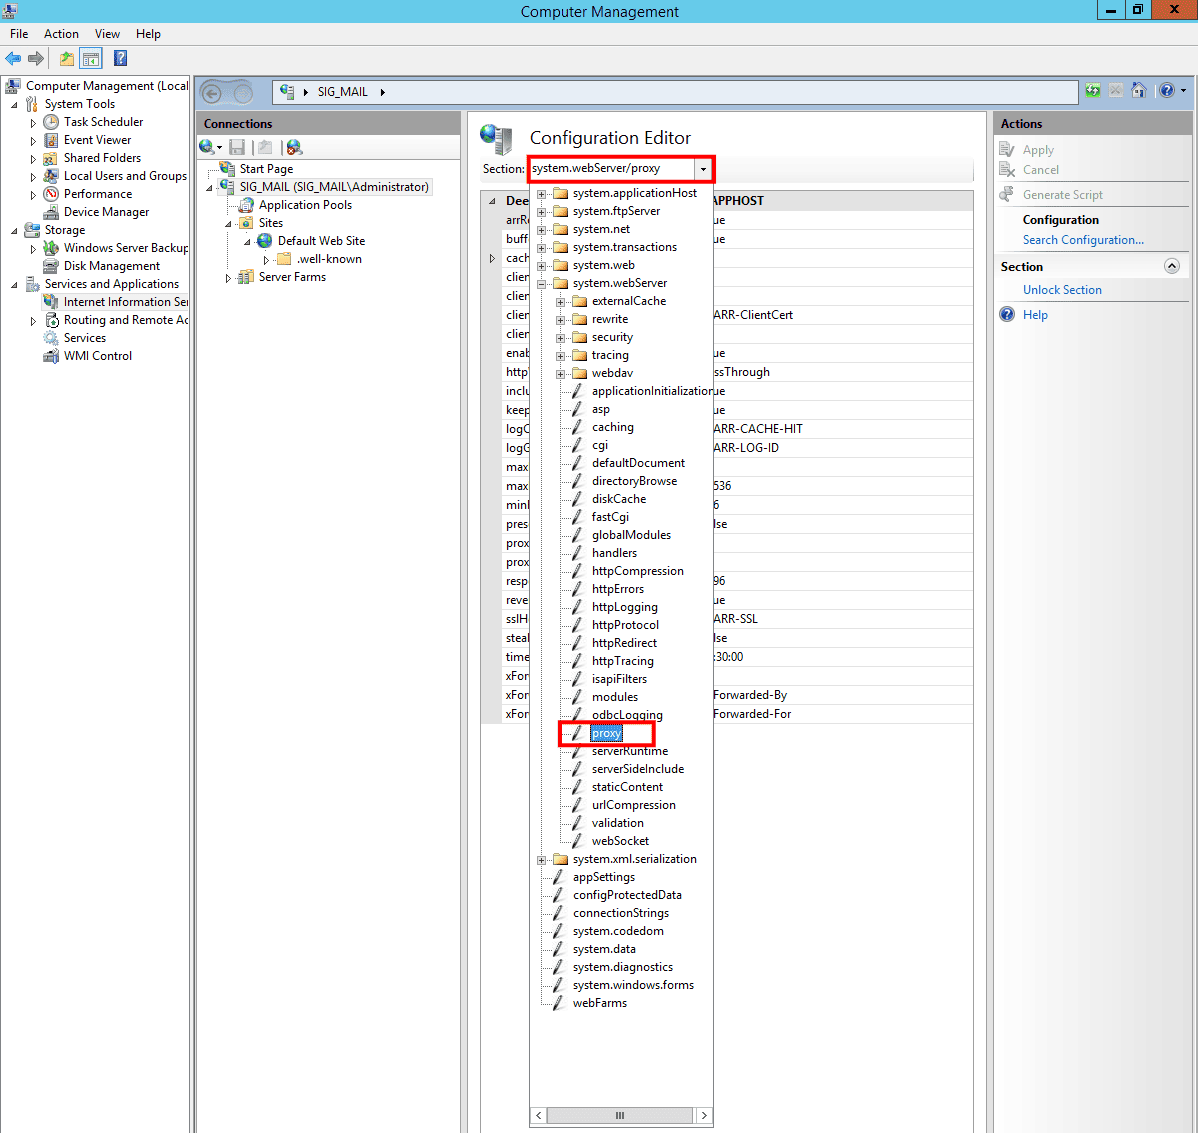
Now we need to locate the system.webServer > proxy > proxy
Now open the configuration and apply a new timeout value
You have to set the value to 30:00min+ so when a user is connected to Kerio Connect mail server using the webmail Interface..,,, the user will not be disconnected after 2 min of inactivity!
Hint! Always revert back until it work’s!
Don’t forget to click the apply button to add this proxy timeout function active on your IIS webserver.
Tuned is a powerful daemon for dynamically auto-tuning Linux server performance based on information it gathers from monitoring use of system components, to squeeze maximum performance out of a server.
It does this by tuning system settings dynamically on the fly depending on system activity, using tuning profiles. Tuning profiles include sysctl configs, disk-elevators configs, transparent hugepages, power management options and your custom scripts.
By default tuned will not dynamically adjust system settings, but you can modify how the tuned daemon operates and allow it to dynamically alter settings based on system usage. You can use the tuned-adm command-line tool to manage the daemon once it is running.
On CentOS/RHEL 7 and Fedora, tuned comes pre-installed and activated by default, but on older version of CentOS/RHEL 6.x, you need to install it.
# yum install tuned
After the installation, you will find following important tuned configuration files.
/etc/tuned – tuned configuration directory.
/etc/tuned/tuned-main.conf– tuned mail configuration file.
/usr/lib/tuned/ – stores a sub-directory for all tuning profiles.
Now you can start or manage the tuned service using following commands.
--------------- On RHEL/CentOS 7 ---------------
# systemctl start tuned
# systemctl enable tuned
# systemctl status tuned
# systemctl stop tuned
--------------- On RHEL/CentOS 6 ---------------
# service tuned start
# chkconfig tuned on
# service tuned status
# service tuned stop
Now you can control tuned using the tunde-adm tool. There are a number of predefined tuning profiles already included for some common use cases. You can check the current active profile with following command.
tuned-adm active
You can get a list of available tuning profiles using following command.
# tuned-adm list
To switch to any of the available profiles for example throughput-performance – a tuning which results into excellent performance across a variety of common server workloads.
# tuned-adm  profile throughput-performance
# tuned-adm active
To use the recommended profile for your system, run the following command.
# tuned-adm recommend
And you can disable all tuning as shown.
# tuned-adm off
That’s all for now! Tuned is a daemon that monitors usage of system components and dynamically auto-tunes a Linux server for maximum performance.
Memory object caching systems like Memcached can optimize backend database performance by temporarily storing information in memory, retaining frequently or recently requested records. In this way, they reduce the number of direct requests to your databases.
Because systems like Memcached can contribute to denial of service attacks if improperly configured, it is important to secure your Memcached servers. In this guide, we will cover how to protect your Memcached server by binding your installation to a local or private network interface and creating an authorized user for your Memcached instance.
Installing Memcached from Official Repositories
If you don’t already have Memcached installed on your server, you can install it from the official CentOS repositories. First, make sure that your local package index is updated:
sudo yum update
Next, install the official package as follows:
sudo yum install memcached
We can also install libmemcached, a library that provides several tools to work with your Memcached server:
sudo yum install libmemcached
Memcached should now be installed as a service on your server, along with tools that will allow you to test its connectivity. We can now move on to securing its configuration settings.
Securing Memcached Configuration Settings
To ensure that our Memcached instance is listening on the local interface 127.0.0.1, we will modify the OPTIONS variable in the configuration file located at /etc/sysconfig/memcached. We will also disable the UDP listener. Both of these actions will protect our server from denial of service attacks.
You can open /etc/sysconfig/memcached with nano:
sudo nano /etc/sysconfig/memcached
Locate the OPTIONS variable, which will initially look like this:
/etc/sysconfig/memcached
. . .
OPTIONS=""
Binding to our local network interface will restrict traffic to clients on the same machine. We will do this by adding -l 127.0.0.1 to our OPTIONS variable. This may be too restrictive for certain environments, but it can make a good starting point as a security measure.
Because UDP protocol is much more effective for denial of service attacks than TCP, we can also disable the UDP listener. To do this, we will add the -U 0 parameter to our OPTIONS variable. The file in full should look like this:
Restart your Memcached service to apply your changes:
sudo systemctl restart memcached
Verify that Memcached is currently bound to the local interface and listening only for TCP connections by typing:
sudo netstat -plunt
You should see the following output:
Output
Active Internet connections (only servers)
Proto Recv-Q Send-Q Local Address           Foreign Address         State       PID/Program name
. . .
tcp        0      0 127.0.0.1:11211         0.0.0.0:*               LISTEN      2383/memcached
. . .
This confirms that memcached is bound to the 127.0.0.1 address using only TCP.
Adding Authorized Users
To add authenticated users to your Memcached service, it is possible to use Simple Authentication and Security Layer (SASL), a framework that de-couples authentication procedures from application protocols. We will enable SASL within our Memcached configuration file and then move on to adding a user with authentication credentials.
Configuring SASL Support
We can first test the connectivity of our Memcached instance with the memstat command. This will help us establish that SASL and user authentication are enabled after we make changes to our configuration files.
To check that Memcached is up and running, type the following:
Now we can move on to enabling SASL. First, we can add the -S parameter to our OPTIONS variable in /etc/sysconfig/memcached, which will enable SASL. Open the file again:
sudo nano /etc/sysconfig/memcached
We will add both the -S and -vv parameters to our OPTIONS variable. The -vv option will provide verbose output to /var/log/memcached, which will help us as we debug. Add these options to the OPTIONS variable as follows:
/etc/sysconfig/memcached
. . .
OPTIONS="-l 127.0.0.1 -U 0 -S -vv"
Save and close the file.
Restart the Memcached service:
sudo systemctl restart memcached
Next, we can take a look at the logs to be sure that SASL support has been enabled:
sudo journalctl -u memcached
You should see the following line, indicating that SASL support has been initialized:
We can check the connectivity again, but because SASL has been initialized, this command should fail without authentication:
memstat --servers="127.0.0.1"
This command should not produce output. We can type the following to check its status:
echo $?
$? will always return the exit code of the last command that exited. Typically, anything besides 0 indicates process failure. In this case, we should see an exit status of 1, which tells us that the memstat command failed.
Adding an Authenticated User
Now we can download two packages that will allow us to work with the Cyrus SASL Library and its authentication mechanisms, including plugins that support PLAIN authentication schemes. These packages, cyrus-sasl-devel and cyrus-sasl-plain, will allow us to create and authenticate our user. Install the packages by typing:
In addition to specifying our logging level, we will set mech_list to plain, which tells Memcached that it should use its own password file and verify a plaintext password. We will also specify the path to the user database file that we will create next. Save and close the file when you are finished.
Now we will create a SASL database with our user credentials. We will use the saslpasswd2 command to make a new entry for our user in our database using the -c option. Our user will be sammy here, but you can replace this name with your own user. Using the -f option, we will specify the path to our database, which will be the path we set in /etc/sasl2/memcached.conf:
sudo saslpasswd2 -a memcached -c -f /etc/sasl2/memcached-sasldb2 sammy
Finally, we want to give the memcached user ownership over the SASL database:
Our Memcached service is now successfully running with SASL support and user authentication.
Allowing Access Over the Private Network
We have covered how to configure Memcached to listen on the local interface, which can prevent denial of service attacks by protecting the Memcached interface from exposure to outside parties. There may be instances where you will need to allow access from other servers, however. In this case, you can adjust your configuration settings to bind Memcached to the private network interface.
Limiting IP Access With Firewalls
Before you adjust your configuration settings, it is a good idea to set up firewall rules to limit the machines that can connect to your Memcached server. If you followed the prerequisites and installed FirewallD on your server and do not plan on connecting to Memcached from another host, then you do not need to adjust your firewall rules. Your standalone Memcached instance should be listening on 127.0.0.1, thanks to the OPTIONS variable we defined earlier, and there should therefore be no concerns about incoming traffic. If you plan to allow access to your Memcached server from other hosts, however, then you will need to make changes to your firewall settings using the firewall-cmd command.
Begin by adding a dedicated Memcached zone to your firewalld policy:
Next, specify the private IP addresses that should be allowed to access Memcached. For this, you will need to know your client server’s private IP address:
Reload the firewall to ensure that the new rules take effect:
sudo firewall-cmd --reload
Packets from your client’s IP address should now be processed according to the rules in the dedicated Memcached zone. All other connections will be processed by the default public zone.
With these changes in place, we can move on to making the necessary configuration changes to our Memcached service, binding it to our server’s private networking interface.
Binding Memcached to the Private Network Interface
The first step in binding to our server’s private networking interface will be modifying the OPTIONS variable we set earlier.
We can open /etc/sysconfig/memcached again by typing:
sudo nano /etc/sysconfig/memcached
Inside, locate the OPTIONS variable. We can now modify -l 127.0.0.1 to reflect our Memcached server’s private IP:
Check your new settings with netstat to confirm the change:
sudo netstat -plunt
Output
Active Internet connections (only servers)
Proto Recv-Q Send-Q Local Address           Foreign Address         State       PID/Program name
. . .
tcp        0      0 memcached_servers_private_IP:11211         0.0.0.0:*               LISTEN      2383/memcached
Test connectivity from your external client to ensure that you can still reach the service. It is a good idea to also check access from a non-authorized client to ensure that your firewall rules are effective.
SSH is the default secured remote management protocol for almost all of Linux distributions. SSH provides a confidentiality and integrity by data encryption and passwords are no longer sent in plain text over the network. Nevertheless, a default configuration of SSH can put the server in a security risk.
That is why it is important to follow a few simple steps to harden an SSH server that can dramatically reduce the risk.
2. Prerequisites
In this document, it is assumed that:
You have already install RHEL/CentOS 7 Linux server up and running.
3. Disable Root Logins
For security concern, it is not recommended to use root user to login via SSH over a network. The best approach is to use normal user to login to the server and use command sudo to perform the task that required root privilege. For more detail about Sudo, please check Linux Privilege Delegation With Sudoers. To disable root login via SSH, update file /etc/ssh/sshd_config and restart SSH service as the following.
#vim /etc/ssh/sshd_config
PermitRootLogin no
#systemctl restart sshd
4. Limit User Logins
By default, all valid users on the system are able access the server. For security reason, we should limit to only certain users who really need to have SSH access to the server. Add the parameter AllowUsers followed by a space separated list of usernames to file /etc/ssh/sshd_config. In the following example, there are only two users, “john” and “sysadmin” who can remote SSH to the server.
$sudo vim /etc/ssh/sshd_config
AllowUsers john sysadmin
$sudo systemctl restart sshd
5. Disable Protocol 1
Using protocol 1 of SSH is less secure. We should be disabled it and always use protocol 2 only instead. Edit file /etc/ssh/sshd_config and restart SSH service as the following.
$sudo vim /etc/ssh/sshd_config
Protocol 2
$sudo systemctl restart sshd
6. Change Default Port
Port 22 is the default SSH listens port for incoming connections. The hacker can constantly scanning the server for port 22, and an effective method is to changing the default SSH port, for example to port 22224 as the following, to eliminate this attacks.
$sudo vim /etc/ssh/sshd_config
Port 22224
Now we need to check SELinux what ports sshd is allowed to listen on by executing the following command.
$sudo semanage port -l | grep ssh
ssh_port_t tcp 22224
To allow sshd to listen on the new port 2223 we have to add a rule to SELinux and restart SSH service as the following
$sudo semanage port -a -t ssh_port_t -p tcp 22224
$sudo systemctl restart sshd
7. Limit Access With Firewall
For security enhancement, we should filter the connections with firewall by adding a firewall rule in IPTables to limit access on the changed port 2223 to only an authorized IP addresses. Edit file /etc/sysconfig/iptables and restart IPTable service as the following.
$sudo vim /etc/sysconfig/iptables
-A INPUT -p tcp -m state –state NEW -m tcp -s 192.168.10.0/24 –dport 22224 -j ACCEPT
$sudo systemctl restart iptables
8. Limit Idle Timeout Interval
If a timeout period for SSH connections on a server is not setting up, it is a security risk. In many cases, people stay away from their computers without locking the screens and SSH is still connected to the server. Thus, it could be compromise. Edit file /etc/ssh/sshd_config as the following. The timeout interval is in seconds. So let set it to 300 seconds to have 5 minutes idle timeout.
Limiting a maximum fail authentication with SSH is a good method to stop the password brute-forcing attacks. If a user input the password incorrectly for N-1 times of the limited N time, the SSH remote session will be disconnected and will have to reconnect again. In below configuration, when user incorrectly input the password for times, the remote session will be disconnected.
$sudo vim /etc/ssh/sshd_config
MaxAuthTries 5
$sudo systemctl restart sshd
10. Limit Listen Address
The default configuration of SSH will listens on all available interfaces which it should be limited. If there are multiple interfaces on the server configured with different IP addresses, it is always best to limit the user to login to the server using management IP address only.
$sudo vim /etc/ssh/sshd_config
ListenAddress 192.168.10.10
$sudo systemctl restart sshd
11. Disable Rhosts Files Support
File .rhosts is used to control which computers trust other computers for SSH remote access to with a certain user account. If a computer trust another computer, then it will allow a specified user to remote SSH access to the trusted computers without having to enter a password.
$sudo vim /etc/ssh/sshd_config
IgnoreRhosts yes
$sudo systemctl restart sshd
12. Disable Empty Passwords Access
In some case, a certain user account on the server might not have set a password or has empty password. It is a best to always disable these users connecting with remote SSH server.
$sudo vim /etc/ssh/sshd_config
PermitEmptyPasswords no
$sudo systemctl restart sshd
13. Disable Host-Based Authentication
Host-based authentication allows hosts to authenticate on behalf of all or some of the users using the public key.
$sudo vim /etc/ssh/sshd_config
HostbasedAuthentication no
$sudo systemctl restart sshd
14. Enable Informational Log Level
It is good to configure SSH server to log INFO level information. Since SSH is an entry point to our server, it is recommended to log as much as possible, so we will a comprehensive log information when we run into a problem.
$sudo vim /etc/ssh/sshd_config
LogLevel INFO
$sudo systemctl restart sshd
15. Reduce Maximum Start Up Connection
Reducing the maximum number of concurrent connections to the SSH daemon can be helpful against a brute-force attack. The setting of MaxStartups 4 tells the ssh server to allow only 4 users to attempt logging in at the same time.
$sudo vim /etc/ssh/sshd_config
MaxStartups 4
$sudo systemctl restart sshd
16. Reduce Login Grace Time
When we try to remote SSH a server, the default configuration will us 2 minutes to login. If we do not do any thing or cannot successfully login within 2 minutes, SSH session will be disconnected. The default 2 minutes time to login successfully is too much. we should consider reduce it to 1 minute instead.
$sudo vim /etc/ssh/sshd_config
LoginGraceTime 1m
$sudo systemctl restart sshd
It’s not OpenCart 3.x the problem!The problem is your internet hosting company bad mail server configuration and spam security policy control! VERY Complicated stuff to fix but all working good on my side!
Hint: Use MAIL and Port 995 Pop3! and the famous -f email option in OpenCart!